Setting up Windows Server 2003: 5. File sharing configuration.
The sense of connecting computers together to form a network consists in the possibility to share files among the users working on the different computers. Whereas on a workstation based network, such shares may be configured on any computer, and accessed by the other computers (provided that user name and password, set on the computer where the share is done, is known). On a domain based network, the situation is entirely different:
- All shares are configured on the server.
- Only users registered in Active Directory may access the shares.
- The credentials needed to access the shares are set on the server, and on the client machine, the user has to log in to the domain using these credentials to access the shared folders.
In this fifth part of my Windows Server 2003 tutorial (cf. Windows Server 2003: Introduction for an overview of the network, and the preceding parts of the tutorial), I describe how to proceed to configure shared folders.
We will actually share 4 folders: a read-only folder ("Downloads"), from where the workstation users may download files placed there by the administrator; a folder for the two users ("Aly" and "Ali"), where these users may place files, readable by other users; a common folder ("All Users"), where everyone (i.e. all domain users) may place and retrieve files
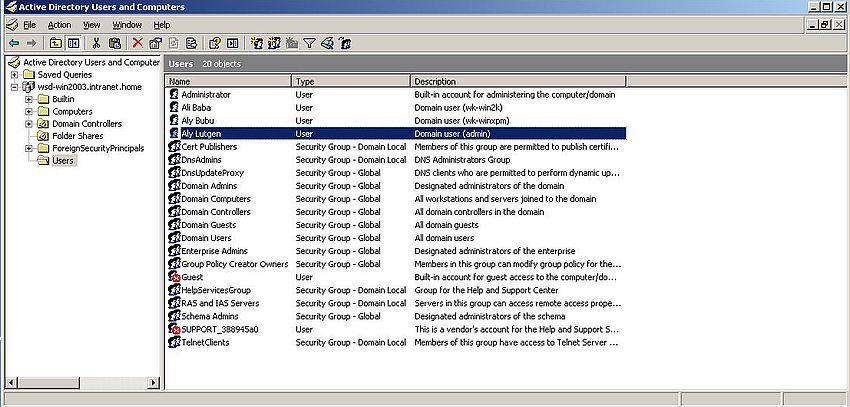
Before I started with the file sharing configuration, I created a third user, called "Admin". Their role will consist in being authorized to access all shared folders (except "Downloads") with full control. I also set a description for all 3 users.
The screenshot below shows the users registered in Active Directory (with the 3 custom users "Admin", "Aly", and "Ali").
 |
Setting up file sharing requires the following steps:
- Creating the folders to be shared.
- Configure the share permissions.
- Configure the NTFS rights.
- Adding the shares to Active Directory.
Creating the (shared) folders.
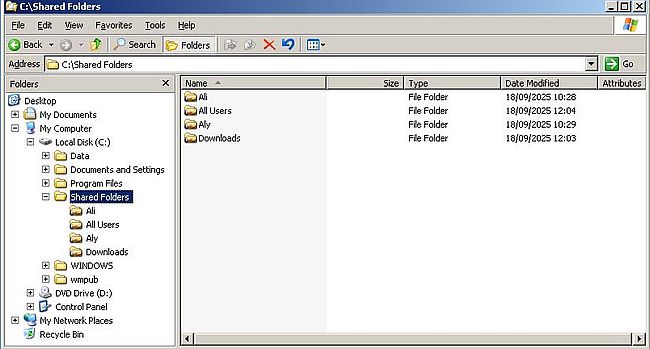
The folders would best be created on a second harddisk, or at least on a second partition. I created them in a new directory of the C: drive, and called this directory "Shared Folders".
 |
Configuring share permissions.
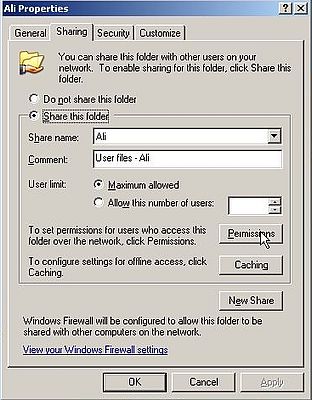
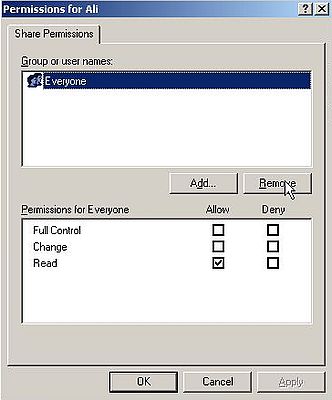
To share the folder "Ali", right-click it in File Explorer and choose Properties. In the Properties window, open the Sharing tab, and select the Share this folder checkbox (screenshot on the left). Now, push the Permissions button. This opens the Permissions window for this folder. As you can see on the screenshot on the right, by default, Windows shares folders with read-only access for "Everyone". This "Everyone" at this level is not good practice, thus, we remove it by pushing the corresponding button.
|
|
We will now add our 3 users and set permissions for them. To do so, push the Add button. In the opening Select Users, Computers, or Groups window, add a user name or parts of a user name, then push the Check names... button. The screenshot shows, how I entered "Admin" as user name.
![Windows Server 2003: File sharing - Adding users who may access a shared folder [1] Windows Server 2003: File sharing - Adding users who may access a shared folder [1]](../screenshots/win2003_filesharing4.jpg) |
This doesn't actually uniquely identify a user (besides our custom user "Admin", there is the standard user "Administrator", and the standard group "Administrators"). That's why a supplementary window is opened in order to give us the possibility to select a specific user.
![Windows Server 2003: File sharing - Adding users who may access a shared folder [2] Windows Server 2003: File sharing - Adding users who may access a shared folder [2]](../screenshots/win2003_filesharing5.jpg) |
If the user name, that we entered in the Select Users, Computers, or Groups window, can be found, it is replaced by the user's full name, plus a fully qualified user name; in the case of "Admin": admin@wsd-win2003.intranet.home.
![Windows Server 2003: File sharing - Adding users who may access a shared folder [3] Windows Server 2003: File sharing - Adding users who may access a shared folder [3]](../screenshots/win2003_filesharing6.jpg) |
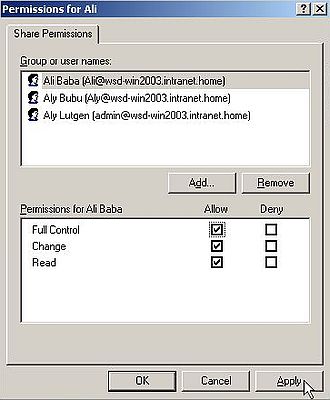
After having added "Admin", let's add the other two users ("Ali" and "Aly"). In this case, if for example we enter "Ali Baba" and "Aly Bubu", the user name, can be uniquely identified, and the replacement of our input by a fully qualified name is done immediately after we have push the Check names... button. The screenshot shows the 3 users, that we want to grant access to the shared folder "Ali", and the permissions that I set for user "Ali Baba" on this folder. That's not what we said above, you may say. That's true: The (probably) best way to configure the share permissions is to give all users full control of all folders, and then configure their effective access permissions by setting specific NTFS rights.
 |
Configuring NTFS rights.
To configure NTFS rights on the 4 shared folders, right-click the folder, and from the context menu choose Properties. In the Properties window for this folder, open the Security tab. As you can see on the screenshot below, there are several users that by default have given NTFS rights on folders. Note, that all the users listed are actually local users (as a difference with domain users). Their NTFS rights are normally inherited from the parent folder. Beside this, the group Administrators has always full control of (almost) all folders.
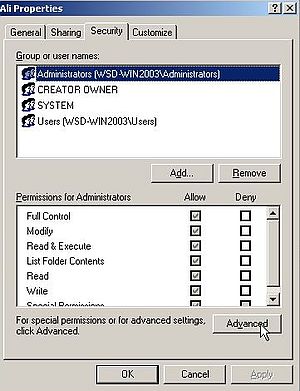 |
To proceed, push the Advanced button. This will open the advanced security settings for this folder. This is similar as in the window before, but with more details. Some websites consider the users mentioned here as "legacy", and when configuring file sharing on Windows Server 2003, remove them all. To remove inherited NTFS rights, uncheck the "Allow inheritable permissions from the parent to propagate to this object and all child objects" checkbox.
![Windows Server 2003: File sharing - Removing inheritable NTFS rights [1] Windows Server 2003: File sharing - Removing inheritable NTFS rights [1]](../screenshots/win2003_filesharing9.jpg) |
A dialog box pops up, telling us that the permissions inherited from the parent will be removed. There are two possibilities to handle this: 1. copy the permissions, that were previously inherited to this folder (using the button Copy); 2. effectively remove all inherited permissions, keeping only those defined in the security settings for this folder (using the button Remove). It's this latter option that we have to choose.
![Windows Server 2003: File sharing - Removing inheritable NTFS rights [2] Windows Server 2003: File sharing - Removing inheritable NTFS rights [2]](../screenshots/win2003_filesharing10.jpg) |
After the inherited permissions have been removed, the only permission remaining is the full control of the Administrators group. On one of the websites, that I consulted when setting up my Windows Server 2003, they also removed this permission (?). I decided to let it as is. Doing so, I can be 100% sure that my shared folders may be locally accessed with full control, using my Windows Server 2003 login account (by default, user Administrator, who is part of the Administrators group).
![Windows Server 2003: File sharing - Removing inheritable NTFS rights [3] Windows Server 2003: File sharing - Removing inheritable NTFS rights [3]](../screenshots/win2003_filesharing11.jpg) |
The screenshots above show the inheritance removal for the folder "Ali". The same procedure has to be repeated for the other 3 shared folders. Then, we are ready to add specific permissions to each of the 4 folders, based on what I said at the beginning of the tutorial.
Let's start with the folder Downloads. In the security settings of this folder, push the Add button to add a user (and their NTFS rights).
![Windows Server 2003: File sharing - Adding NTFS rights for domain users [1] Windows Server 2003: File sharing - Adding NTFS rights for domain users [1]](../screenshots/win2003_filesharing12.jpg) |
The folder Downloads should be accessible by all domain users, but just in read-only mode. The simplest way to implement this, is to add user Everyone, and in the permissions list select the checkboxes for Read & execute, List folder contents, and Read.
![Windows Server 2003: File sharing - Adding NTFS rights for domain users [2] Windows Server 2003: File sharing - Adding NTFS rights for domain users [2]](../screenshots/win2003_filesharing13.jpg) |
Does this "Everyone" means that really everyone may access this folder? No, it doesn't. Remember the configuration of the share permissions: We there removed user "Everyone", and explicitly specified the 3 users "Admin", "Aly", and "Ali" to have the permission to access the shared folders. Thus, it's only these three users that may download the files from the Downloads folder (and none of them has the permission to write to this read-only folder, where the available files are supposed to be stored by the (local) Windows 2003 Server administrator.
Let's continue with the folder Ali. Everyone should be able to read files from this folder, thus we add user "Everyone" just as before (no screenshot). Furthermore, we have to add user "Admin", who should have full control of this folder (screenshot on the left), and user "Ali", who should be able to write, modify and delete files and folders (as these are "his" files and folders), thus giving him all permissions, except "full control" (screenshot on the right).
![Windows Server 2003: File sharing - Adding NTFS rights for domain users [3] Windows Server 2003: File sharing - Adding NTFS rights for domain users [3]](../screenshots/win2003_filesharing14a.jpg)
|
![Windows Server 2003: File sharing - Adding NTFS rights for domain users [4] Windows Server 2003: File sharing - Adding NTFS rights for domain users [4]](../screenshots/win2003_filesharing14b.jpg)
|
The configuration for folder Aly is similar: Read access for "Everyone", full control for "Admin", and all rights, except "full control" for "Aly" (as these are "his" files and folders).
Now the "All Users" folder. This will be a little bit more tricky. My first approach was to do similarly as for the other folders, defining rights for "Everyone" and "Admin", in this case giving "Everyone" read-write permissions, or more correctly all rights, except "full control". As this includes the right to delete files and folders, what we don't want here, we'll have to define special permissions, denying the deletion right. And it's here, where we get a problem: On Windows (perhaps on other OS, too), denying some action has always priority over allowing some action. This means: If we deny the deletion right for "Everyone", user "Admin", even though their permissions are set to "full control", would not be allowed to delete any files or folder in the "All Users" directory.
I guess that you found yourself the solution to this issue: Defining the rights (including the deletion denial) for "Aly" and "Ali", instead defining them for "Everyone", will not effect the rights of "Admin".
Defining the "normal" rights for "Ali", then the special rights for "Ali", then all the same for "Aly", and if we add another user, the same a third time ... that's not really an effective way to work. That's why I decided to create a user group, where "Ali" and "Aly" are part of (and all future users will be part of), and to define the rights for this group, instead of defining them for individual users.
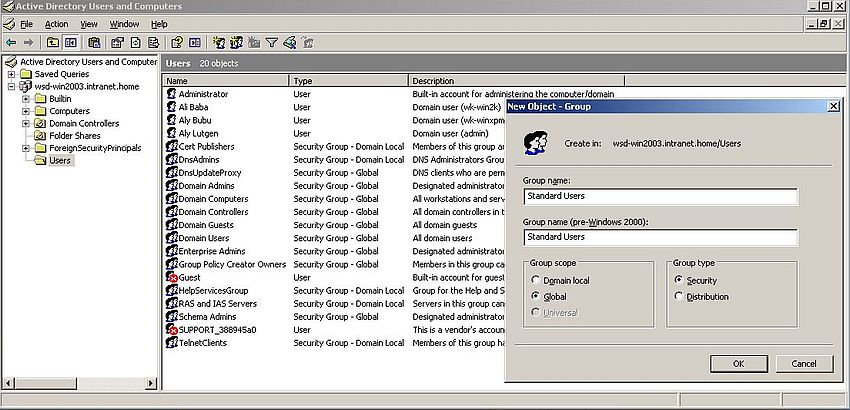
To create the new group, in the Active Directory Users and Computers window, select the "Users" folder, and choose Action > New > Group from the menu bar. The New object - Group dialog box opens. Enter the name for the group (I chose "Standard Users"), letting all other settings at their default value.
 |
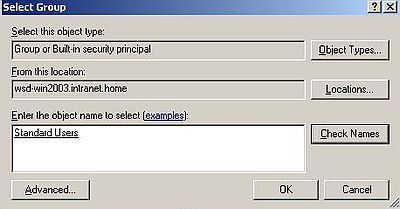
Adding a given user to a group is really easy. In the Active Directory Users and Computers window, with the list of all users displayed, right-click "Ali" and from the context menu choose Add to a group.... The Select group dialog box opens. Enter the group name (in my case: "Standard Users"), and push the Check Names button, to be sure that you pick the group that you want.
 |
Do the same for "Aly"...
With the new group created, I decided to review the share permissions, removing users "Ali" and "Aly", and adding the group "Standard users" instead.
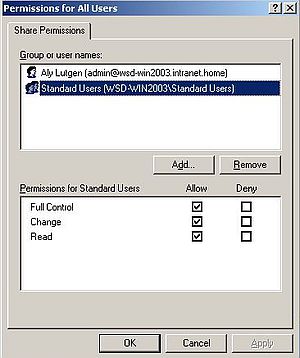 |
Now we are ready to set the NTFS rights for the folder All Users. First, let's add user "Admin", and give them full control of the folder. Then, let's add the user group "Standard Users" and give them all permissions, except "full control".
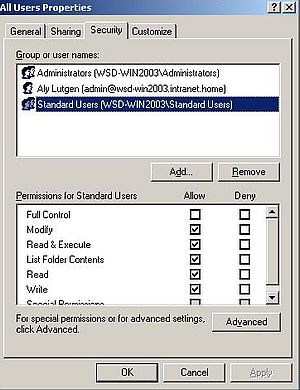 |
The permissions, as defined so far, include the right to delete files and folders. To change this, push the Advanced button. The Advanced Security Settings for All Users window opens. The permissions list contains 3 entries (one for the "Administrators" group, one for user "Admin", and one for the "Standard Users" group.), allowing some action on the All Users folder. To proceed, select the "Standard Users" entry, and push the Edit button.
![Windows Server 2003: File sharing - Denying the NTFS rights to delete files and folders [1] Windows Server 2003: File sharing - Denying the NTFS rights to delete files and folders [1]](../screenshots/win2003_filesharing19.jpg) |
A very detailed list of possible permissions is displayed. Deny the "Delete" and "Delete subfolders and files" permissions, by selecting the corresponding checkboxes in the "Deny" column.
![Windows Server 2003: File sharing - Denying the NTFS rights to delete files and folders [2] Windows Server 2003: File sharing - Denying the NTFS rights to delete files and folders [2]](../screenshots/win2003_filesharing20.jpg) |
When back in the Advanced Security Settings for All Users window, you can see that a fourth entry has been added to the permissions list (actually at the top of the list): A special permission of type "deny" for the group "Standard Users".
![Windows Server 2003: File sharing - Denying the NTFS rights to delete files and folders [3] Windows Server 2003: File sharing - Denying the NTFS rights to delete files and folders [3]](../screenshots/win2003_filesharing21.jpg) |
When pushing the Apply button, a warning pops up. It tells you that you have added a permission of type "deny" and that this permission will take priority over the permissions of type "allow". That's ok for us; push OK to close the message box.
When back in the (simple) permissions window, you'll notice that the checkbox near Modify has been cleared. This is due to the fact, that denying to delete files and folders will also include denying renaming them!
Adding the shares to Active Directory.
After this rather complex part about NTFS rights, one last step to take to configure file sharing on our Windows Server 2003: Adding the shares to Active Directory. From the Manage Your Server window, choose Manage Users and Computers in Active Directory. In the left pane, select the server (wsd-win2003.intranet.home). Right-clicking it opens a context menu; choose New > Organizational Unit. This is in fact nothing else than creating a new container, a folder in the server folder structure, that will contain the shares.
![Windows Server 2003: File sharing - Adding the shares to Active Directory [1] Windows Server 2003: File sharing - Adding the shares to Active Directory [1]](../screenshots/win2003_filesharing22.jpg) |
In the New Object - Organizational Unit dialog box, enter the name, that you want to give to the container. I use Folder Shares.
![Windows Server 2003: File sharing - Adding the shares to Active Directory [2] Windows Server 2003: File sharing - Adding the shares to Active Directory [2]](../screenshots/win2003_filesharing23.jpg) |
The "Folder Shares" folder is added to the folder structure in the left pane of the window. Select it. From the right-click context menu, choose New > Shared Folder.
![Windows Server 2003: File sharing - Adding the shares to Active Directory [3] Windows Server 2003: File sharing - Adding the shares to Active Directory [3]](../screenshots/win2003_filesharing24.jpg) |
In the New Object - Shared Folder dialog box, you'll have to enter the following:
- Name: This is the name that we gave to the share, when setting the sharing permissions, i.e. the content of the Share name field in the corresponding dialog box. We have actually set this name to the folder name ("Downloads" for the folder "Downloads", etc), but this is not mandatory. You may choose a share name different from the folder name, just in this case, be sure that, when adding the share to Active Directory, to use the name of the share, not the one of the folder.
- Network path: This is the name, that will be used by the client when accessing the share. It has to be of the form \\<computer-name>\<resource-name>, where <computer-name> is the name of the Windows Server 2003 machine (in my case: sv-win2003), and <resource-name> is the name that the clients have to use for the shared folder. You can use the name of the share for this, but this is not mandatory; in fact you may choose the name that you want.
![Windows Server 2003: File sharing - Adding the shares to Active Directory [4] Windows Server 2003: File sharing - Adding the shares to Active Directory [4]](../screenshots/win2003_filesharing25.jpg) |
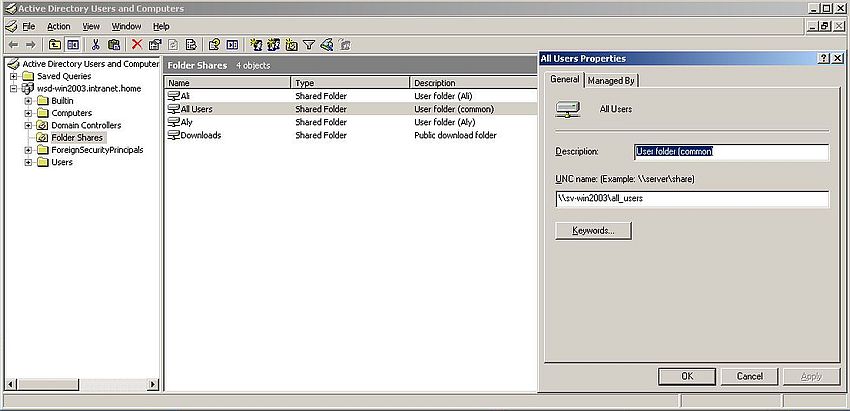
The "new shared folder" procedure has to be repeated for the other 3 shares. For Ali and Aly, I use resource names identical to the share names, just in lowercase. For the share All Users, I use "all_users" (to avoid problems with the space in the network path name).
The screenshot shows the 4 shares in Active Directory (with the properties of the "All Users" share). Note, that I had added a description of the shares, before taking the screenshot.
 |
Note: I had some problems with the All Users folder, when accessing it from my workstations. This could be due to the fact that I use a space in the name of the share (?). Another possibility is that some things work correctly if the resource name is different from the share name (?). Thus, to be sure that everything works well, use names without spaces, and use the name of the share as resource name in the network path...
This terminates the tutorial part about configuring file sharing. If you like, you can continue with the part Shared folders access to learn how to access the shared folders from our Windows XP Media Center Edition and Windows 2000 Professional workstations.
If you find this text helpful, please, support me and this website by signing my guestbook.