Developing Ruby applications on Windows 10.
"Ruby is an interpreted, high-level, general-purpose programming language. It was designed with an emphasis on programming productivity and simplicity. In Ruby, everything is an object, including primitive data types. It was developed in the mid-1990s by Yukihiro "Matz" Matsumoto in Japan. Ruby is dynamically typed and uses garbage collection and just-in-time compilation. It supports multiple programming paradigms, including procedural, object-oriented, and functional programming. According to the creator, Ruby was influenced by Perl, Smalltalk, Eiffel, Ada, BASIC, Java, and Lisp."
The paragraph above is how Ruby is described in Wikipedia. As a scripting language for both the command line and the Web, it may be seen as an alternative to languages like Perl, Python, or Raku. Ruby is very popular in Japan, as it supports by default the Japanese language. Its major disadvantage seems to be that it's lots slower than Perl or Python. If you are interested, here is an Internet article about Comparing Perl, Python, and Ruby.
There are lots of tutorials concerning the installation of Ruby on Windows available on the Internet, and there are several, very different, ways to proceed. Things become even more complicated if you consider the installation of Ruby on Rails (web application framework running on the Ruby programming language). This tutorial, describing the installation and usage of Ruby (and Rails) on Windows 10, is based on the article How to install Ruby on Rails in 2024 - A step by step guide at medium.com.
The author of that article suggests the following steps for the installation of Ruby and Ruby on Rails:
- Installation of Node.js. Node.js is essential for running JavaScript-based applications and is a prerequisite for many modern web development frameworks, including Ruby on Rails. You can download and install Node.js from the official website. Here is the link to download Node.js version 20.11.0 (64-bit), the version used in the article mentioned above. You probably should install the most recent version instead.
- Installation of Yarn. Yarn is a package manager for Node.js applications, more a personal preference of the author of the article, that my tutorial is based on, than a requirement, I guess. I did install it, but never used it. Here is the link to download the latest version of Yarn at classic.yarnpkg.com.
- Installation of the RailsInstaller. This is a convenient tool that streamlines the installation process for Ruby on Rails, that should saving you a lot of time and effort. Here is the link to download the RailsInstaller 3.4.0 at railsinstaller.org.
- Installation of RubyInstaller. RubyInstaller is a popular distribution of Ruby for Windows users, that should provide a hassle-free installation experience. You can download the RubyInstaller package from the official website (rubyinstaller.org/downloads/). Here is the link to download RubyInstaller + Devkit 3.3.6-2 (64-bit), the version that I actually use.
- Installation of Ruby on Rails.
You may ask yourself if you really have to install all this software. With the Ruby programming language, you can create command line programs, as well as CGI scripts, thus if you do not intend to use Rails, the RubyInstaller is all that you need (maybe that you should install RailsInstaller, too, for the case that you decide to give Rails a try, later). If you intend to use Rails, you should install all software mentioned, except for Yarn, that is just an option.
Installing Node.js.
For details concerning the installation of Node.js, please, have a look at my tutorial A short introduction to Node.js.
Installing Yarn (optional).
Just double-click the downloaded MSI file and follow the instructions on the screen.
Installing RailsInstaller.
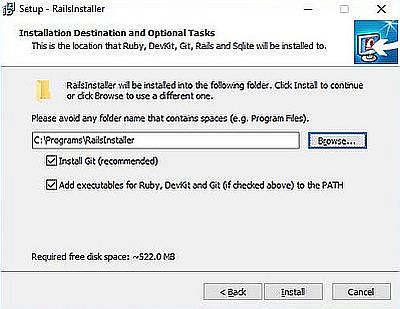
After you have accepted the license, you have to choose the installation directory (default = C:\RailsInstaller; I changed it to C:\Programs\RailsInstaller), and to select (or not) two optional tasks: They recommend that you install Git; to add the executables for Ruby, DevKit and Git to the PATH is a must, I would say.
|
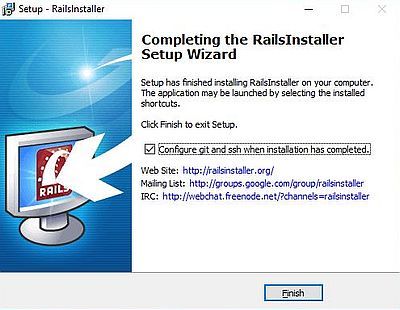
At the end of the installation process, you are asked if you want to configure Git and SSH.
|
The configuration is done in Command Prompt, that is automatically opened. To configure Git, you'll have to enter your name and email address. The SSH configuration will generate a public key (filename = id_rsa.pub) that will be stored into the C:\Users\<user-name>\.ssh directory.
Installing Ruby (RubyInstaller).
In the first window, you are asked if you want to install Ruby for all users, or only for the current user. In the second window, you have to accept the license agreement.
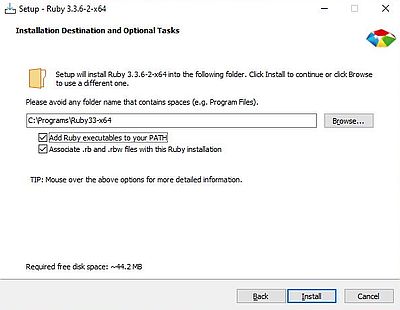
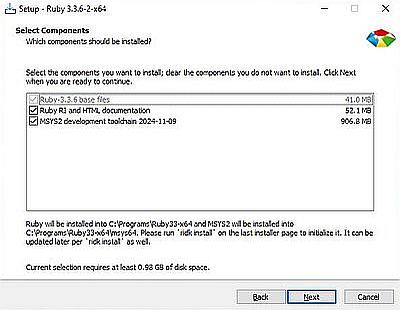
Then, you have to choose the installation directory (default for my Ruby version = C:\Ruby33-x64; I changed it to C:\Programs\\Ruby33-x64). Be sure that Add Ruby executables to your PATH is checked. You may also want to associate .rb and .rbw files with Ruby (screenshot on the left). Finally, you must decide if you want to install the Ruby documentation and/or the MSYS2 development toolchain. You should select both checkboxes (screenshot on the right).
|
|
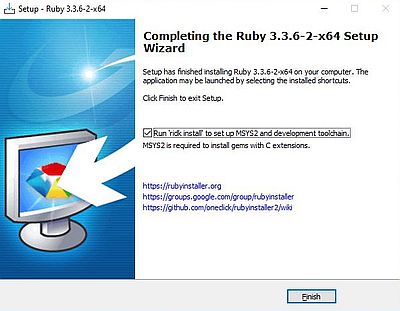
At the end of the installation process, you are asked if you want to run ridka to setup MSYS2 and development toolchain. These are required to install gems with a C extension, thus select the checkbox.
|
Note: Setup of MSYS2 and development toolchain is done in Command Prompt (that automatically opens). To be sure that all components are available, make sure to have an active Internet connection when this is done!
For details concerning the Ruby programming language, visit the Ruby documentation website; you will find there the links to download the complete distribution documentation, as well as the standard library documentation.
Installing Ruby on Rails.
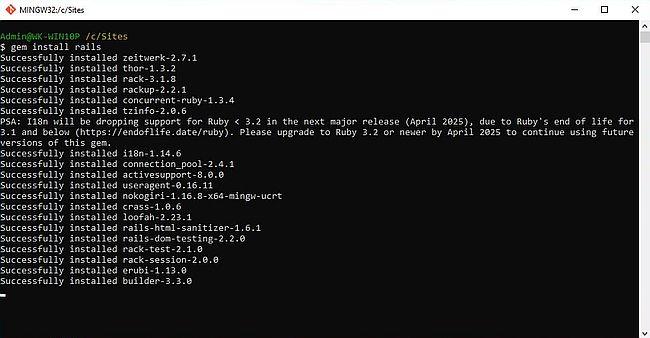
With Ruby installed, we can now install the Rails gem (active Internet connection needed!). Launch Git bash (you find
it in the RailsInstaller folder in Windows Start menu), and run the following command:
gem install rails
The screenshot shows the initial part of the Rails gem installation.
|
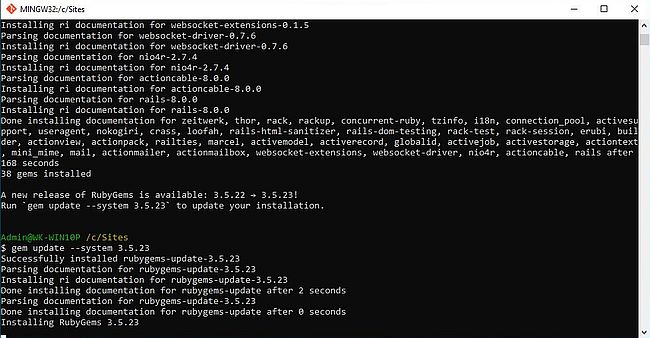
At the end of the installation process, I got the message that a new version of RubyGems is available. The screenshot shows the final part of the Rails gem installation and the gem update --system ... command to install the new version of RubyGems.
|
Ruby IRB and Ruby command line programming.
There are two ways to run Ruby programs: 1. using IRB (Interactive Ruby); 2. running ruby.exe with a source file as argument in the command line.
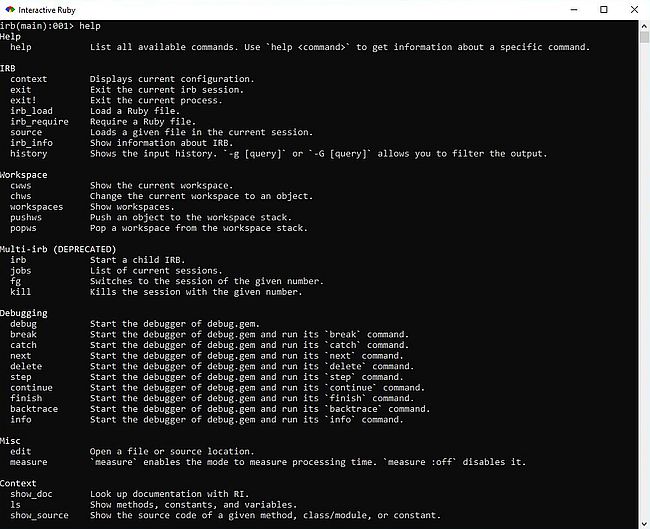
You find a shortcut to launch Interactive Ruby (IRB) in the Windows Start menu. Besides Ruby source code, that will be interactively executed, you can enter a series of shell specific commands. Use help to display the help text shown on the screenshot below. To quit IRB, use the command exit (or quit).
|
Some simple Ruby code that you can enter in IRB:
a = 20
b = 5
Math.Sqrt(a*b)
Final output:
10.0
a = 20
b = 5
a, b = b, a
print a, " ", b, "\n"
Final output:
5 20
3.times { puts "Hello!" }
Output:
Hello!
Hello!
Hello!
myarray = [ "Aly", "Lutgen", 19, 4, 1962, "Wiltz" ]
myarray each do |i|
puts i
end
Output:
Aly
Lutgen
19
4
1962
Wiltz
Note that in all these examples, except for the last one, IRB displays a return value for each line that you enter. In the last example, a return value will only be displayed after the input of the first and the fourth line. In fact, it takes all three of the last lines to make a correct Ruby instruction. The screenshot shows how I made execute the examples above in IRB.
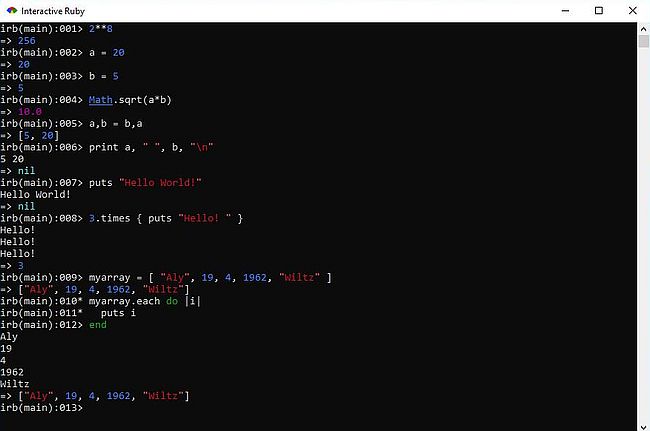
|
Ruby is essentially an object oriented programming language. The following OO code, a modified example from "6.170 Tutorial 3 - Ruby Basics"
(a PDF that I found on the Internet) shows how to define classes, objects and methods in Ruby, as well as the principle of inheritance.
class Hello
def hello
greeting = "Hello!"
puts greeting
end
end
class Howdydo < Hello
def howdy
greeting = "Hello! How do you do?"
puts greeting
end
end
sayhello = Howdydo.new
sayhello.hello
sayhello.howdy
There are two classes: Hello that contains the method hello, and Howdydoo that contains the method howdy. Also, the class Howdydoo inherits the content of the class Hello (that's the meaning of the "<" sign), thus the method hello may be used with objects of the class Howdydoo, as is done with the object sayhello.
We can create the program in a text editor, such as Notepad++ (that has syntax highlighting for many
programming languages, including Ruby) and save it as hello.rb, for example. Then, we can run it in Windows Command Prompt, by entering:
ruby hello.rb
The screenshot shows the script output.

|
Web-programming with Ruby CGI.
If you are familiar with Perl CGI, writing CGI scripts in Ruby shouldn't be a big deal. The following examples suppose that you have an Apache webserver running (tutorial: Web development environment setup on MS Windows - Apache webserver), and that your cgi-bin directory is configured to allow the execution of CGI scripts (tutorial: Web development environment setup on MS Windows - Perl).
Here is the code of a simple "Hello World" Ruby CGI script:
#!C:/Programs/Ruby33-x64/bin/ruby.exe
print "Content-type: text/html\n\n"
print "<br/><h1><center>Hello, World!</center></h1>\n"
The first line, called shebang line tells Apache where the executable of the script interpreter program is located. Creating a webpage consists in printing out the page HTML. This may be done using a common print command, provided that you have printed a webpage header before. The webpage header consists of the string Content-type: text/html. The important thing to know is that it's mandatory that the webpage header is followed by a blank line!. That's why there are two end-of-line characters (\n) in the print instruction in line 2 of the script above.
Lets call the script "hello2.rb" and place it into the cgi-bin folder of the Apache webserver. You can run it by
entering the following in the address field of your web browser:
localhost/cgi-bin/hello2.rb
The screenshot shows the execution of the script in Microsoft Edge.

|
This is the same way that we can proceed in Perl. And also as in Perl, that provides a module called CGI, there is a
CGI library in Ruby. Here is the code of a Ruby "Hello World" program that uses this library:
#!C:/Programs/Ruby33-x64/bin/ruby.exe
require 'cgi'
mycgi = CGI.new
print mycgi.header
print "<br/><h1><center>Hello, World!<br/>from Ruby CGI...</center></h1>\n"
CGI applications not only allow to create dynamic webpages, but also the interaction of the script with the user. The most common way to implement this kind of application is to create a static HTML page containing a form, where the user can enter data, and then push a submit button to send the data to the script.
Our simple example consists in asking the user for their firstname and lastname and displaying a personal greeting message including this data using a Ruby script. Here
is the HTML code of the static page containing the form (I called it "test_ruby_cgi.html" and placed it in the Apache document root directory).
<html>
<head>
<title>Test Ruby CGI</title>
</head>
<body>
<form method="POST" action="/cgi-bin/hello_user.rb">
<br/>Please, enter your name:<br/><br/>
First Name <input type="text" name="firstname" value=""/><br/><br/>
Last Name <input type="text" name="lastname" value=""/><br/><br/>
<input type="submit" value="Submit"/>
</form>
</body>
</html>

|
Pushing the submit button will launch the script "hello_user.rb" located in the cgi-bin directory. The data entered by the user in the two text
fields of the form will be sent to the script as "firstname" and "lastname" (values of the name attribute of the
<input> tag). Here is the code of the script.
#!C:/Programs/Ruby33-x64/bin/ruby.exe
require 'cgi'
mycgi = CGI.new
print mycgi.header
fn = mycgi['firstname']
ln = mycgi['lastname']
print "<br/><h1><center>Hello, ", fn, " ", ln, "!</center></h1>\n"
The script retrieves the form data using the names given to the text fields in the HTML file containing the form and "calling" the script. Then it creates a webpage with the greeting message.

|
Note: To launch this application, type the following in the address field of your web browser:
localhost/test_ruby_cgi.html
Ruby templating with ERB.
ERB provides an easy to use but powerful templating system for Ruby. Using ERB, actual Ruby code can be added to any plain text document for the
purposes of generating document information details and/or flow control. Here is a very simple example:
require 'erb'
x = 5
template = ERB.new <<-EOF
The value of x is: <%= x*x %>
EOF
puts template.result(binding)
This script creates a text document from a template defined within the script (a more common way is to read the template from a file), replacing the ruby expression x*x by the actual result of the expression. So, the output of this script is: "The value of x is: 25".
ERB finds the embedded Ruby code by identifying specific tags. The two most important tags are:
- <%= ... %> identifies a Ruby expression, that will be replaced with its calculated result;
- <% ... %> identifies a regular Ruby inline statement.
Note: Instead of using <% ... %>, you can simply use % ...
For details concerning ERB, please, have a look at the Ruby documentation website.
Adding Ruby code to a plain text document, I said. HTML is plain text, thus we can embed Ruby code into a HTML document and use Ruby similar to programming languages like JSP or ASP.NET.
That's what is discussed in the following paragraphs. Consider a very simple webpage where we want to include the actual time, and suppose that we want to get
the time using the regular Ruby expression Time.now.strftime("%r"). We can realize this by creating an ERB template, called, for example,
"test_erb.erb" (a better name would be: "test_erb.html.erb") and containing something like this:
<html>
<head>
<title>Test Ruby ERB</title>
</head>
<body>
<h1>Hello World!</h1>
<p>Wanna know how late it is?<br/>Just ask Ruby ERB!<br/>
The actual time is: <%= Time.now.strftime("%r") %>.</p>
</body>
</html>
Note the Ruby expression included within the <%= ... %> tag; on the webpage displayed this will be replaced with the actual value of the expression, i.e. the actual time.
The question now is: How to use our .erb file in a web environment. Apache itself could render the HTML, but what about the Ruby code? And considering the whole as a Ruby script and execute it as Ruby CGI is obviously nonsense. I guess that the most common way to use .erb files is to use them within the Ruby on Rails web framework. However, there also is a simpler way: using a Ruby CGI script that, thanks to the ERB library loaded, is capable to create the desired HTML document from a template. The template in this case will be our .erb file, the path of which will be passed to the script using ENV["PATH_TRANSLATED"]. If you want to know what this is and how it works, have a look at the Ruby documentation, or search the Internet. All that is really important to know is that when accessing the .erb file from the browser, ENV["PATH_TRANSLATED"] will contain the name of this file, and the script can read it as template for the generation of the webpage containing the actual time.
I suppose that you wonder how Apache can know that it has to run some CGI script if there is a request for a .erb file. Apache can't ... unless we add a
handler for .erb files. This is done by adding the following to the Apache configuration file httpd.conf:
# Embedded Ruby (ERB) support
AddHandler application/x-httpd-erb .erb
Action application/x-httpd-erb /cgi-bin/erb_cgi.rb
where "erb_cgi.rb" is the script that will be called when there is a request for a .erb file.
And here is the code of the Ruby CGI script erb_cgi.rb (the name of the script must, of course, being the one used in the Apache handler
configuration):
#!C:/Programs/Ruby33-x64/bin/ruby.exe
require 'erb'
print "Content-type: text/html\n\n"
myerb = ERB.new(File.read(ENV["PATH_TRANSLATED"]))
print myerb.result(binding)
The first line of the script (shebang line) tells Apache to "call" ruby.exe; the following lines will be interpreted by ruby.exe. The second line loads the ERB library. The third line creates a new webpage and all print instructions will write to that webpage. The fourth line creates a new "ERB document", by reading the template, the path of which the script finds in ENV["PATH_TRANSLATED"]. This path will actually be a URL to filesystem translation of the URL that triggered the "call" to the script. And finally, the last line prints out the document created, i.e. the template read with the modifications done by the embedded Ruby code.
So, with test_erb.erb placed in htdocs and erb_cgi.rb placed in cgi-bin, we can access our webpage by entering the following in the address-field of the web browser:
localhost/test_erb.erb
Receiving a request for a document with extension .erb, Apache will call our CGI script erb_cgi.rb. This script will read the file test_erb.erb, replace the tagged get-time expression by the actual time, and display the (modified) test_erb.erb as HTML page. Here is the result:

|
Note: There are alternatives to ERB (that are probably faster), in particular erubi and erubis, both available at Github.
The Ruby on Rails framework.
"Rails is a web application development framework written in the Ruby programming language. It is designed to make programming web applications easier by making assumptions about what every developer needs to get started. It allows you to write less code while accomplishing more than many other languages and frameworks. Experienced Rails developers also report that it makes web application development more fun."
The paragraph above is how Ruby on Rails (or simply Rails) is described in the article Getting Started with Rails at rubyonrails.org. Personally, I would call Rails huge and complex, and only worth to start with if you really intend to use it to create greater web projects. If you just need some Ruby scripts for your homepage, use Ruby CGI, with or without ERB; in the case where a very high number of visitors makes CGI applications too slow, you can try FastCGI instead.
Creating a Rails application is creating a Rails project; this consists of the automatic generation of a complex folder structure with a huge number of files, a kind of web application skeleton including all that you could possibly need to run your application. The obvious advantage is that you haven't to worry about lots of things, because they are automatically done for you; the obvious disadvantage is that you get a lot of stuff that you will not need, except, as I said, if you are creating a greater web project.
The Rails part of my Ruby tutorial is not less and not more than showing how to proceed to create a very simple "Hello World" application using Rails, without giving all related details or explanations. If you are serious about Rails, have a look at the article mentioned above, or some other Rails introduction, as for example Rails Girls guides. You can also find several books about Rails in PDF format on the Internet.
Lets start with checking if everything is there and the executables are included in the PATH. In Command Prompt, enter the following:
ruby -v
sqlite3 --version
rails --version

|
You should create a folder where to place all your Rails projects; I use D:\Programming\Ruby\Rails. Important: When creating your Rails project, be sure to have an
active Internet connection. It is very probable that some library is missing or not up to date and has to be downloaded. To create a
Rails application (Rails project) called hello_world, cd to the folder with your Rails projects, and run the command
rails new hello_world
This will create the application folder structure and also automatically run bundle install. As I said, Rails is huge, and the creation of the project may take some time! The screenshots below show the first part (screenshot on the left) and last part (screenshot on the right) of the application creation.
![Ruby on Windows 10: Ruby on Rails - Creating a Rails project [1] Ruby on Windows 10: Ruby on Rails - Creating a Rails project [1]](../screenshots/ruby15a.jpg)
|
![Ruby on Windows 10: Ruby on Rails - Creating a Rails project [2] Ruby on Windows 10: Ruby on Rails - Creating a Rails project [2]](../screenshots/ruby15b.jpg)
|
Note: To redo the installation for an existing application, cd to the project folder (in our case:
D:\Programming\Ruby\Rails\hello_world) and run
bundle install
The screenshot below shows the folder structure of our Rails application with the file "Gemfile" opened in Notepad++. It is in this file where are defined (and where you can redefine) the minimal required version of the different gems. "Gemfile" is used by the Bundler when installing the application.
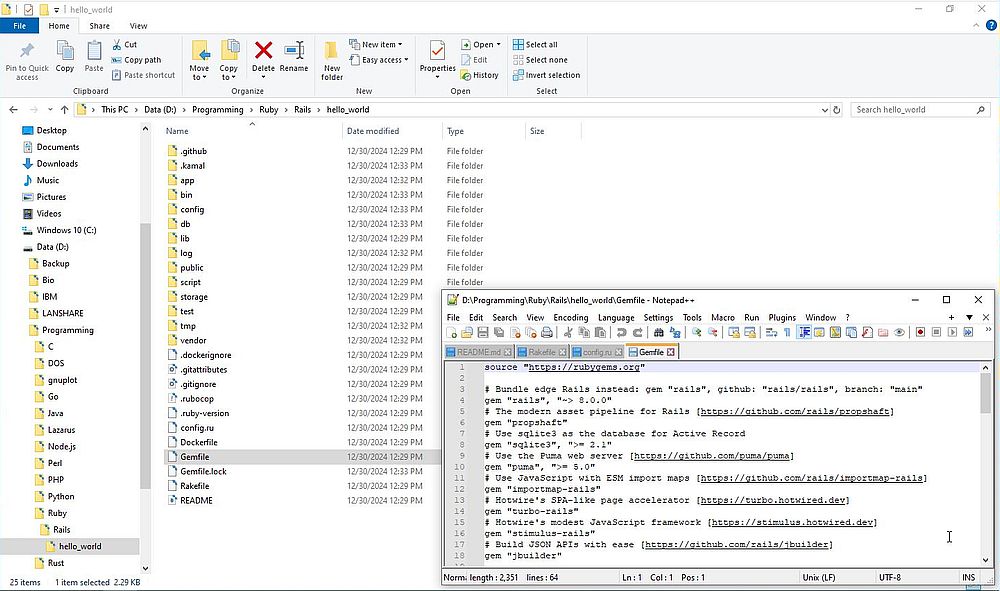
|
The function of the most important of all these files and folders is briefly described in the Getting Started with Rails article. Two of them are particularly important: The folder apps/ contains the controllers, models, views, helpers, mailers, channels, jobs and assets for the application. We will see further down in the text what controllers and views are; for the other items, have a look at the Rails documentation when you need them. Also very important is the folder config/ where we configure the application's routes, database, and more. The routes item will be described further down in the text.
I said above that a Rails project contains everything that you could need to run your application. So it contains all that you need to start a
webserver with its configuration defined in some of the files generated, and serving the content as defined in others of the files generated.
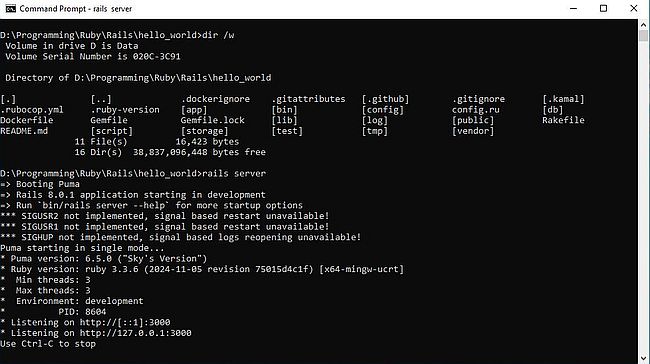
The default webserver used by Rails is called Puma and we start it from the project directory with the command
rails server
|
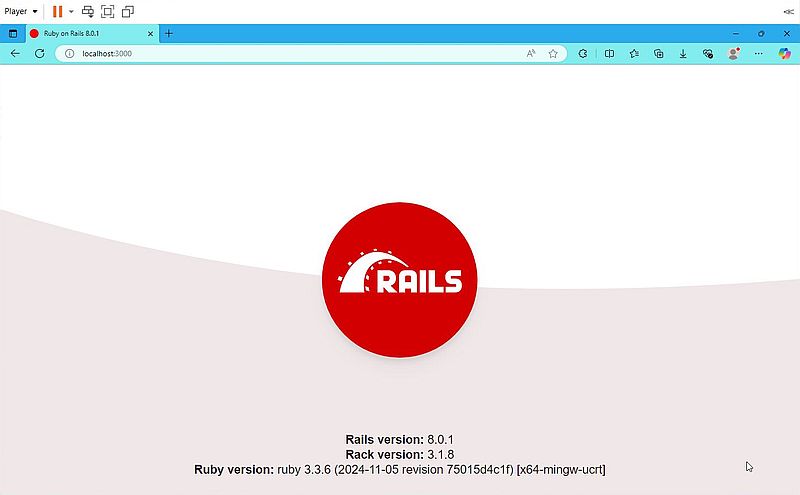
Puma runs by default on localhost port 3000. And a default webpage has been generated while creating the application.
We can access it by entering the following the in the address field of the web browser:
localhost:3000
|
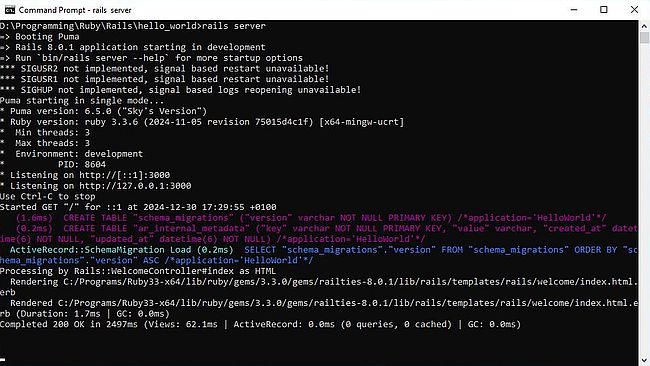
The screenshot below shows the start up of the server from the previous screenshot plus the server log created when I accessed the default Rails webpage.
|
The minimum needed by a Rails application are a controller and a view. Here are the definitions of these items, as given in some old version of "Getting Started with Rails":
A controller's purpose is to receive specific requests for the application. Routing decides which controller receives which requests. Often, there is more than one route to each controller, and different routes can be served by different actions. Each action's purpose is to collect information to provide it to a view.
A view's purpose is to display this information in a human readable format. An important distinction to make is that it is the controller, not the view, where information is collected. The view should just display that information. By default, view templates are written in a language called eRuby (Embedded Ruby) which is processed by the request cycle in Rails before being sent to the user.
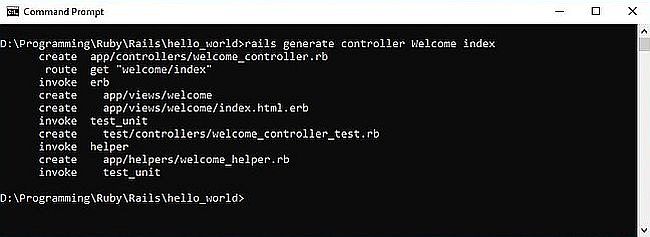
To create a new controller, called "Welcome" with an action called "index", we have to run the controller generator
as follows:
rails generate controller Welcome index
|
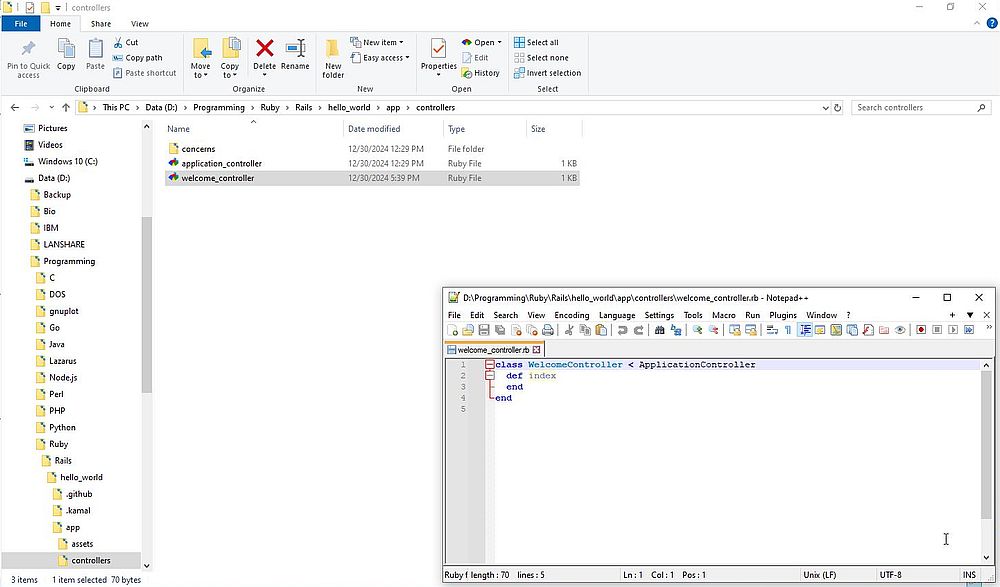
Among the files generated when creating the controller, the two most important are app/controllers/welcome_controller.rb and app/views/welcome/index.html.erb.
The controller welcome_controller.rb is simply a class that is defined to inherit from ApplicationController. It's inside this class that we can define the methods that will become the actions for this controller. The default file content is an "empty class" definition. We don't not need to change this file here.
|
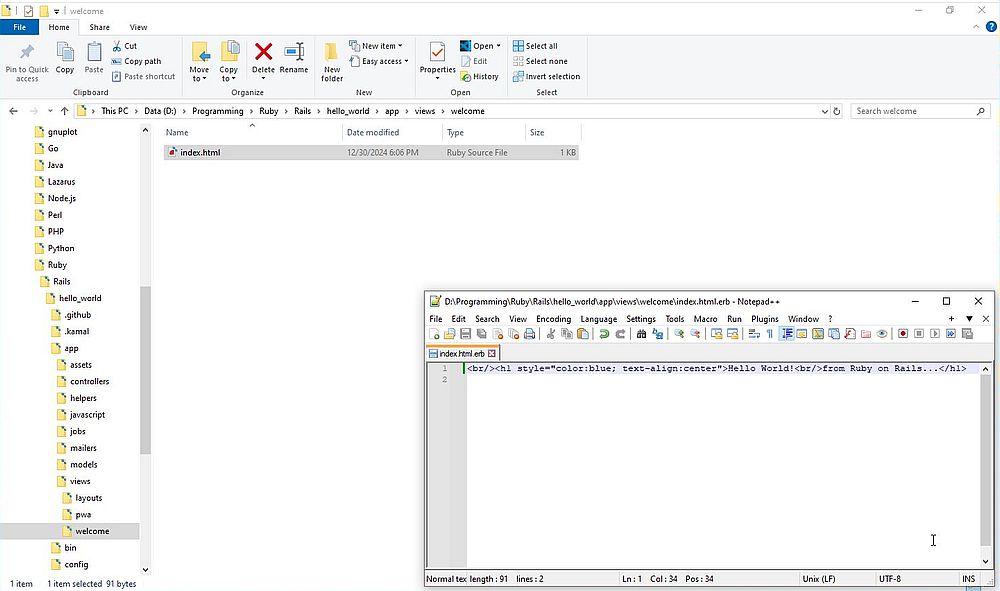
The view index.html.erb contains the information that the user should see in the web browser. In the simplest case (as here) this is pure HTML.
In more advanced cases this is a mixture of HTML and Embedded Ruby. The default file content doesn't make any sense to us, thus delete it all, and replace it by the
HTML of your webpage, for example:
<br/><h1 style="color:blue; text-align:center">Hello World!<br/>from Ruby on Rails...</h1>
|
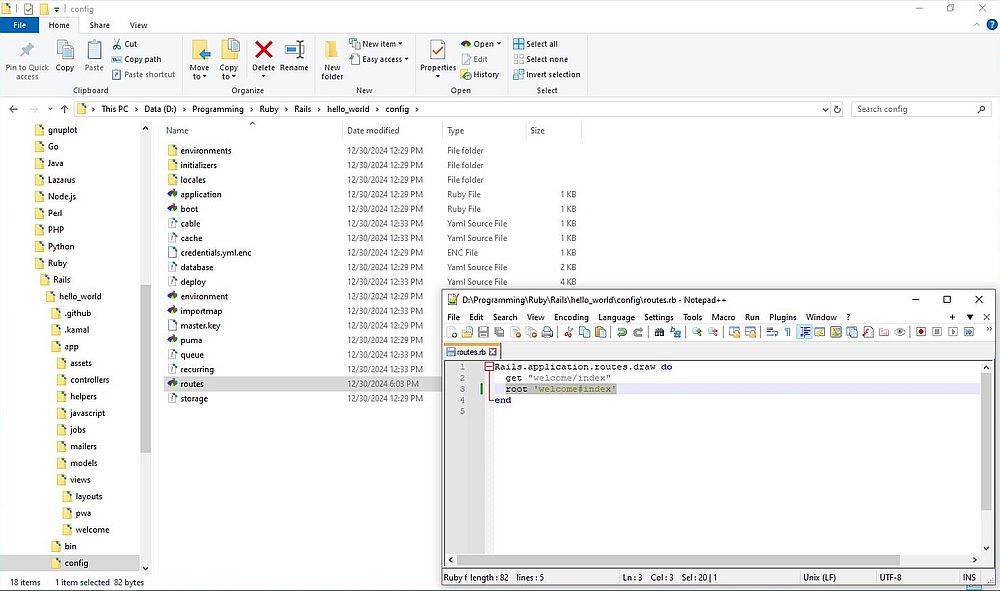
A last thing that remains to do: We have to tell Rails that when we access localhost on port 3000 (access the document root of the Puma webserver), we want to have the content of our index.html.erb file displayed. This is done by defining a route. What is actually done in the file config/routes.rb.
Edit the file config/routes.rb modifying it to the following content (just replace the comment in the default file by the
line root 'welcome#index'):
Rails.application.routes.draw do
get 'welcome/index'
root 'welcome#index'
end
|
The line get 'welcome/index' (inserted in the file automatically when we ran the controller generator) tells Rails to map requests to localhost:3000/welcome/index to the welcome controller's index action. The line root 'welcome#index' (that we have to add) tells Rails to map requests to the root of the application to the welcome controller's index action.
To access our Rails application, enter the following into the address field of your web browser:
localhost:3000

|
It's here where I stopped playing around with Ruby on Rails, and thus ends my Rails tutorial. If you want to go further with Rails, I think that the Rails Girls guides are a good starting point. And, of course (maybe only after these), the official Getting Started with Rails article.
Using VSCode as Ruby IDE.
There are several editors or IDE that you can use for Ruby and/or Ruby on Rails development. I mentioned Notepad++ that offers syntax highlighting for Ruby. Another programming editor, that you can use with Ruby, is Geany, powerful, stable, lightweight and providing tons of useful features. Aptana Studio is a complete web development environment that combines powerful authoring tools with a collection of online hosting and collaboration services that help you and your team do more. It includes, among others, support for HTML, CSS, JavaScript, PHP, Ruby and Ruby on Rails. Unfortunately the software is discontinued since 2021. However, it is still available for download at Github.
The best IDE for Ruby and Rails is probably VSCode. However, as with Ruby and Rails themselves, you find several tutorials on the Internet that are quite different in their approach, because they use different VSCode extensions. I will update my tutorial, if (one day) I try out Ruby/Rails with VSCode...
Source code download.
I hope that you enjoyed reading and that my tutorial succeeded to make things understandable to Ruby/Rails newbies. You can click the following link to download the sources of the samples used in the tutorial (concerning the Rails application, only the files welcome_controller.rb, index.html.erb and routes.rb are included, so you'll have to create the application yourself...). And, don't forget: Programming is not only (hard) work; it can (and should) also be fun!
If you find this text helpful, please, support me and this website by signing my guestbook.