A short introduction to Node.js.
"Node.js® is a platform built on Chrome's JavaScript runtime for easily building fast, scalable network applications. Node.js uses an event-driven, non-blocking I/O model that makes it lightweight and efficient, perfect for data-intensive real-time applications that run across distributed devices."
The paragraph above is how Node.js is described in the official documentation.
You can download the Windows installer (MSI) from the Node.js website. I actually use version 20.11.0 (64-bit) on Windows 10. This is not the latest version; I suppose that the tutorial applies as such to the actual version, too, as well as to Windows 11.
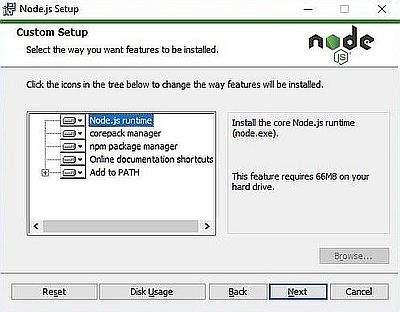
The installation is straight forward. The default installation directory is C:\Program Files\nodejs. The screenshot below shows the component selection. I let all defaults, without viewing what is and what is not installed. It is not to exclude that the Node.js folder is not by default added to the PATH. Another possibility is that is does not work correctly. In fact, I had to add it manually later (cf. further down in the text).
|
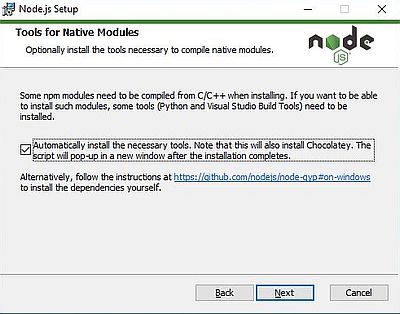
At the end of the installation you are asked if you want to continue by installing the tools for native modules. These include Python and the Visual Studio build tools. The installation is done using the package manager Chocolatey, that will also be installed. An Internet connection is of course required to perform this installation. You can decide to do the installation later. The Node.js setup program creates a shortcut to launch the installation script in the Windows Start menu.
|
The tools installation starts with two information screens. On the first one (screenshot on the left), you find a link that explains how to proceed to install the tools manually; this will be necessary if the installation by the script fails. On the second one (screenshot on the right) you are told about Chocolatey. If you don't want to install the package manager, you can install the tools manually...
![Installation of the tools for native modules [1] Node.js on Windows 10: Setup - Installation of the tools for native modules [1]](../screenshots/nodejs3a.jpg)
|
![Installation of the tools for native modules [2] Node.js on Windows 10: Setup - Installation of the tools for native modules [2]](../screenshots/nodejs3b.jpg)
|
The additional tools are a huge thing; that you will need 3 GB of free disk space, they say. The installation, consisting in downloading and installing all that you need to work with Node.js using Chocolatey, should succeed without issues. There are two points that you should take notice of. First, you'll get a lot of warnings; I'm not really sure, but I think that you may simply ignore them (anyway the warnings are just displayed and the installation continues). Second, some of the components to be installed are very big in size and it may appear that nothing happens anymore during minutes. This is not because the system would hang, but because the installer needs lots of time to do its work; just be patient!
![Installation of the tools for native modules [3] Node.js on Windows 10: Setup - Installation of the tools for native modules [3]](../screenshots/nodejs3c.jpg)
|
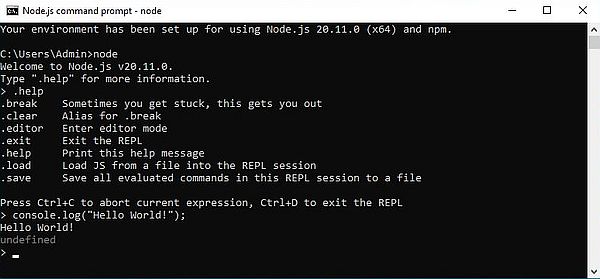
In the Windows Start menu, you find a shortcut to launch the Node.js REPL. REPL stands for "Read-Evaluate-Print-Loop" and is nothing else than an interactive shell where, beside some shell specific commands, you can enter Node.js code that is then immediately executed. To note that using the shortcut is essentially the same that entering node without any command line argument in Windows Command Prompt. The difference is that using the shortcut sets some environment variables for your Node.js. installation.
You can perform a quick test to check if your Node.js installation works correctly by entering the following Node.js code in REPL:
console.log("Hello World!");
|
The "undefined" that you can see on the screenshot above is the return value of the console.log() function. Function return values are always displayed when you work with the REPL; they aren't if you run node with a filename as command line argument (cf. below). A consequence of this is that the function console.clear() not really clears the screen; in fact, you'll get an empty screen with the text "undefined" in the first screen line.
The REPL command allows to process multiple lines code input, saving and loading files, etc. For details, cf. the Node.js documentation.
You can clear the screen, print in color and print a given screen position using the ANSI escape sequences (cf. my tutorial Text positioning and coloring using ANSI escape sequences on DOS), that are supported in Command Prompt of the latest Windows 10 releases, as well as on Windows 11. You can specify the escape control character ASCII code as hexadecimal number: \x1b. Here is the code to display "Hello World!" with "World" being displayed in red (formatted output using %s is the same as with printf in C): console.log("%s \x1b[31m%s\x1b[0m%s", "Hello", "World", "!");

|
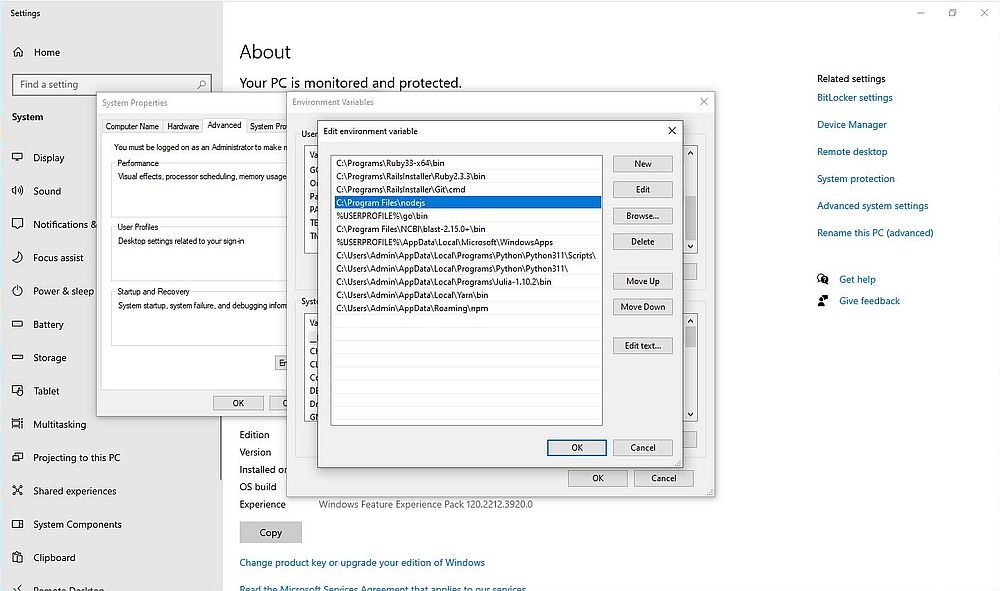
Running Node.js in the REPL is mostly to test your code when writing a Node.js program. Another way to use Node.js is to write your code (for example in Notepad++, that has syntax highlighting support for Javascript) and save it as a .js file. You can then run this program in Command Prompt with the command node <filename>. To be able to run "node" from any directory, the Node.js installation folder must be in the user's (or the system) PATH. If this isn't the case after you have installed Node.js, you can do it manually by opening Preferences > System > About and then clicking the Advanced system settings link at the right side of the window. In the opening System Properties window, push the Environment variables button and edit the PATH user variable, adding the Node.js installation directory.
|
This small program (I called it hello.js) shows an example of console input-output. First, it asks the user for their name, then prints out a greeting message with the user's name in red. Important: In order to print a variable as part of a string, you have to use grave accents. Using single or double quotes will both display the variable name instead of its content! Here is the code: const readline = require('readline').createInterface({ input: process.stdin, output: process.stdout }) readline.question(`What's your name? `, (name) => { console.log(`Hi \x1b[31m${name}\x1b[0m!`) readline.close() })

|
This code will probably appear strange to most of you. Node.js differs from programming languages like Pascal, C, C++, Java, etc by using a different programming model. Node.js is asynchronous and event driven. This essentially means that a Node.js based application never waits for a API to return data. After calling the API, it continues with the (main) program execution. A notification mechanism of events within Node.js helps the application to get the response from the (previous) API call(s).
Callback is the asynchronous equivalent for a function. A callback function is called at the completion of a given task. All APIs of Node.js are written in such a way that they support callbacks. For example, a function to read a file may start reading the file and then return the control to the execution environment immediately so that next instruction can be executed. Once file I/O is complete, it will call the callback function, passing the content of the file as argument. If an application works this way, there is no blocking or wait for File I/O. This makes Node.js highly scalable, as it can process a high number of requests without waiting for any function to return a result.
The two paragraphs above are from Node.js Quick Guide by Tutorialspoint, as is the sample program below. For further information, please, search the Internet. Here are two articles that might be helpful: Asynchronous vs. Synchronous Programming: Key Similarities and Differences and What Are Callback Functions?
As an illustration, lets consider reading a file and displaying its content in the console. Here is the content of test.txt:
This is the content
of our test file
"test.txt".
The sample program readfile1.js shows the classic approach (blocking code example): The program starts, calls the API to read the file, then
waits for the file content to be returned and displays it. Here is the code:
var fs = require("fs");
var data = fs.readFileSync('test.txt');
console.log(data.toString());
console.log("Program Ended");
Now the asynchronous approach (non-blocking code example; the programming method that we would use with Node.js in "real life"). The program starts, calls the API to read
the file with (beside the filename) a callback function as argument, then continues execution, in this case immediately terminates. The callback function (with the
file-read return code and the file data as arguments) is executed when reading the file is done. If there was no error, the file content is displayed. Here is the
code of the sample program readfile2.js:
var fs = require("fs");
fs.readFile('test.txt', function (err, data) {
if (err) return console.error(err);
console.log(data.toString());
});
console.log("Program Ended");
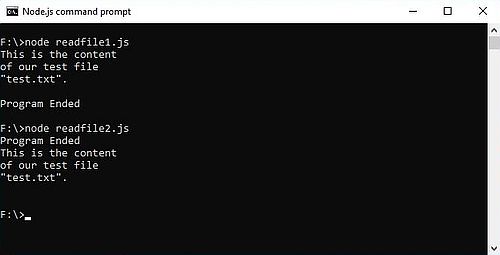
The screenshot shows the output of the two programs. Note the difference: With the synchronous programming method, the program is blocked until reading the file (what takes some time) is terminated. With the asynchronous programming method, the program terminates independently of how long reading the file takes. When this is finally done, its content is displayed.
|
The main usage of Node.js consists in writing server applications. The following two sample programs (modified from examples in Node.js Quick Guide by Tutorialspoint) implement a simple server (source file server.js), that pipes some text to the connecting client (source file client.js), that displays this text. The server starts listening on port 3000, logs the client connections and continues listening. The client connects, displays the text received and terminates.
Here is the code of server.js:
var net = require('net');
var server = net.createServer(function(connection) {
console.log('Client connected.');
connection.on('end', function() {
console.log('Client disconnected.');
});
connection.write(' Hello You out there!\r\n You are connected to a node.js server,\r\n running on localhost, port 3000.');
connection.pipe(connection);
});
server.listen(3000, function() {
console.log('Server is listening.');
});
And the code of client.js:
var net = require('net');
var client = net.connect({port: 3000}, function() {
console.log('Connected to server.');
});
client.on('data', function(data) {
console.log('Message received from server:');
console.log('\x1b[32;1m', data.toString(), '\x1b[0m');
client.end();
});
client.on('end', function() {
console.log('Disconnected from server.');
});
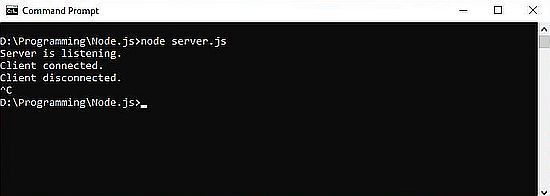
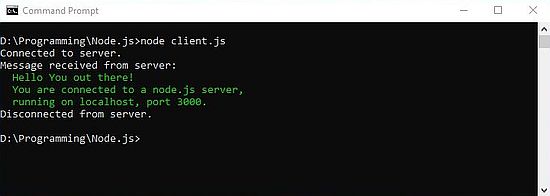
Run the server in one Command Prompt, and the client in another one. The screenshot on the left shows the output of the server program, the screenshot on the right shows the output of the client program.
|
|
Note, that in this simple application, there is no implementation of a way to stop the server. You can "kill" the server program in Command Prompt by entering CTRL+C.
Implementing a basic webserver with Node.js is not more complicated than implementing the simple server of our example before. The sample program
http.js(modified from an example in Node.js Quick Guide by Tutorialspoint) implements an elementary webserver running
on localhost and listening to port 3080. When the HTTP client (web browser) makes a request for a file, the server looks for this file in the directory where http.js is
located itself. If the file is found, it is served to the client; otherwise, an error 404 ("not found") is returned. The server also logs the requests that are made. Here
is the code:
var http = require('http');
var fs = require('fs');
var url = require('url');
http.createServer(function (request, response) {
var pathname = url.parse(request.url).pathname;
console.log("Request for " + pathname + " received.");
fs.readFile(pathname.substr(1), function (err, data) {
if (err) {
console.log(err.stack);
response.writeHead(404, {'Content-Type': 'text/html'});
}
else {
response.writeHead(200, {'Content-Type': 'text/html'});
response.write(data.toString());
}
response.end();
});
}).listen(3080);
console.log('Server running at localhost, port 3080');
To test the HTTP server, lets create a file named test.html and place it together with the http.js source file. Here is its content:
<html>
<head>
<title>Test Node.js</title>
</head>
<body>
<br/><h1><center>Hello World from Node.js!</center></h1>
</body>
</html>
Now we can start our server by typing node http.js in Command Prompt. The message that the server is running is displayed. With the server listening on port 3080, we request the file test.html by typing the following in the address bar of the web browser: localhost:3080/test.html.
The screenshot below shows the page test.html (in the Node.js root directory on localhost) opened in Microsoft Edge.

|
In the console, where you started the server, you can view the logging of the request. The file /test.html is well located on the Node.js server (and thus is returned to the browser). You can also see that Edge made the request for /favicon.ico. I suppose that all (modern) browsers do that. As this file does not exist on our Node.js server, a read file error occurs.

|
This part of the tutorial is about how to proceed to run Node.js and Apache on the same server. I would say that you have to consider two different scenarios:
- If you want to have high performance and scalability, run the two servers separately. In order to access the Node.js server on the default HTTP port 80, the simplest way is to use a server with two IP addresses, Apache listening to the one, Node.js listening to the other.
- In the case of a specific role with a limited number of users, you can access the Node.js server indirectly, via Apache. This has several advantages (the disadvantage being a loss of performance and scalability): You need only one IP address, all requests are made in the same way (the user is not aware that some files are served by a second server), all requests will be listed in the Apache log file.
It's this second way to proceed that is described here, implementing it using the reverse proxy technique. This is done in less than a minute, works well on my Windows 10 virtual machine, and except for a webserver with really heavy load, you will not notice a difference in speed. The principle of the reverse proxy technique is simple: By default, the request of a given URL is served by Apache itself; except for specific URLs (URLS starting with /node, for examples), where Apache acts like a reverse proxy and passes the request to the node.js application.
All we have to do to implement this scenario is to make some changes to the Apache configuration file httpd.conf:
- Enable the two modules "mod_proxy" and "mod_proxy_http". This is done by uncommenting the corresponding
LoadModule directives
LoadModule proxy_module modules/mod_proxy.so
LoadModule proxy_http_module modules/mod_proxy_http.so - In the main server configuration part of the file (for example after the ServerRoot directive), add the following line:
ProxyPass /node http://localhost:3080
where 3080 is the port that Node.js listens to, and "node" is the "URL prefix" that you intent to use in order to access files on the Node.js server.
Important: Be sure, not to insert a slash (/) at the end of the HTTP address (as you can read on some websites). This will result in a URL with two slashes and, of course, the files on Node.js will not be found!
Also to note that after having changed httpd.conf, you'll have to restart Apache.
My Windows 10 virtual machine is part of a local network, including an IPFire firewall/router machine that runs a DHCP and a DNS server. Windows 10 gets an IP address (for the virtual Ethernet host-only adapter) from IPFire and is registered as wk-win10p.intranet.home in DNS. The domain name being automatically appended, Apache can be accessed from other computers on the local network, using the URL http://wk-win10p/ and with the configuration as described, I can now access the file test.html from the previous example from other computers by entering http://wk-win10p/node/test.html (if you don't have a local network, you can access the file using the URL localhost/node/test.html). The screenshot shows how I access test.html with Firefox from another Windows 10 machine (being part of the intranet.home network). For the user browsing for the file, it's the same as for a file located on Apache itself; the user is not aware that test.html is served by our Node.js server (that has to be started, of course).

|
If you find this text helpful, please, support me and this website by signing my guestbook.