| 3. |
Setting up a local database server using Microsoft SQL Server. |
| |
In Part 1 and Part 2 of my Web/Database environment using IIS and SQL
Server tutorial, I have described how to install and configure IIS 8.5 on Windows 8.1, resp. how to run scripts written in ASP.NET, PHP and Perl on IIS.
This part of the tutorial explains how to install and configure Microsoft SQL Server. The tutorial continues to use Windows 8.1 (German
language version). Not really an idea, how far it applies to Windows 10 or Windows 11.
|
| |
The last version of SQL Server, that supports Windows 8.1, is SQL Server 2017. I found download links for this old version of the server at the
SQL Server 2017 Editions page on the Microsoft website,
and downloaded the web installer of the free SQL Server 2017 Developer Edition.
|
| |
The screenshot shows the startup of the web installer, that offers several ways how to install SQL Server. I decided to download the installation media (German:
"Medien herunterladen"), what gives the possibility to download an ISO DVD-image, that allows the offline installation of SQL Server, whenever you want to start
with it.
|
| |
|
| |
You may select the language (German: "Sprache") (I chose "German", as this is the language of my Windows 8.1), as well as the type of installation file; I
chose to download the software as ISO.
|
| |
|
| |
I used a USB stick to move the ISO from the Windows 8.1 VM to the host, where I mounted it in my virtual DVD drive. Running setup from the DVD launches the
SQL Server Installation Center, that includes several groups, listed in the left pane, and for a given group selected shows the
available tasks in the right pane. Before starting the installation, you should run the Check system configuration (German:
"Systemskonfigurationsprüfung") from the Planning (German: "Planen") group. The screenshot on the left shows the selection of the
"Check system configuration" task; the screenshot on the right shows that all requirements and conditions tests have been successful.
|
| |
|
| |
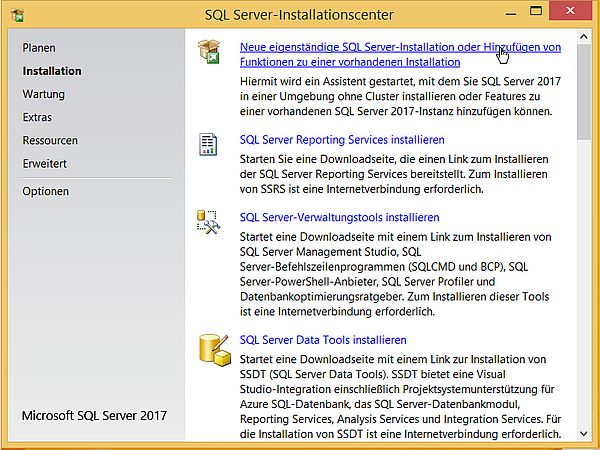
Now, select Installation in the left pane, and from the right pane, choose New Stand-alone SQL Server Installation
... (German: "Neue eigenständige SQL Server-Installation ...").
|
| |
|
| |
In the next window, we may choose between selecting a freeware edition (German: "Kostenlose Edition"), what in our case is the Developer
edition, or to enter the product key for a commercial edition. And in the Window after that, we have to accept the license agreement.
|
| |
Setup continues with asking if we want to search for updates using Microsoft Update. No sense to select the checkbox, support for
Windows 8.1 has ended a long time ago...
|
| |
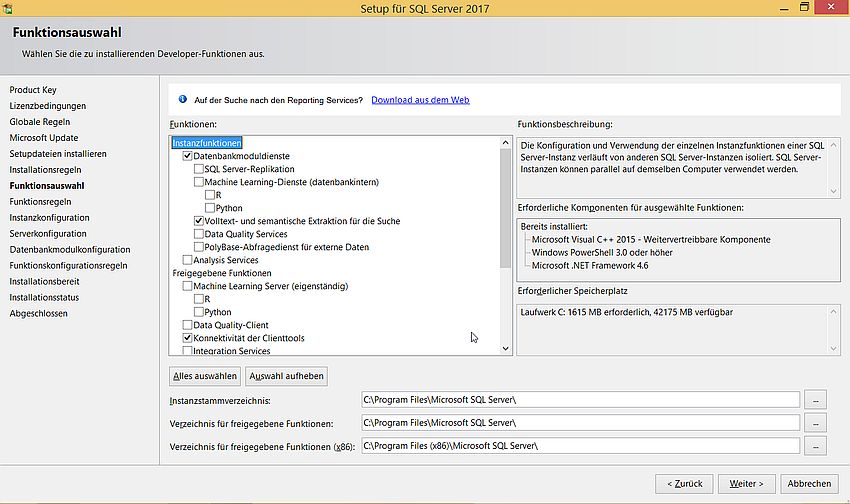
In the next window, we have to select the functions to be installed for this instance, as well as the different installation directories.
Concerning the functions, I only selected "Database module services", "Fulltext and semantic extraction for the search", "Client tools connectivity", "Client tools
downward compatibility", "Client tools SDK", and "SQL client connectivity SDK" (you can add functions later by rerunning the application). Concerning the directories,
I let all defaults.
|
| |
|
| |
In the first window concerning the configuration of the instance, select the Default instance (German: "Standardinstanz") radiobutton. In the
window concerning the accounts to be used with the different services (German: "Dienstkonten"), I let all defaults.
|
| |
In the window concerning the encoding and sorting of the data, I let Latin1_General, but I selected the checkbox with the option to
differentiate between uppercase and lowercase (German: "Unterscheidung nach Groß/Kleinschreibung" (differentiation for accents is selected by default). Thus, the
encoding/sorting used actually is Latin1_General_CS_AS.
|
| |
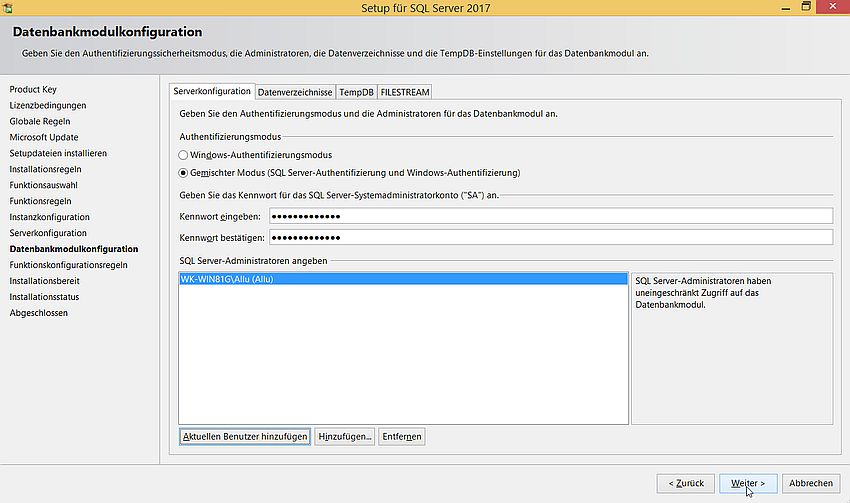
In the window concerning the server configuration, I changed the authentication mode from Windows authentication
to mixed mode (German: "Gemischter Modus"), i.e. SQL Server authentication and Windows authentication. Do not forget to enter a password
for the SQL system administrator (that's like "root" for MySQL). I also added the current user ("Allu") as SQL system administrator (using the button
Add actual user; German: "Aktuellen Benutzer hinzufügen").
|
| |
|
| |
I let all other settings as they are by default. In fact, I forgot to review those settings...
|
| |
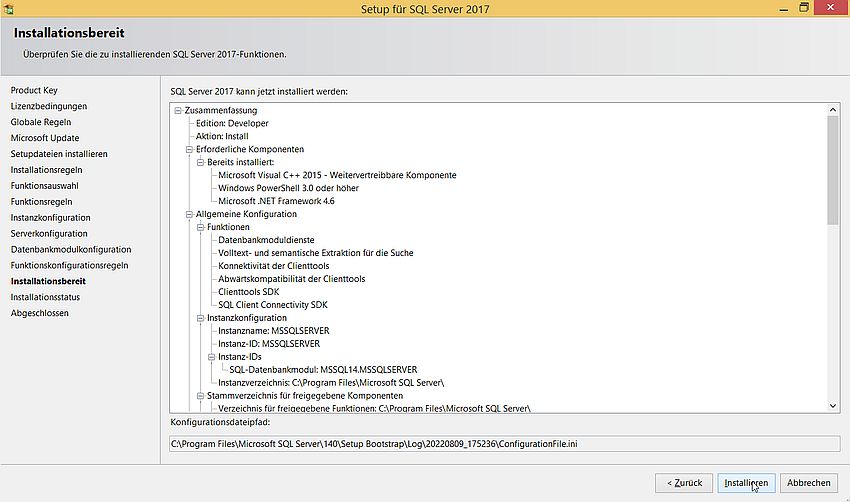
The setup program now has all information that it needs. A summary of the installation options is displayed. Push the Install button to
start the installation.
|
| |
|
| |
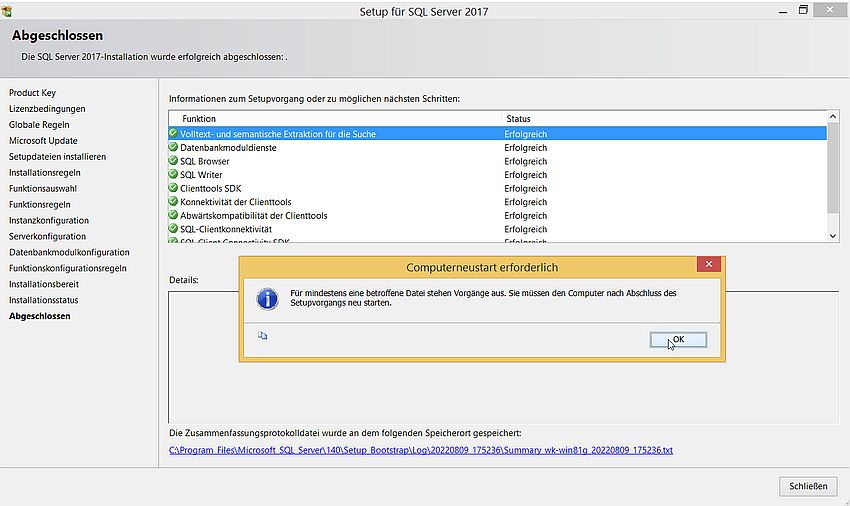
The new files are copied. When finished (German: "abgeschlossen"), a list of the successfully installed features is displayed. Also, a message box pops up, telling us
that we have to reboot the computer.
|
| |
|
| |
Installing Microsoft SQL Server Management Studio.
|
| |
Microsoft SQL Server Management Studio with Azure Data Studio (SSMS) is probably the best solution when searching for an application to manage your SQL Server, its
databases, and the data stored in them. There are download links for SSMS available at
sqlserverbuilds.blogspot.com; not sure, however, if it
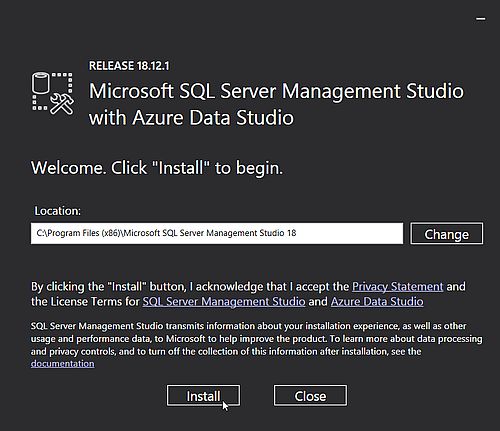
was from that site that I downloaded my installer. On my Windows 8.1, I use version 18.12.1. The screenshot below shows the "Welcome" window of the setup program.
|
| |
|
| |
The installation shouldn't make any problems. When finished, you'll have to reboot your computer.
|
| |
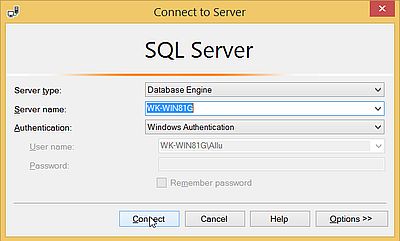
When starting SSMS, a login window pops up. All fields are filled in with default values. In particular: the server name is set to the name
of the computer (in my case: WK-WIN81G); authentication is set to "Windows authentication", i.e. the actual Windows user (in my case "Allu") is used to log in (no
need to specify a password in this case).
|
| |
|
| |
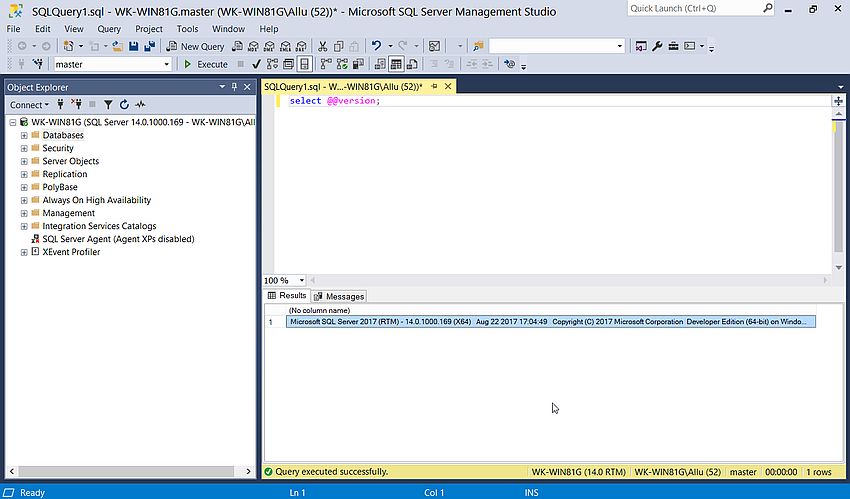
The screenshot below shows how I ran a simple query to display the version of SQL Server in SQL Server Management.
|
| |
|
| |
Configuring SQL Server network protocols.
|
| |
If instead of using Windows authentication, you try to login as SA using SQL Server authentication, you get the error message No process at the
other end of the pipe (German: "Kein Prozess am anderen Ende der Pipe"). In fact, after initial installation, neither TCP/IP, nor named pipes are activated! To
configure access to SQL Server, we use SQL Server Configuration Manager (installed with SQL Server). Login to the server using Windows
authentication. In the left pane, select SQL Server network configuration > Protocols for "MSSQLSERVER" (German: "SQL Server Netzwerk
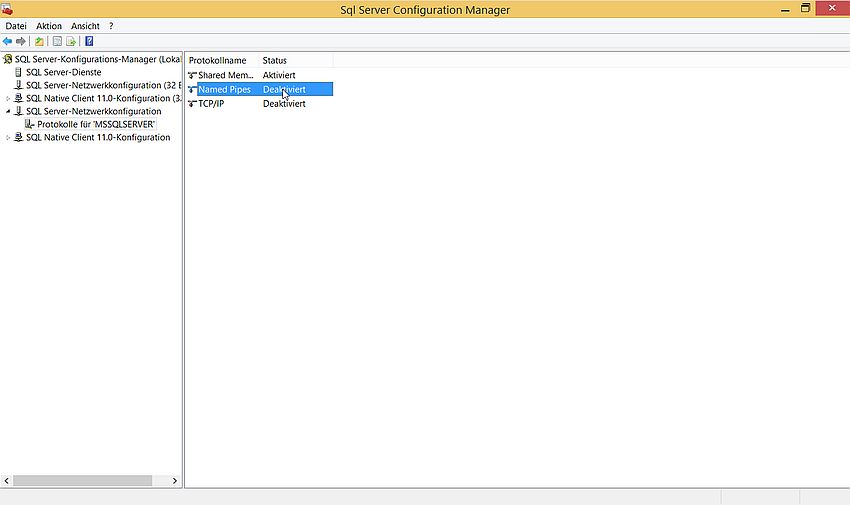
Konfiguration > Protokolle für MSSQLSERVER"). As you can see on the screenshot that, by default, TCP/IP and named pipes are disabled (German: "deaktiviert").
|
| |
|
| |
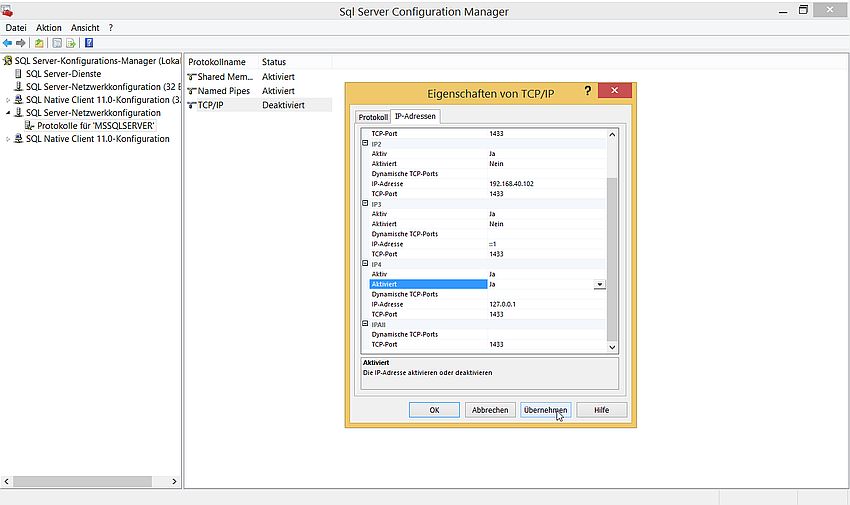
I activated named pipes with the default pipe name \\.\pipe\sql\query. And I activated TCP/IP on IP4 address 127.0.0.1 (that's "localhost"),
port 1433 (SQL Server default). I suppose that after making these changes, SQL Server has to be restarted...
|
| |
|
| |
Note: To configure SQL Server to start or not automatically with Windows, use Administrative Tools > Services
in Control Panel. It's also here that you can start or stop the server. If you should experience problems with the SQL server start at
Windows startup, please, have a look at my article SQL Server doesn't automatically start with Windows.
|
| |
Creating the "BikeStores" database.
|
| |
There is no sample database installed with SQL Server. However, there are several databases available on some Internet sites. I installed "BikeStores", that you
can download from the sqlservertutorial.net website. At that site, you also
find an article titled SQL Server Sample Database; it
describes the "BikeStores" database structure.
|
| |
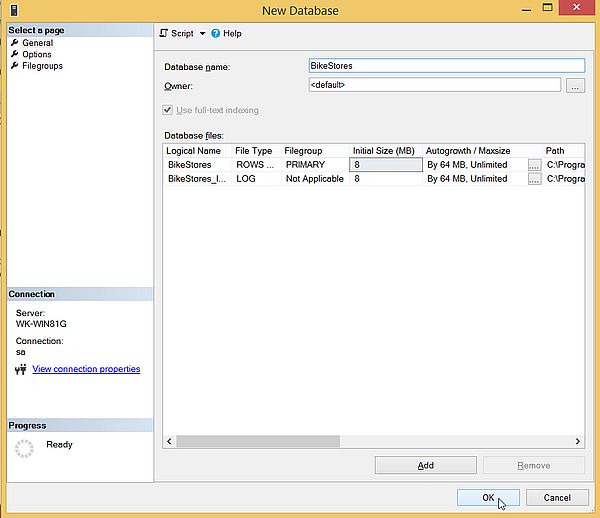
To create the database, right-click onto Databases in the left pane. Then, from the opening context menu, choose
New Database. The screenshot shows the "New Database" window, where you have to enter the name of the database to be created.
|
| |
|
| |
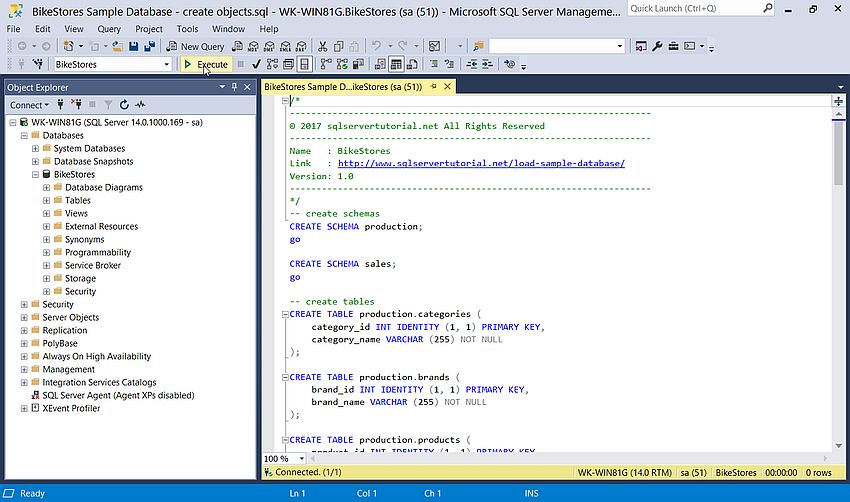
You can create the database objects (tables, ...) by running the SQL contained in file "BikeStores Sample Database - create objects.sql". To do so, choose
File > Open > File from the menu bar. The SQL is loaded into the query editor, and we can execute the SQL statements, just the same
way than we execute a manually entered query.
|
| |
|
| |
Similarly, to fill the tables, you can use the SQL contained in the file "BikeStores Sample Database - load data.sql".
|
| |
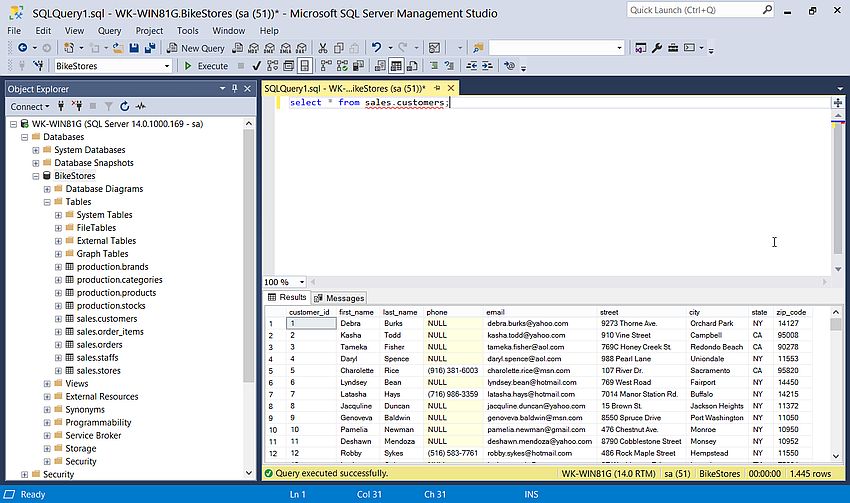
Quick test: Display of the "BikeStores" customers:
select * from sales.customers;
The screenshot shows the query result.
|
| |
|
| |
Creating a read-only user.
|
| |
We will now create a user called "nemo" and give them read (read-only) access to all tables of the "BikeStores" database.
|
| |
Note: Concerning the creation of my read-only user, I am not sure if this is properly done, or if there is a way to do it better (?).
|
| |
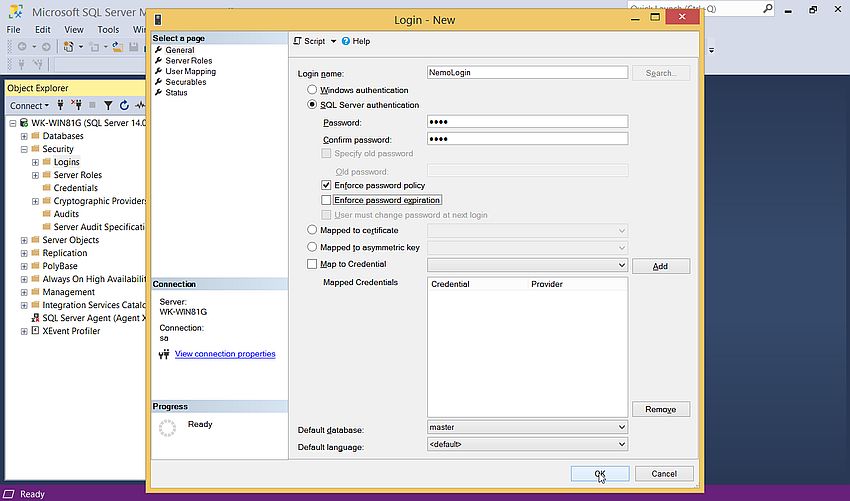
In the left pane, in the groupSecurity, right-click on Logins, and from the opening context menu, choose
New Login. In the Login - New window, set the login name to "NemoLogin", select SQL
Server authentication, and enter a password. You may also want to uncheck the option Enforce password expiration.
|
| |
|
| |
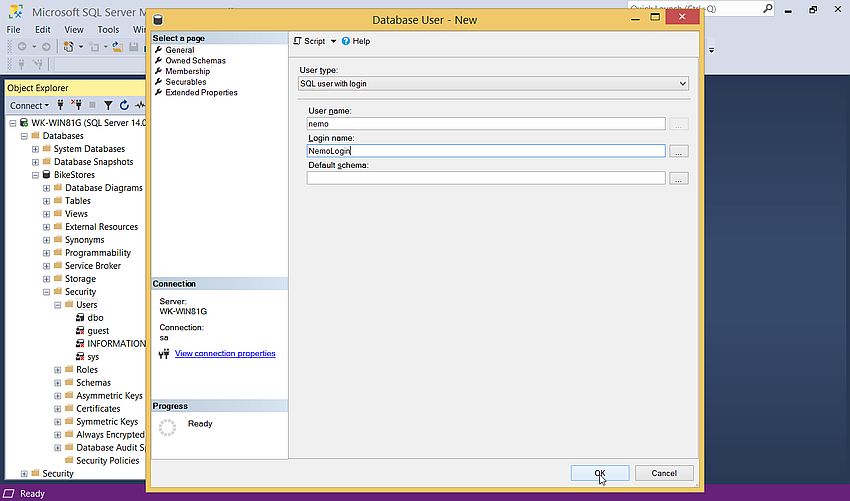
Then, in the left pane, navigate to the group Databases > BikeStores > Security, right-click on Users, and from
the opening context menu, choose New User. In the Database User - New window, set the user type to
SQL user with login, the user name to "nemo", and the login name to NemoLogin.
|
| |
|
| |
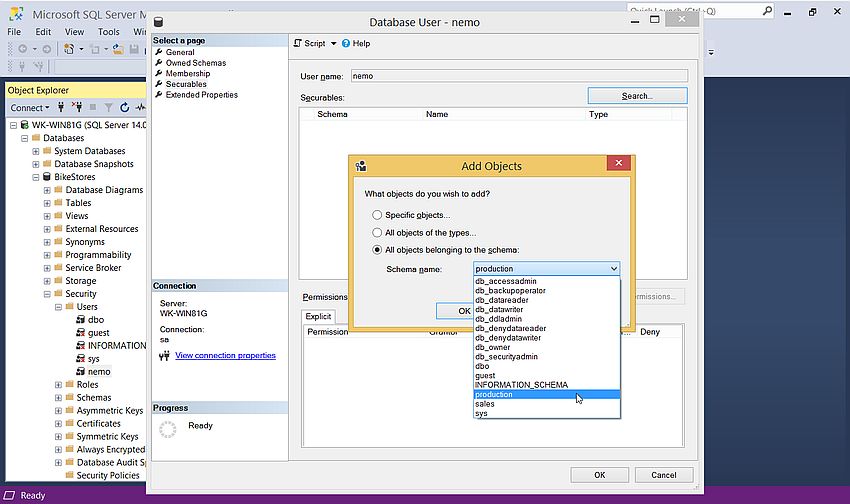
We now define the securables for user "nemo". In the Database User - New window, use the Search button to
display the Add Objects dialog box. Select the All objects belonging to the schema radiobutton. From the schema
list, add the two schema "production" and "sales".
|
| |
|
| |
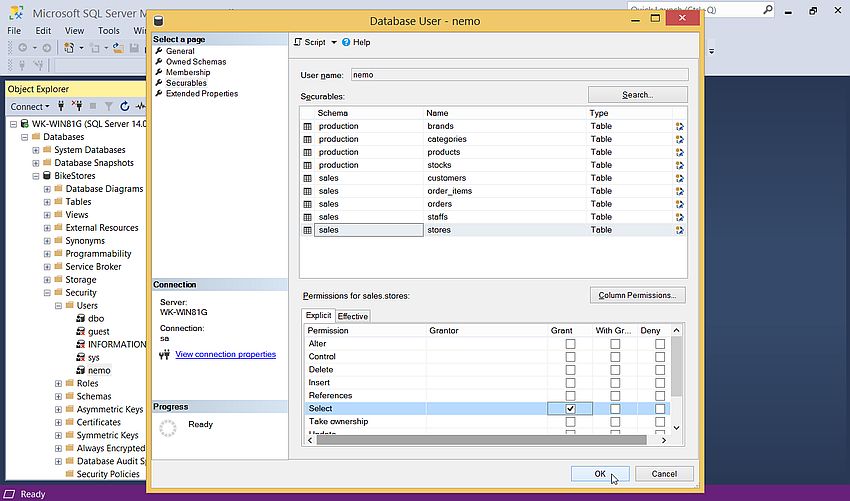
And finally, for all tables of the schema "production" and "sales", set the Select permission.
|
| |
|
![SQL Server web installer: Download the installation media [1] SQL Server web installer: Download the installation media [1]](../screenshots/webdb_mssql1.jpg)
![SQL Server web installer: Download the installation media [2] SQL Server web installer: Download the installation media [2]](../screenshots/webdb_mssql2.jpg)
![SQL Server installation: Checking the system configuration [1] SQL Server installation: Checking the system configuration [1]](../screenshots/webdb_mssql3a.jpg)
![SQL Server installation: Checking the system configuration [2] SQL Server installation: Checking the system configuration [2]](../screenshots/webdb_mssql3b.jpg)
