Setting up a local website using Turnkey Linux LAMP Stack.
"Turnkey GNU/Linux is a popular Debian/GNU Linux based library of open source system images that helps you save time and money by pre-integrating and polishing up the best open source software into ready-to-use solutions that are secure, well supported and easy to maintain. TurnKey automatically updates itself daily with security fixes and is built in a transparent 100% open source process that is free of hidden back-doors, restrictive licensing or proprietary secret sauce. Standard features include 1-click backup/restore & migrate, a web control panel and out-of-the-box system monitoring with optional email alerts."
The paragraph above is how Turnkey Linux is described at Amazon Marketplace. In other words: Turnkey Linux are a series of Linux distributions, built for a specific purpose and supposed to fully work out-of-the-box.
"Turnkey Linux LAMP Stack is a popular open source web platform commonly used to run dynamic web sites and servers. It includes Linux, Apache, MariaDB (MySQL drop-in replacement), and PHP/Python/Perl. It is considered by many, as the platform of choice for development and deployment of high performance web applications which require a solid and reliable foundation."
This is how Turnkey Linux LAMP Stack is described on the corresponding page at turnkeylinux.org, where you can download the CD ISO.
This tutorial is about the installation and usage of Turnkey Linux LAMP Stack v18.0 on a VMware Workstation 16 virtual machine, running on Windows 10. It should apply to the installation on other virtualization platforms, as well as on a physical machine, too.
Note: If you prefer PostgreSQL over MySQL/MariaDB, you can use Turnkey Linux LAPP Stack instead.
If you are familiar with installing Linux operating systems, the installation of Turnkey Linux should not be a big deal. I actually encountered three problems:
- I did not succeed to boot the CD in UEFI mode. Is it possible that Turnkey Linux requires the legacy BIOS boot method?
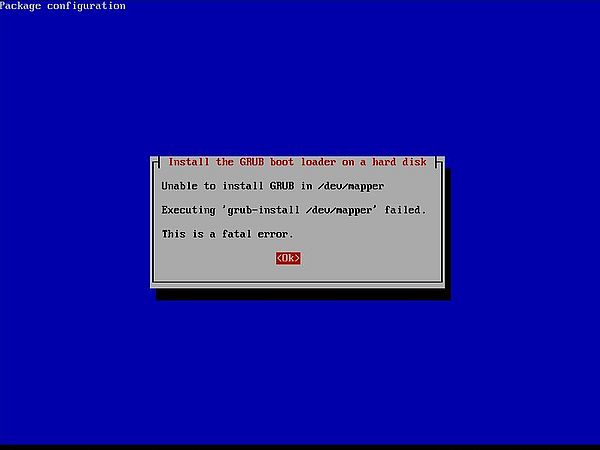
- Trying to use LVM, I did not succeed to install GRUB. None of the proposed choices worked. You probably have to enter a custom device where to put the boot loader. The easiest way to avoid problems is not to use LVM.
- I did not succeed to install the German keyboard. I admit that I did not really try hard to solve this problem. As I know where the different keys are located on the US keyboard, I simply let all as is by default.
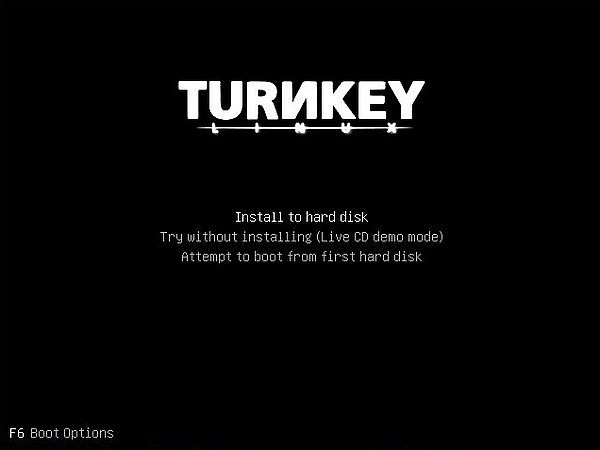
The Turnkey Linux CD boots up displaying a boot menu, where the first option is: Install to hard disk.
|
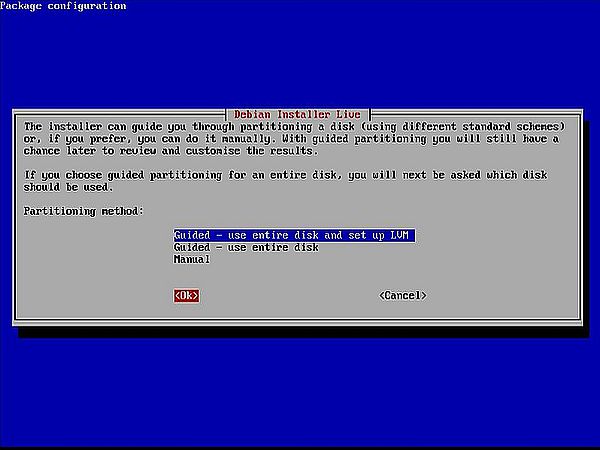
The following screenshots show the installation failure with LVM. On the left, the selection of setting up LVM, on the right the fatal error when trying to install GRUB to /dev/sda. To note that after the partitioning method having been chosen (and before the device for the boot loader has to be chosen), the disk partitions are created and the system is actually installed.
|
|
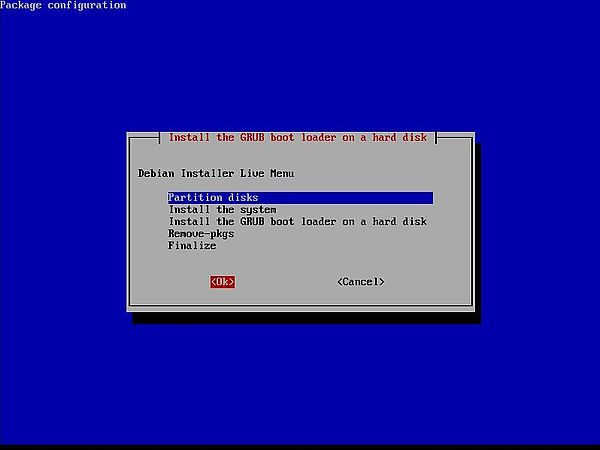
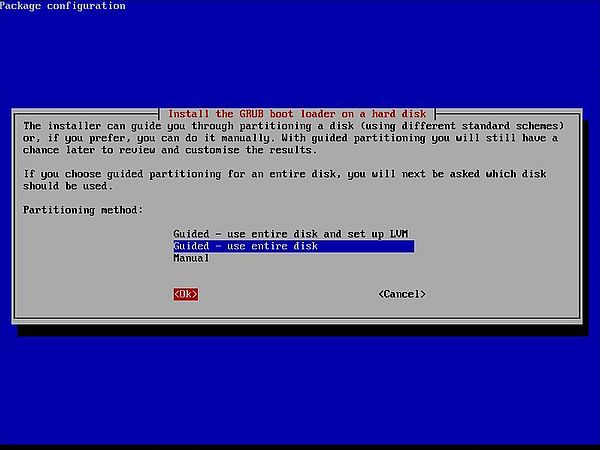
After the failure with LVM, a menu with the remaining tasks is displayed (I think that if you immediately choose an installation without LVM, you will not get this menu). Choose the Partition disks option (screenshot on the left). Then, on the next screen, choose Guided – Use entire disk as partitioning method (screenshot on the right).
|
|
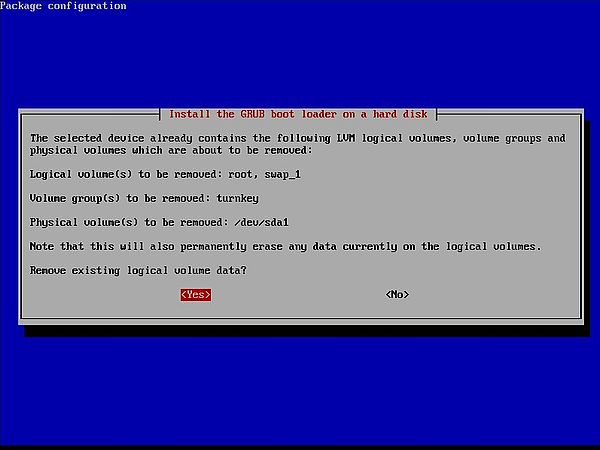
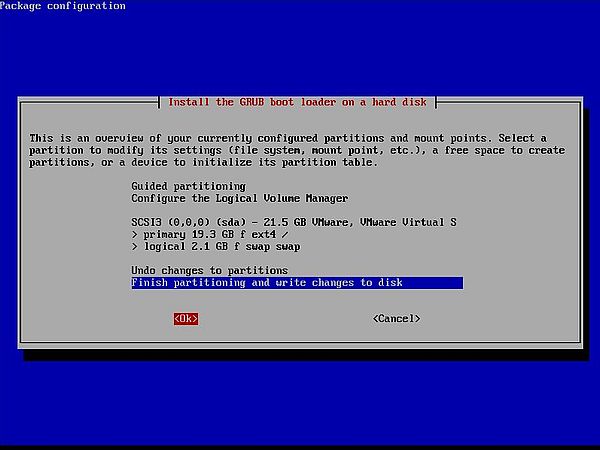
After the failed attempt with LVM, the harddisk is not empty, and before creating the DOS partitions, all LVM related volumes will have to be removed (screenshot on the left). Then the DOS partitions can be created, by default an ext4 partition that on the new system will be mounted as /, and a swap partition (screenshot on the right).
|
|
After confirmation, the new partitions will be created. Back to the Debian Installer Live Menu, select Install the system. This will launch file copy from the CDROM to the harddisk.
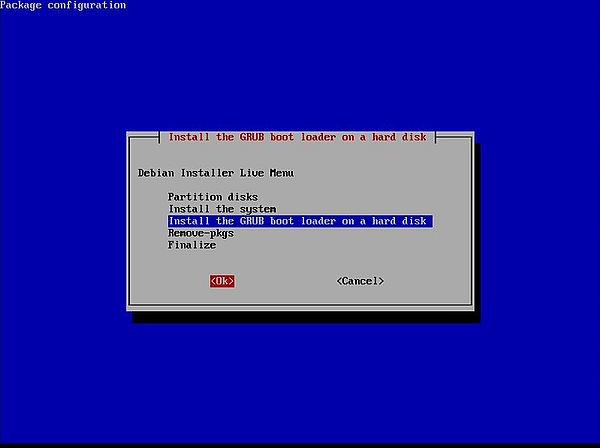
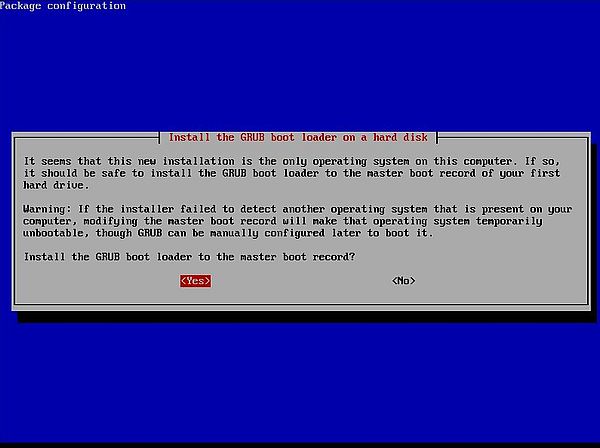
Now, from the Debian Installer Live Menu, select Install the GRUB boot loader on a harddisk (screenshot on the left). By default, the boot loader is installed into the MBR (screenshot on the right).
|
|
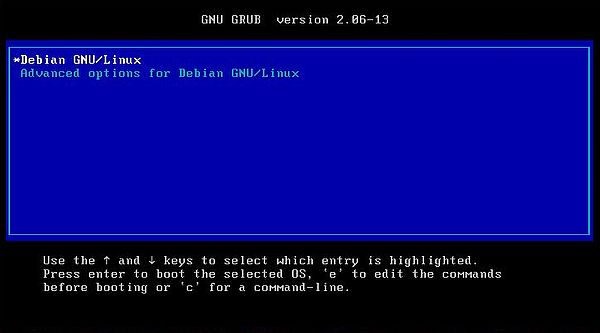
To terminate installation, from the Debian Installer Live Menu, select Remove-pkgs (to remove the Live CD packages), and then Finalize. When done, reboot the computer. The screenshot shows the boot menu of the new system.
|
When booting for the first time, you are asked for the root password, as well as for the password for the MySQL user "adminer". Then you are asked to initialize Hub services (Turnkey Backup and Migration; Turnkey Domain Management and Dynamic DNS), to configure system notifications per email, and to perform a system update. I skipped all those...
Finally, the login screen is displayed. Sign in as root, using the password that you created before.

|
When logging in for the first time, an initialization/configuration script is launched. It starts with the error message Network is not yet configured.
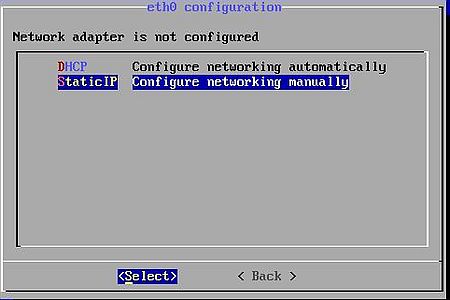
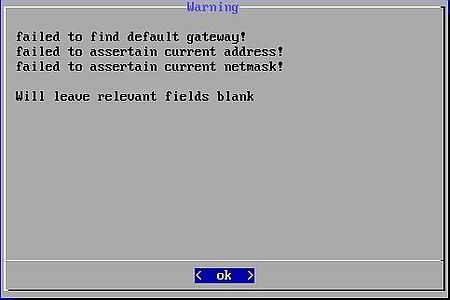
Network configuration is then automatically launched. If you have a DHCP server that leases the IP addresses to the computers on your local network, you have to choose to configure the network adapter with DHCP. In my case, the Turnkey Linux machine being located in the DMZ, that is not served by the DHCP server on my IPFire firewall/router machine, I chose to configure networking manually (screenshot on the left). Just ignore the warnings on the next screen; they are displayed because there haven't yet been any configuration settings entered (screenshot on the right).
|
|
On the next screen, you can enter the computer's IP address, the netmask, the default gateway, and the DNS server(s). In my case, the default gateway and the DNS server IP are both the address of my IPFire machine (screenshot on the left). Selecting Apply brings you back to the network card configuration screen, where the manual settings are now filled in. Select Back to go to the main configuration menu (screenshot on the right).
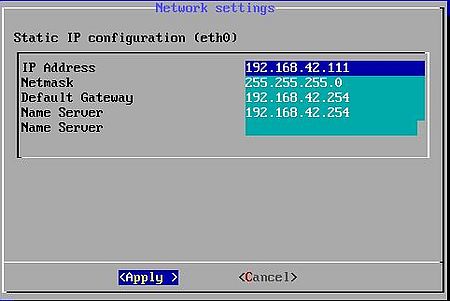
|
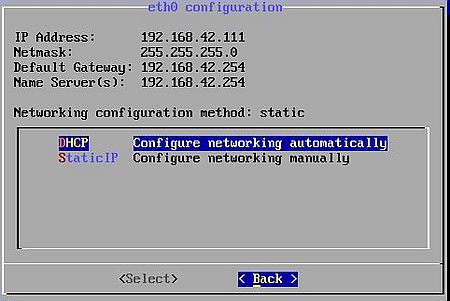
|
After having pushed the Back button, you return to the Advanced Menu screen, where you can select several other settings to be changed.
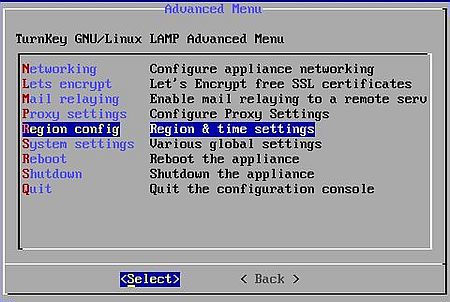
|
The Region and time settings group contains 3 items that you can change: 1. the keyboard (as I said, I failed to do so); 2. the locale (as they highly recommend to choose "None" as default locale, I did not make any changes); 3. the time zone (that I set to "Europe/Luxembourg").
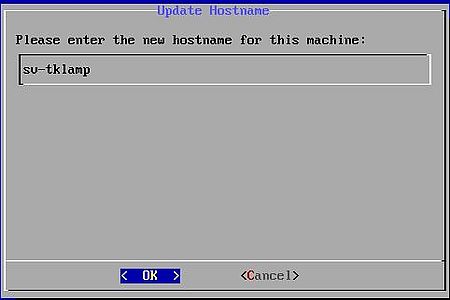
The Global system settings group contains 5 items (screenshot on the left). The only changes, that I did, was setting the hostname to "sv-tklamp" (screenshot on the right). Note that when doing this change, you are told that the network has to be restarted. In the corresponding window push the Yes button to do so.
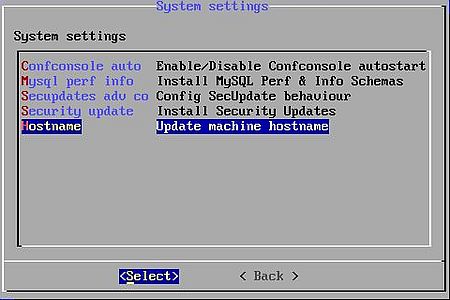
|
|
Back to the Advanced Menu screen, you can now choose to reboot the appliance..
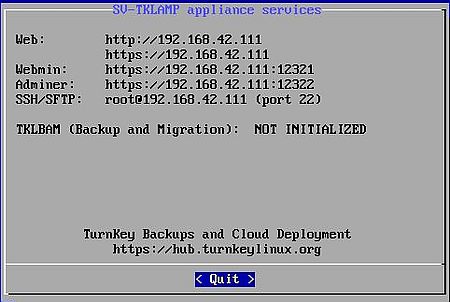
Before getting to the login screen, the IP address and ports of the services available on the appliance are displayed. On the screenshot below, note the IP address and the hostname, that I configured before.
|
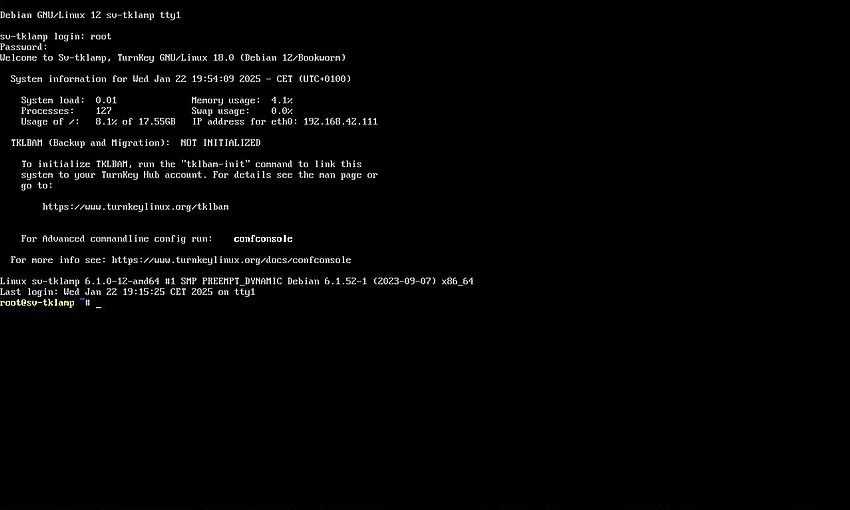
After login as root, you get into a root terminal. On the screenshot, you can see the actual time (with TZ set to CET, in my case), some system information, details about TKLBAM (backup and migration), and the note that you can run the script confconsole for further system configuration (this will bring up the Advanced Menu that we already had before).
|
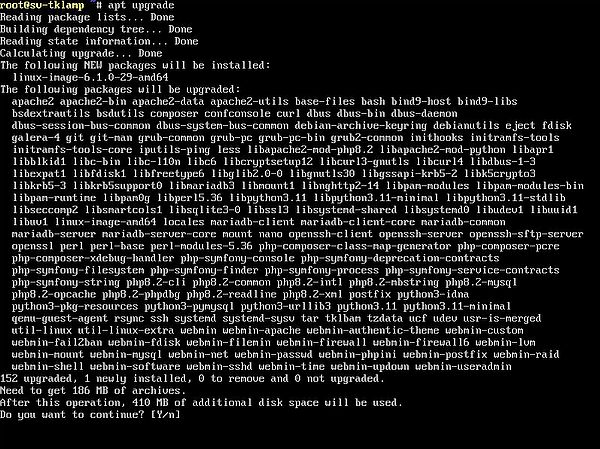
The Turnkey appliances normally update automatically. In my case, with no permanent Internet connection, I chose to do a manual system update.
Maybe, this should have been done using the update functionality of Turnkey itself (?). I did it using apt:
apt update
apt upgrade
|
Whereas there are some issues with the installation of Turnkey Linux, connection to the different services on the Lamp Stack appliance work out of the box.
The Lamp Stack website is running on standard port 80, so to connect to it, just enter the following in the address field of your web browser:
localhost
or, using your computer's DNS name (this supposes a DNS server being running on your local network), in my case:
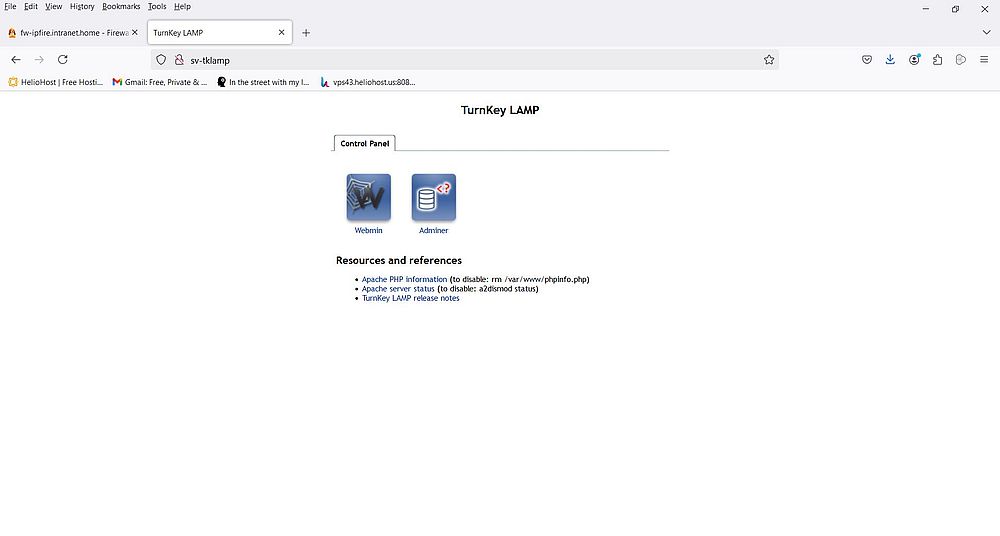
http://sv-tklamp
|
As you can see on the screenshot, the website index page contains links to the Webmin and Adminer web pages (cf. further down in the text), so you can start these features from here if you like.
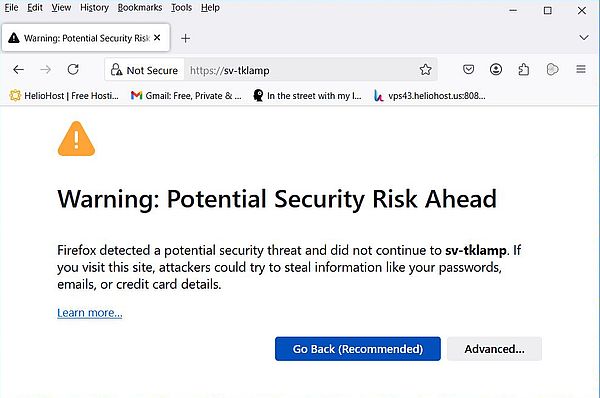
To connect to the Lamp Stack website using HTTPS (the server listens on standard port 443 for secure connections), use the following address:
https://localhost
Don't be afraid if your web browser issues a warning that there is a potential security risk when accessing the site. This is not because Turnkey Linux is contaminated with some malware, but simple because the SSL certificate is not signed by a recognized authority (but self-signed by the web server). In Firefox, click the Advanced... button, and confirm that you accept the risk and want to go to the website despite the warning.
|
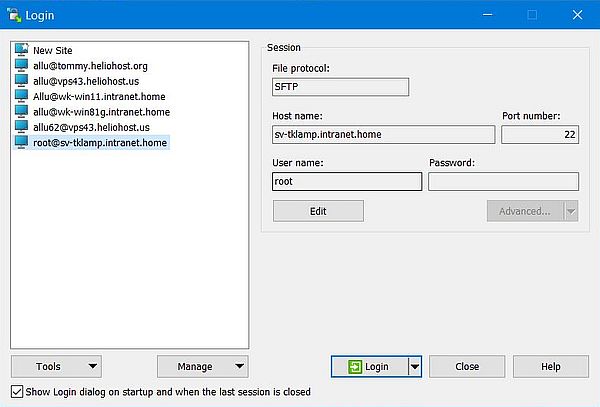
The Lamp Stack FTP server uses the secure SFTP protocol, listening on standard port 22. The screenshot shows the configuration of the connection to my Turnkey Linux in WinSCP. The information to enter for this connection are as follows: Server protocol: SFTP; hostname: localhost (I used the full DNS name of my Turnkey Linux machine instead); port: 22; user: root; password: the root password that you configured during the installation of Turnkey Linux (if you let the input field empty, you will be asked for the password when connecting).
|
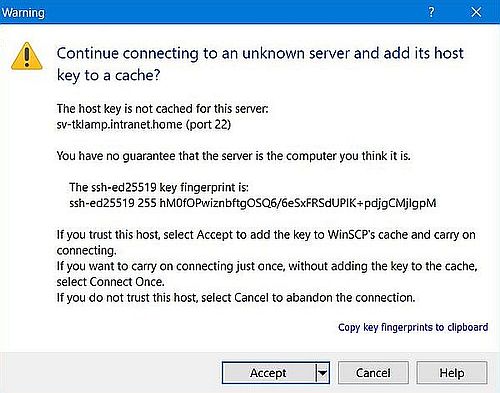
As with HTTPS, you'll get a security warning because of the self signed certificate (warning that you can safely ignore).
|
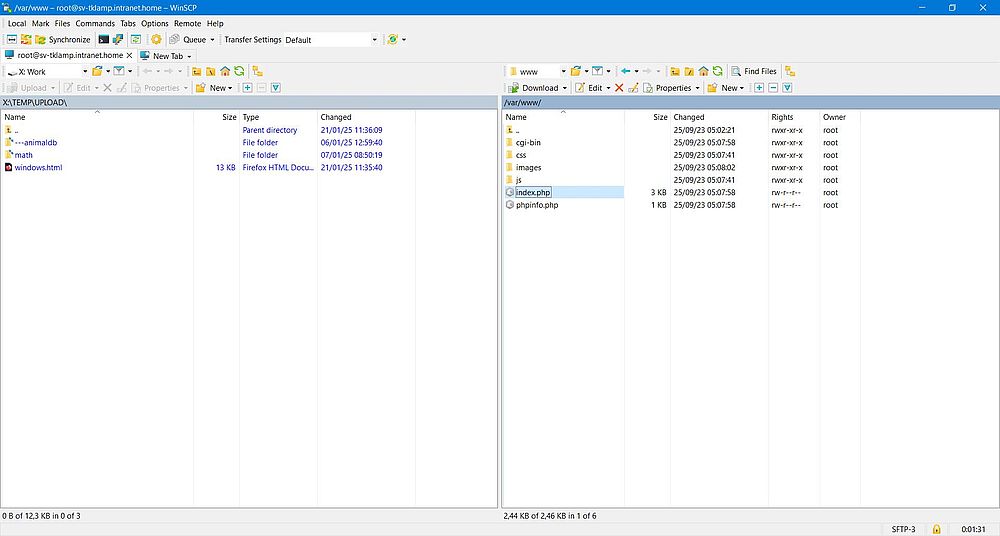
The screenshot below shows the content of the directory /var/www, that is actually the root of the web server. Note the file index.php that generates the web page that we saw before in the browser when connecting to the Turnkey Linux website.
|
Note: Be careful when uploading and overriding, or deleting files on your Turnkey Linux. As you are connected as root, you are like a god who has the right to do whatever he wants. And there is no recycle bin, from where you can restore a file that you accidentally destroyed!
The web administration software Webmin uses the HTTPS protocol and runs on port 12321, thus to connect to it, you
have to enter the following in the address field of the web browser:
https://localhost:12321
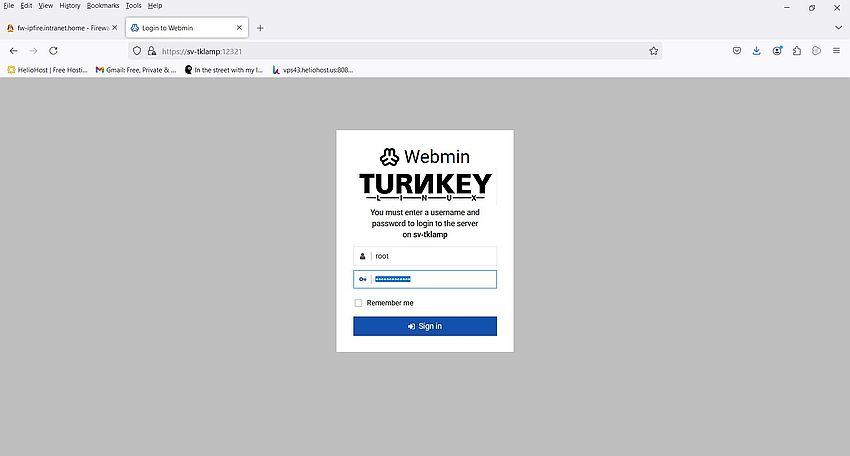
The Webmin pages are password protected and you have to login as root, using the password of the Linux user root, as configured when installing Turnkey Linux.
|
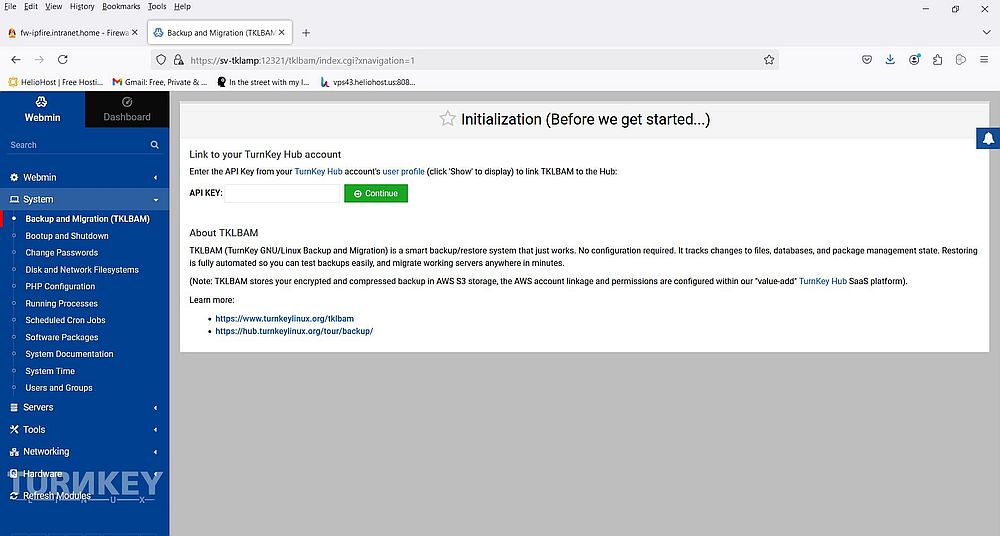
The screenshot below shows the Webmin home page.
|
Webmin is huge and amazing; more features than Hestia CP that I use on my real world VPS, where streetinfo.lu is running on... Configuration of the different servers, file manager, file up- and download, network and iptables configuration, installation of new packages, and (important to know), the possibility to change the password of MariaDB user "adminer" are some examples of what you can do with the software.
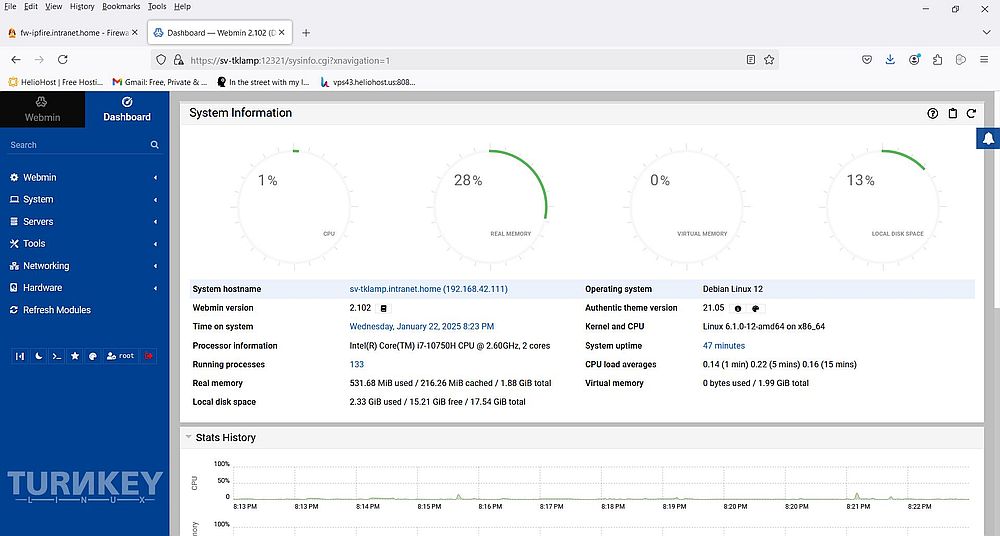
The screenshot below shows the system configuration of my Lamp Stack VMware Workstation 16 virtual machine.
|
The web interface also allows to configure Webmin itself. That looks nice, isn't it?
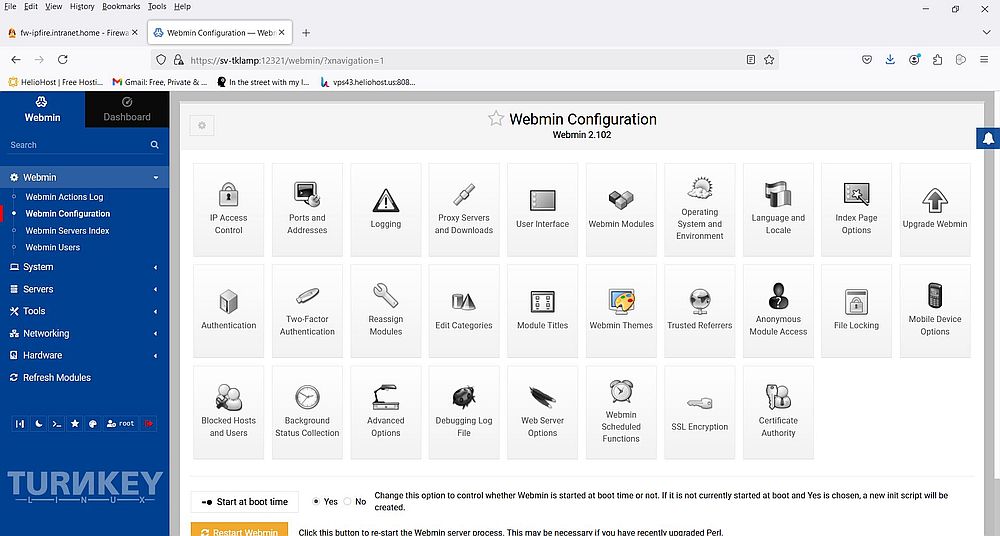
|
If you use a web interface to administer your MySQL/MariaDB database, you probably use phpMyAdmin, so do not the Turnkey Linux appliances,
that use a software called Adminer. Adminer uses the HTTPS protocol and runs on port
12322, so to connect to the database server, you have to enter the following into your browser's address field:
https://localhost:12322
The Adminer pages are protected by a password, or more correctly, you have to connect as a registered database user in order to access the server, or some given database(s) on the server. The MySQL "root" user is called adminer, and his password is the one that you configured when installing Turnkey Linux. Note, that Linux user root cannot connect to the database server, as he is not registered as database user (this does not mean that root isn't a god, because, as I mentioned above, he can change the password for adminer using Webmin). The screenshot shows the Adminer login page.
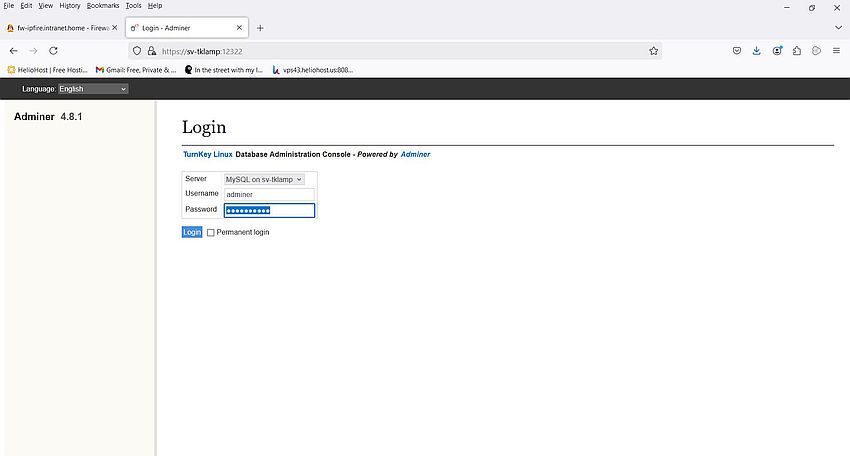
|
Adminer is similar to other database administration software. You can create and alter databases and tables, add indices, run SELECT queries, define the privileges of a given user on all databases, or a given database. The screenshot shows the page that is displayed after login. It shows the databases actually hosted on the server. From the menu at the top at the page, you can select other tasks: creating a new database, edit privileges, view the process list, the MySQL environment variables, or the server status. In the left pane, you can import SQL queries, or export database records.
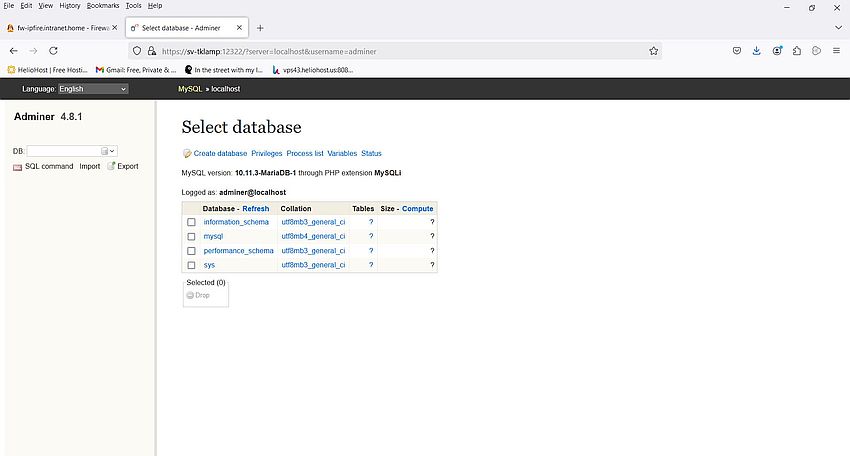
|
Not only connection to the different services works out of the box, but also scripting using PHP, Perl and Python, including the connection to MariaDB.
The web site home page index file actually is a PHP script, thus we already successfully tried PHP. The root directory of the web server contains another PHP
script, called phpinfo.php. To run it, enter the following into your browser's address field:
localhost/phpinfo.php
We also used already PHP to connect to MariaDB, when running Adminer. Here is the code of another simple PHP script (I called it mysql.php),
that displays the number of help categories in the "mysql" database.
<html>
<head>
<title>PHP-MySQL test</title>
</head>
<body><p>
<?php
$host= '127.0.0.1'; $database='mysql'; $user = 'adminer'; $passwd = 'password';
$mysqli = new mysqli($host, $user, $passwd, $database);
$sql = "SELECT count(*) AS _count FROM help_category";
$uresult = $mysqli->query($sql, MYSQLI_USE_RESULT);
$count = 0;
if ($uresult) {
$row = $uresult->fetch_assoc(); $count = $row['_count'];
}
echo "Number of help categories in database 'mysql' = $count";
?>
</p></body>
</html>
Place the script in the root directory of the server server (you can, for example upload it using FTP), and run it:
localhost/mysql.php
The screenshot shows the script output.

|
Concerning Perl and Python, I wrote 4 simple scripts called hello-perl.cgi, mysql-perl.cgi, hello-python.cgi, and mysql-python.cgi (you can use the extensions .pl and .py instead of .cgi, if you prefer) and used WinSCP to upload them to the cgi-bin directory of the web server.
Important notes:
- Be sure that the end-of-line character is LF (and not CR,LF as is on Windows). If you use the text editor Notepad++, for example, you can change this setting using the menu command Edit > Convert EOL > Unix (LF).
- You have to make the scripts executable in order to run them. This can, for example, be done in WinSCP, selecting the 3 "X" checkboxes.
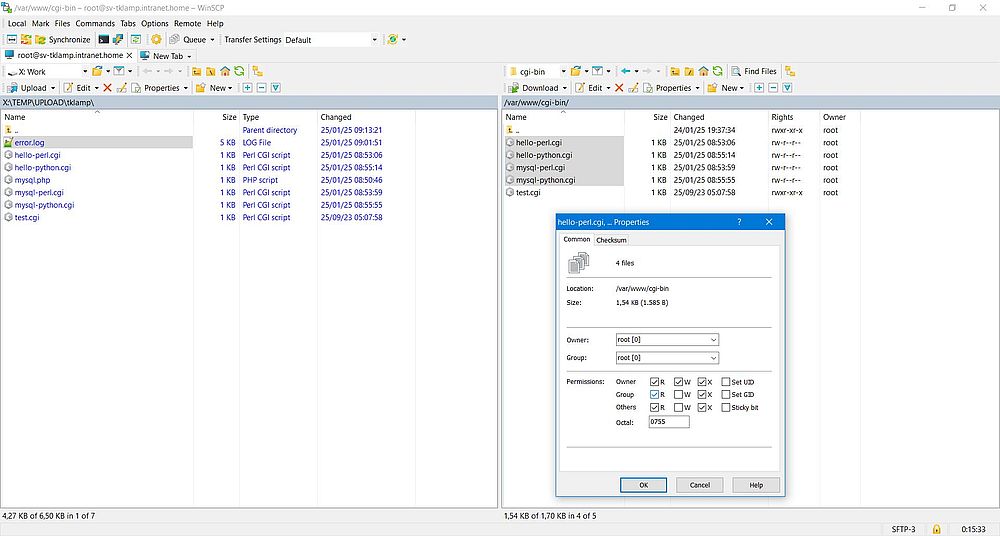
|
Here is the code of my hello-perl.cgi script:
#!/usr/bin/perl
use strict; use warnings;
print "Content-type: text/html\n\n";
print "<html>";
print "<head><title>Perl CGI test</title></head>";
print "<body><h1>Hello from Perl!</h1></body>";
print "</html>";
To run it, enter the following in the address field of your web browser:
localhost/cgi-bin/hello-perl.cgi
The screenshot shows the script output.

|
If, for some reason, your script results in an internal server error, you will not get an error specific message displayed. To see what is wrong, you'll have to view the Apache error log. It is located at /var/log/apache2. I guess that you can view it in Webmin. Another possibility is to download it using your FTP client.
Important note:
The Turnkey Linux appliances are distributed without CGI.pm installed, thus if you try to
use CGI, you'll get an error 500. CGI.pm is considered being obsolete by lots of people (on the other hand, the most recent release of Strawberry
Perl for Windows still includes the module), and has been removed from Perl's core years ago. Normally, if it is missing, and you want to use it, you can install it from
CPAN. This failed however on my Turnkey Linux Lamp Stack. Thus, if you want to use Perl scripts that read form data, you'll have to use some other way to retrieve the data
from the HTML form that "calls" the script.
Here is the code of my mysql-perl.cgi script, that displays the number of help categories in the "mysql" database (the output is the same as for mysql.php):
#!/usr/bin/perl
use strict; use warnings;
use DBI;
my $database='mysql'; my $username = 'adminer'; my $passwd = 'password';
print "Content-type: text/html\n\n";
my $dbh = DBI->connect("dbi:mysql:database=$database", $username, $passwd, { AutoCommit => 1, RaiseError => 1 })
or die "Failed to connect to database: $DBI::errstr";
my $sql = "SELECT count(*) FROM help_category";
my ($count) = $dbh->selectrow_array($sql);
print "<html>";
print "<head><title>Perl-MySQL test</title></head>";
print "<body><p>Number of help categories in database 'mysql' = $count</p></body>";
print "</html>";
$dbh->disconnect();
Finally, here is the code of my Python scripts hello-python.cgi and mysql-python.cgi.
#!/usr/bin/python3
print("Content-type: text/html")
print()
print("<html>")
print("<head><title>Python test</title></head>")
print("<body>")
print("<h1>Hello World!</h1>")
print("</body>")
print("</html>")
#!/usr/bin/python3
import pymysql
print("Content-type: text/html")
print()
print("<html>")
print("<head><title>Python MySQL test</title></head>")
print("<body>")
db = pymysql.connect(host='localhost', user='adminer', password='password', db='mysql')
cursor = db.cursor()
cursor.execute("SELECT count(*) FROM help_category")
count = cursor.fetchone()[0]
print("<p>Number of help categories in database 'mysql' = ", count, "</p>")
print("</body>")
print("</html>")
db.close()
And to terminate the tutorial, a very important hint: In all these CGI scripts, it is mandatory that "Content-type: text/html" is followed by an empty line!
If you find this text helpful, please, support me and this website by signing my guestbook.