Solaris 10 post-installation configuration.
Solaris 10 installs rather easily on VMware Workstation. As a difference with most Linux distributions, the clock shows the correct time without manual intervention. And the keyboard layout, defined during the installation, is correctly available on the login screen, in desktop applications (like the text editor) and in the terminal (all keys on my German keyboard producing the character that they should). However, there are several important configuration tasks to perform after the system setup has finished:
- Change the screen resolution.
- Set a hostname.
- Create a regular user.
- Install VMware tools.
- Run system update.
Changing the screen resolution.
The default screen resolution on Solaris operating systems is rather unusual, the desktop appearing so high, that it doesn't even fit in the window of my virtual machine. Anyway, I change the screen resolution on all my VMs, setting it to 1440×900 pixels (unless this is not possible for a given OS); this corresponds to a VM screen that best fits on my laptop screen.
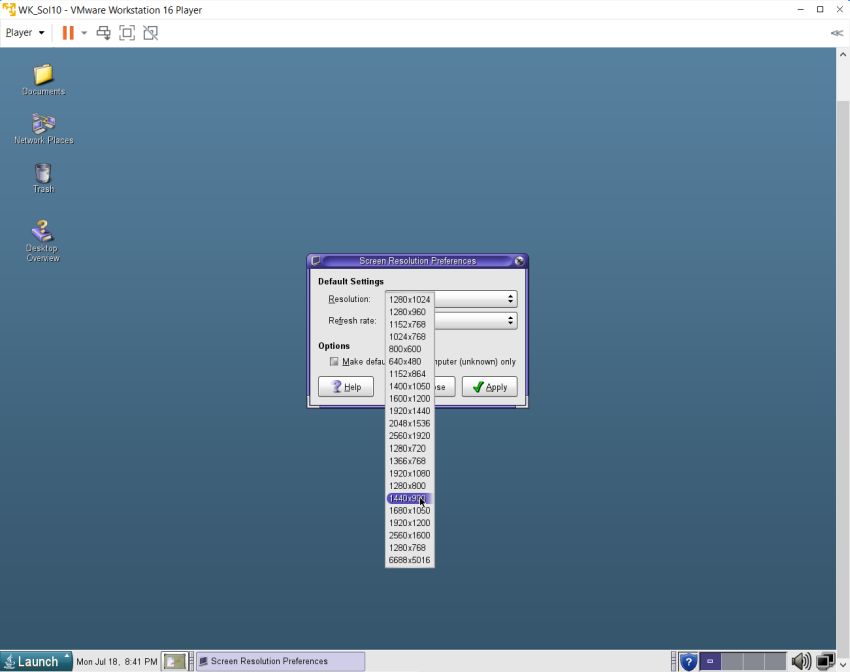
To change the screen resolution in Solaris 10, from the Launch menu, choose Preferences > Desktop Preferences > Display > Screen Resolution. Then, in the Screen Resolution Preferences window, choose the resolution that you want from the list (as I said, 1440×900 in my case); let the refresh rate be filled in automatically. I don't know, if you should also check the Make default for this computer (unknown) only checkbox; I did select it.
The screenshot below shows how I changed the screen resolution in my Solaris 10 VMware virtual machine. As you can see, I had to scroll down in the VM window to view and access the Launch button, situated at the bottom of the Solaris desktop.
 |
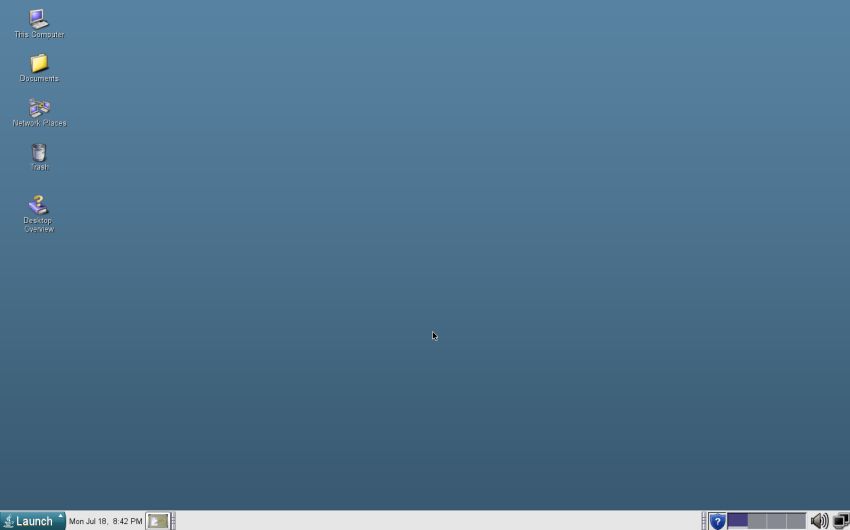
The following screenshot shows the Solaris 10 desktop after the new screen resolution has been applied. The desktop now fits well in the VM window, and on the screen of my laptop.
 |
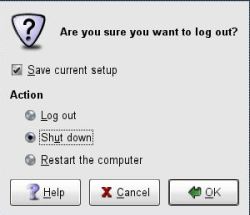
As with lots of Linux distributions, the screen resolution settings will be reset to their defaults when rebooting. No, this is not entirely true: it may be reset to its defaults. In fact, you can prevent the settings from being reset by a reboot or a power-off/power-on of your machine. Just select the Save current setup checkbox in the logout dialog box.
 |
Setting a hostname.
The uncommon default screen height is not the only "bizarre" thing with Solaris 10. Another one is that the installation program asks well for the domain name, but not for the host name! Thus, when the installation of the system is finished, the hostname is set to "unknown". Of course, it is not mandatory to set a "real" hostname, but I think that this is something that should be done.
I changed the hostname (actually to "wk-sol10"), following the instructions that I had found in some Internet forum. It's possible that there is a simpler way; it's certain that if you follow the way I did it, the changes will be permanent, i.e. will not be reset when rebooting.
First, create the file /etc/nodename and enter the new hostname (screenshot on the left). Then, edit the file /etc/hosts, and replace "unknown" by the new hostname (screenshot on the right).
![Solaris 10 configuration: Setting the hostname [1] Solaris 10 configuration: Setting the hostname [1]](../screenshots/solaris10_postinstall3a.jpg)
|
![Solaris 10 configuration: Setting the hostname [2] Solaris 10 configuration: Setting the hostname [2]](../screenshots/solaris10_postinstall3b.jpg)
|
Finally, you have to add the new hostname to the file /etc/hostname.<interface-name>, where <interface-name> is the name used by Solaris to reference your network adapter. The name depends on the hardware of your machine. There are chances that it is called e1000g0 (as in my case), or hme0, or bge0. To find the file, scroll down in the text editor's "Open" dialog box, until you find a file with a name that starts with "hostname" (screenshot on the left). In this file, simply enter the new hostname (screenshot on the right).
![Solaris 10 configuration: Setting the hostname [3] Solaris 10 configuration: Setting the hostname [3]](../screenshots/solaris10_postinstall4a.jpg)
|
![Solaris 10 configuration: Setting the hostname [4] Solaris 10 configuration: Setting the hostname [4]](../screenshots/solaris10_postinstall4b.jpg)
|
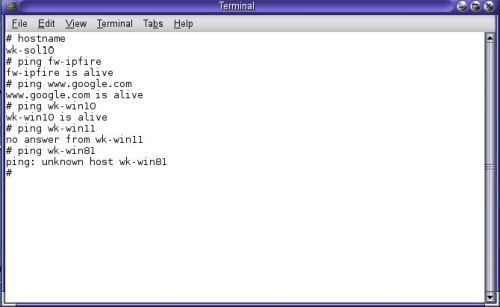
After having made these changes, we'll have to reboot the computer. Then, opening a terminal, and typing hostname should return the hostname that we set in the 3 files. The screenshot below shows the hostname on my system ("wk-sol10"). It also shows, how I tested network connectivity using the ping command. The Solaris setup program configures DHCP by default, and even if there isn't a DHCP server found at that moment. Thus, if your local network includes a DHCP and a DNS server, pinging the local (and Internet) computers by their name should work out of the box. Note, that on the screenshot, "fw-ipfire" is my router/firewall machine (that actually runs the DHCP and DNS server), "wk-win10" is my Windows laptop, on which VMware Workstation is running, "wk-win11" is a Windows 11 machine, that is not running at the moment of the ping, and "wk-win81" is a computer not defined in the hosts settings of IPFire. Also note that I used the short computer names in my ping command. Remember: The Solaris setup program asks for the domain name ("intranet.home" in my case), which is automatically added to the URL suffixes list.
 |
Adding a user.
Another "bizarre" thing with the Solaris setup program is that we are not asked to create a user. Thus, we start our new Solaris installation as root, and the creation of a standard user has to be done manually. Here again, I followed the instructions found in some forum. There may be a simpler way to proceed; on the other hand, if you do the way I did, the creation of a user and their home directory should succeed, and you should be able to log in as this user after having rebooted the computer. Note, that user "allu" can become super-user in a terminal by running the command su and entering the root password.
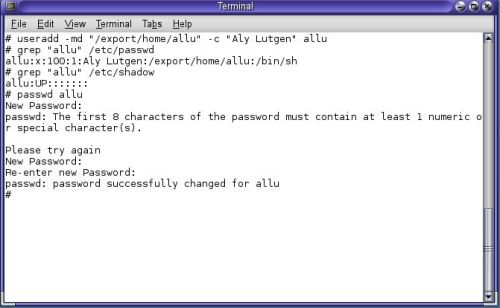
To create user "allu", with home directory /home/allu, and all defaults (-c "Aly Lutgen" adds my full name as comment), run the following
commands in a terminal:
useradd -md "/export/home/allu" -c "Aly Lutgen" allu
grep "allu" /etc/passwd
grep "allu" /etc/shadow
passwd allu
the last command being used to set allu's password.
 |
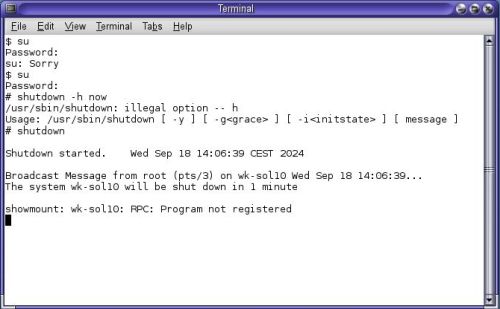
Note: I failed to shutdown the computer when being logged-in as "allu". The logout dialog box of "allu" does not include any buttons to shutdown or reboot the computer (as does the one of root). I tried to do so in a terminal as root, using the shutdown command. However, this command failed with the error message showmount wk-sol10 RPC: Program not registered. I did not further investigate this problem. A work-around (annoying, but working) is to reboot, login as root, and shutting down the system from root's logout dialog box.
 |
Installing VMware Tools.
As the machine runs properly (in particular the screen resolution being what I want), I did not yet try to install them...
Running system update.
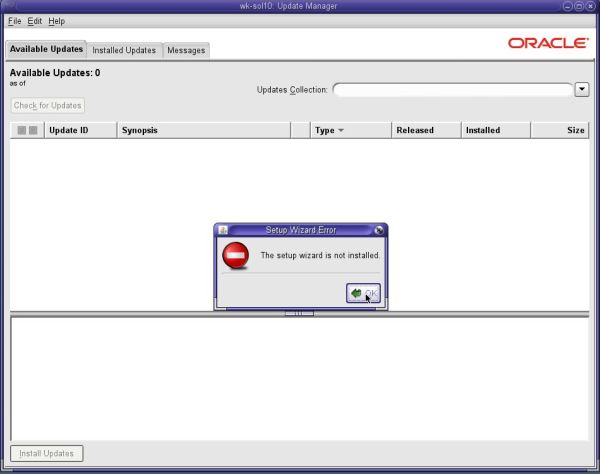
Trying to run the graphical Update Manager fails with the error message The setup wizard is not installed. Probably, updating from the command line would be the best way to proceed. I say "probably", because I did not yet try it out...
 |
If you find this text helpful, please, support me and this website by signing my guestbook.