Installing Internet Information Server (IIS) on Windows XP.
Internet Information Server (IIS) consists of several applications in relationship with Internet publishing; in some sense you can say that it is the Microsoft HTTP/FTP/SMTP server solution for Windows. IIS is included with Windows XP; possibly that this is only the case for the Professional Edition (so, IIS will, possibly, not work on Windows XP Home). The tutorial is about the installation and configuration of IIS 5.1 on Windows XP Pro, 32-bit (running as a virtual machine on VMware Workstation 16).
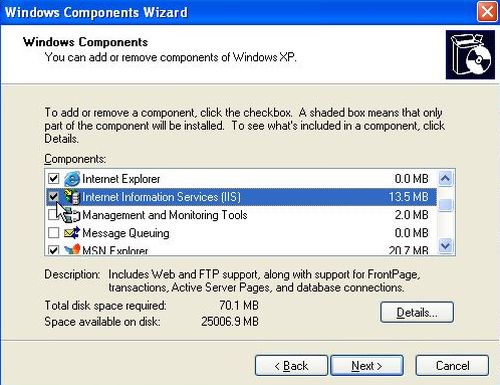
IIS is not installed by default. To do so, open Control Panel > Add or Remove Programs. In the corresponding window (that you normally use to uninstall some application), click the Add/Remove Windows Components.
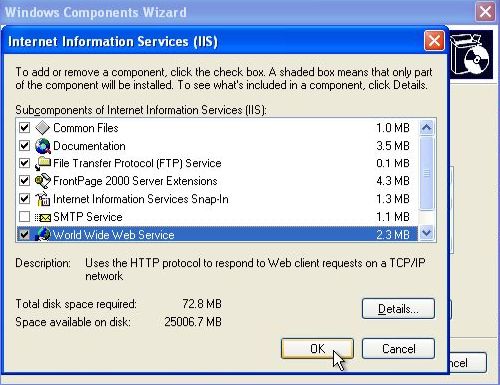
In the opening Windows Components window, select Internet Information Server (IIS) (screenshot on the left). Click the Details button, to make a more detailed selection of which components to install (screenshot on the right).
|
|
As you can see on the screenshot, I selected all components, except the mail server. If you don't want to set up FTP, you can also let this service unselected.
Back in the Windows Components window, click the Next button to continue setup.
Setup needs some files that haven't been copied to the harddisk, so asks for the CD. In my case, the CD was referenced as "Windows XP Professional Service Pack 3" CD. I inserted the installation CD, that actually does include SP3. In the case where you installed an earlier version of Windows XP, and then only SP3, it might be the service pack CD that you'll have to mount (?).
Files are copied and setup should terminate with the message "You successfully completed the Windows Components Wizard".
You'll find the shortcut to launch the IIS Management Console (named "Internet Information Services") in Control Panel > Administrative Tools; I suggest do copy the shortcut onto the desktop. Also, the ISS Admin service has to be active in order to use the IIS servers. You can check if this is the case in Administrative Tools > Services; the service should be running by default after IIS installation and its startup mode should be set to "Automatic".
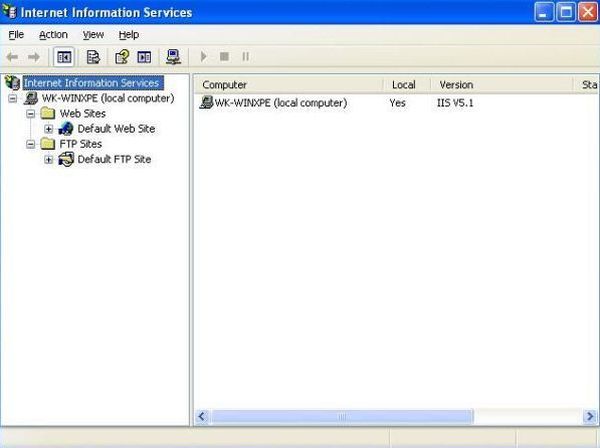
The screenshot below shows IIS as installed with the options that we chose above. On the local computer (called "wk-winxpe" in my case), there is one default server listed for both "Web Sites" and "FTP Sites".
|
Setting up IIS HTTP-server.
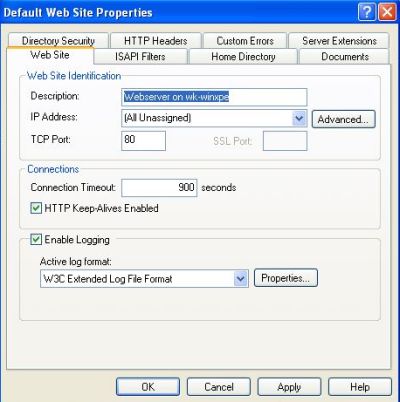
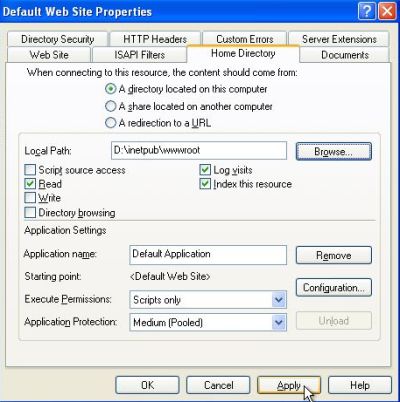
In IIS Management Console, right-click on Default Web Server and from the opening context menu, choose Properties. I did not have a closer look at all these configuration settings available, just checked some of them and adapted some others. On the Web Site tab, the default values listen on all assigned IP addresses and port 80 are adequate in most situations. However, if you want your web server be only accessible from the machine where it is running on, set the IP address to 127.0.0.1 (localhost). If you decide to use a port other than 80, you should choose one greater than 1024; remember that in this case, you'll have to specify the port as part of the address that you enter in your web browser. I let the defaults, my web server thus listening on port 80 on localhost as well as on the internal IP address of "wk-winxpe" (that is part of a local network and gets its IP from the DHCP server running on my IPFire firewall/router). All that I finally changed, is the description of the server (screenshot on the left). On the Home Directory tab, too, you can let all defaults. The default document root (corresponding to the "htdocs" directory on Apache) is C:\inetpub\wwwroot. I actually use a home directory with the same name, but on drive D: (screenshot on the right).
|
|
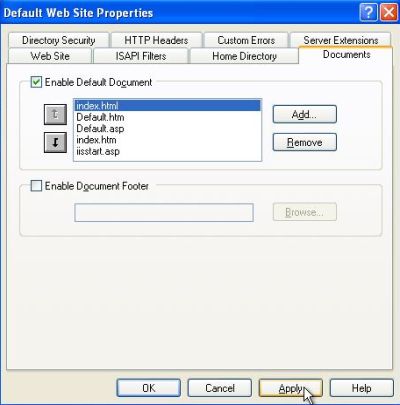
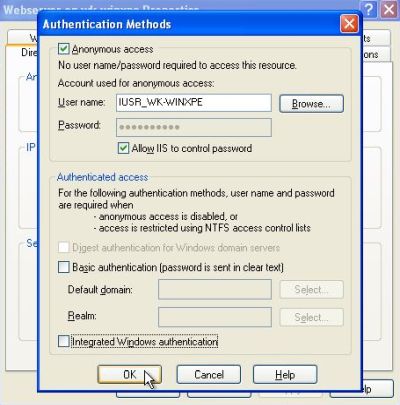
On the Documents tab, you choose the default documents, i.e. the files that are served if the browser address does not explicitly specify a file. I added the item index.html to the list and moved it at the first place (screenshot on the left). Finally, on the Directory Security tab, you can configure the authentication methods for your web server. The default setting, anonymous read access should be adequate in most situations. I think that you can unselect the "Integrated Windows authentication" check box, that is normally not needed (screenshot on the right).
|
|
Notes:
- Don't bother about the username and password mentioned in the configuration of the anonymous web server access. These are for internal use only; with the settings as they are, everyone can access the server (to view and download, but not to upload files) without having to enter a password.
- When applying the default document and authentication settings, I got a popup window entitled Inheritance Overrides, telling that some child nodes ("Printers", resp. "Printers" and "localstart.asp") also define the actually set value. I don't know what that is about (?). I chose to use the new value for all items, what was probably the wrong choice, as localstart.asp did not work when I tried out the access to my web server.
As I use a custom home directory (D:\inetpub\wwwroot), I moved the whole content of the original home directory to there. I also created a file named
index.html, with the content shown below, in D:\inetpub\wwwroot. As we had set this filename as first default document, it will be the content
of this file that will be displayed when we'll access the server root (cf. further down).
<html>
<head>
<title>Hello</title>
</head>
<body>
<h1><br/><br/><center>H E L L O W O R L D !</center></h1>
</body>
</html>
As I said above, my Windows XP machine is part of a local network with DHCP and DNS server. The machine is configured to get its IP from the DHCP server, and knows the IP of the DNS server to ask for URL resolution. The machine itself is registered at the DNS server as wk-winxpe.intranet.home. The domain name being automatically appended, we can access our IIS web server by entering http://wk-winxpe in the web browser address field. This should work from the Windows XP machine, but also from the other machines on this network (except, if there is a firewall application running on Windows XP that blocks the HTTP traffic). The screenshot shows our IIS website in Firefox on a Windows 10 machine.

|
Notes:
- If your local network hasn't a DNS server, you can use the IP address of the Windows XP machine instead of the machine's name. You can look it up by running the command ipconfig in Command Prompt.
- If your Windows XP isn't part of a local network, you can access the IIS web server by entering localhost in the web browser address field.
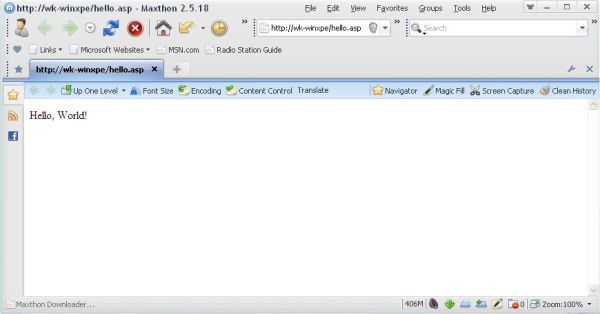
Active Server Pages (ASP) scripts can be run without any supplementary configuration. Here is the code of an elementary script:
<% Response.Write("Hello, World!") %>
The script being called hello.asp and placed into the IIS web server root, we can execute it in the web browser by entering http://wk-winxpe/hello.asp in the address field. The screenshot shows the result in the Maxthon web browser (on the Windows XP machine itself).
|
Setting up IIS FTP-server.
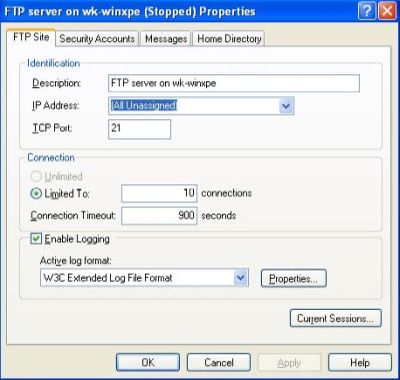
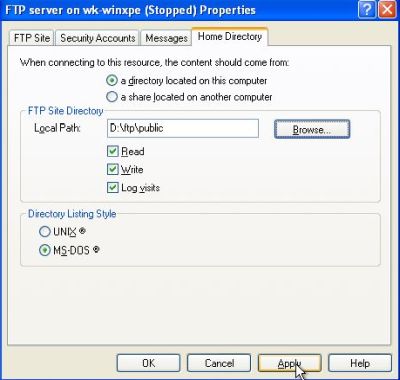
In IIS Management Console, right-click on Default FTP Server and from the opening context menu, choose Properties. As for the web server, I did not have a closer look at all these configuration settings available, just adapted some of them. On the FTP Site tab, the default values listen on all assigned IP addresses and port 21 are adequate in most situations. If you want the FTP server be only accessible from the machine where it is running on, set the IP address to 127.0.0.1 (localhost). If you decide to use a port other than 21, you should choose one greater than 1024; remember that in this case, you'll have to specify this port in your FTP client. I let the defaults, my FTP server thus listening on port 21 on localhost as well as on the internal IP address of "wk-winxpe" (that is part of a local network and gets its IP from the DHCP server running on my IPFire firewall/router). All that I finally changed, is the description of the server (screenshot on the left). On the Home Directory tab, too, you can let all defaults. The default FTP Site directory is C:\inetpub\ftproot. I actually use a FTP root directory on my D: drive: D:\ftp\public. Intended for download as well as for upload, I selected both the read and write checkboxes (screenshot on the right).
|
|
Note: Instead of using the home directory D:\ftp\public, it would have been more logical to simply use D:\ftp...
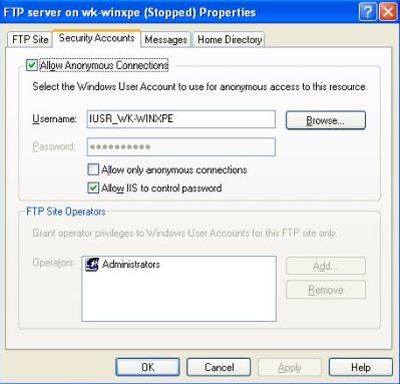
On the Security Accounts tab, you configure who can access your FTP server. The normal scenario is that you connect with your Windows XP user name and that you have to specify this user's password. The main Windows XP user being part of the Administrators group, and "Administrators" being set as FTP Site Operators, connecting with this account gives you full access to the files and folders on the FTP server (as we set the root directory to "read/write"). You can also allow anonymous access (you should not do this on an Internet server), which allows access without specifying a user name or password (the user name and password listed in the Security Accounts tab are for internal usage only). With the FTP root being readable and writable, the anonymous user can download all files, they can upload files, but they cannot alter, rename, or delete files created by regular users.
|
To connect to the IIS FTP server, you need a FTP client such as FileZilla or WinSCP. Here are the connection details:
- Host: the Windows XP computer network name (in my case: "wk-winxpe"), or if you connect from the local machine: localhost.
- File protocol: FTP (this is insecure, non encrypted file transfer).
- Port: 21 (the default port for insecure FTP).
- Username and password: either the Windows XP administrator user credentials, or let blank (resp. check "anonymous access").
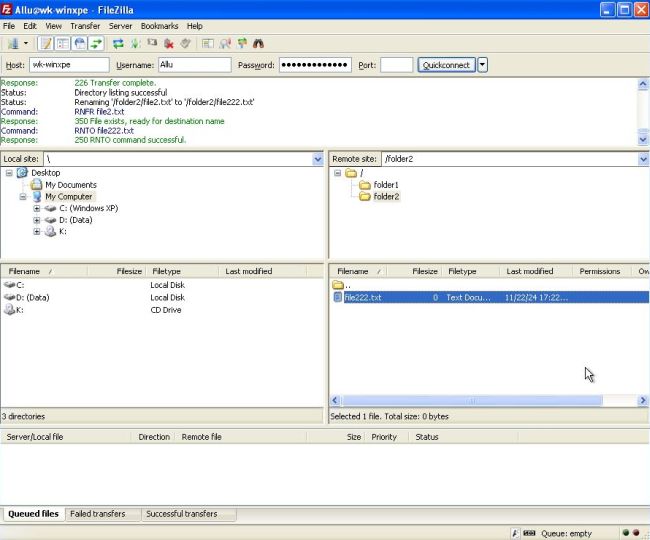
The screenshot below shows the access of the IIS FTP server by the regular Windows XP user "Allu" using the FileZilla FTP client (connection from the local machine). As you can see in the log, renaming the file "file2.txt" in folder "/folder2" to "file222.txt" was successfully done.
|
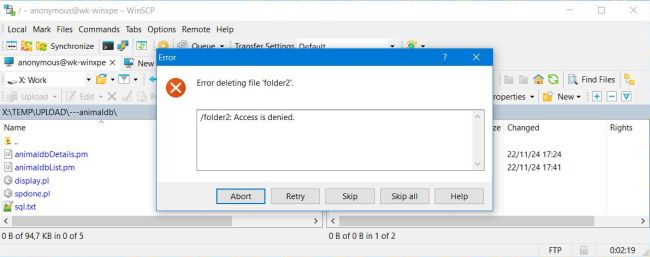
And here is the screenshot of anonymous access of the IIS FTP server using the WinSCP FTP client (connection from my Windows 10). The anonymous user may download files and also upload their own files, but they can't alter, rename, or delete the files created by regular users.
|
Note: If your Windows XP computer runs a firewall, it may be that you'll have to create a rule to allow access from other computers on port 21.
If you like this page, please, support me and this website by signing my guestbook.