Installing a Linux-Linux multiple boot with two harddisks (BIOS boot).
This tutorial is about the BIOS boot of three Linux distributions, installed on two computer harddisks. The Linux distributions used are Bodhi Linux 5.1 (English), BunsenLabs Boron (English), and Emmabuntüs DE5 (French), all of them the 32-bit release. Most of the tutorial's content should apply to most other Linux systems, provided that they still support legacy BIOS boot.
The implementation of a Linux multi-boot with two harddisks is not more complicated than with one single disk (cf. my tutorial Installing a Linux dual boot with one harddisk). In fact, the only challenge is the need of custom partitioning, the multi-boot configuration being so to say automatic, as Emmabuntüs (installed as third OS on the first harddisk, the other two OS having been installed before on the second disk) will find the Bodhi and BunsenLabs installations and add them to the GRUB boot menu, from which, at boot time, you can choose which of the three operating systems you want to start.
1. Installing Bodhi Linux.
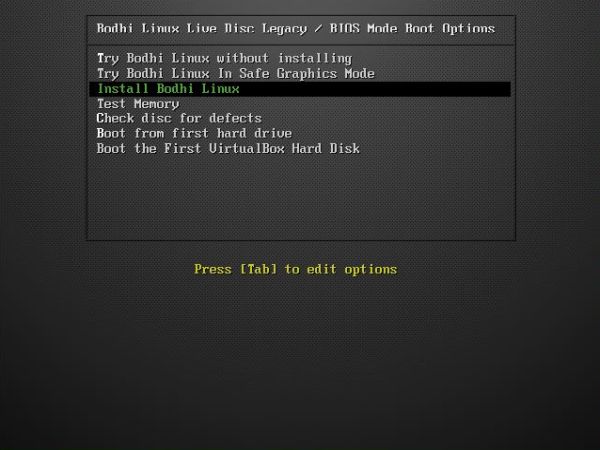
Before beginning the installation, boot into BIOS Setup and make sure that the boot sequence is 1. CD-drive, 2. harddisk, 3. removable devices. Insert the Bodhi Linux DVD and power-on the computer. I chose to immediately start to Install Bodhi Linux.
|
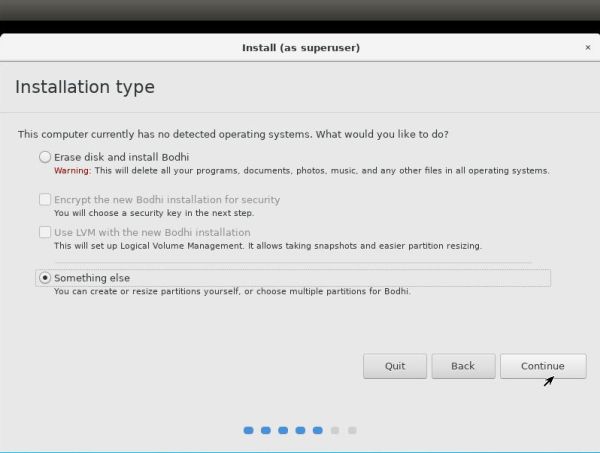
Follow the lead of the setup wizard until you get at the Installation type page. Here, we will choose to perform a manual partitioning. This will give us the possibility to install Bodhi as and where we want. Be sure that Something else is checked before continuing to the next page.
|
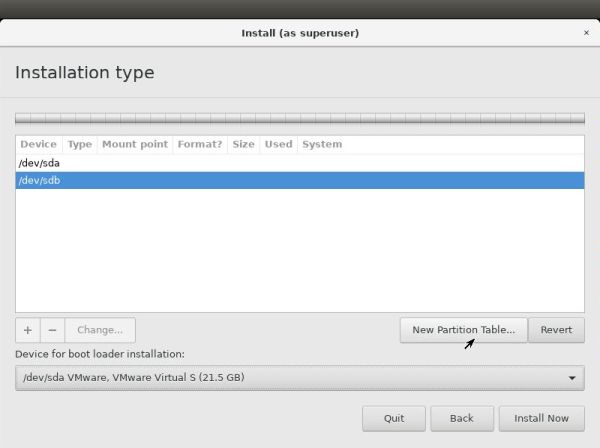
The first thing to do is to create a new partition table. As we want to install Bodhi Linux on the second harddisk, we have to select the /dev/sdb as device, where to create it.
|
In the free space on /dev/sdb (screenshot at the left), we will create a swap partition (screenshot on the right); create it as primary partition at the beginning of the free space; on my 30 GB disk, I choose a size of 2,212 MB for this partition.
![Linux triple boot: Bodhi Linux installation - Creating a swap partition on the second harddisk [1] Linux triple boot: Bodhi Linux installation - Creating a swap partition on the second harddisk [1]](../screenshots/lin_dualboot3d.jpg)
|
![Linux triple boot: Bodhi Linux installation - Creating a swap partition on the second harddisk [2] Linux triple boot: Bodhi Linux installation - Creating a swap partition on the second harddisk [2]](../screenshots/lin_dualboot3e.jpg)
|
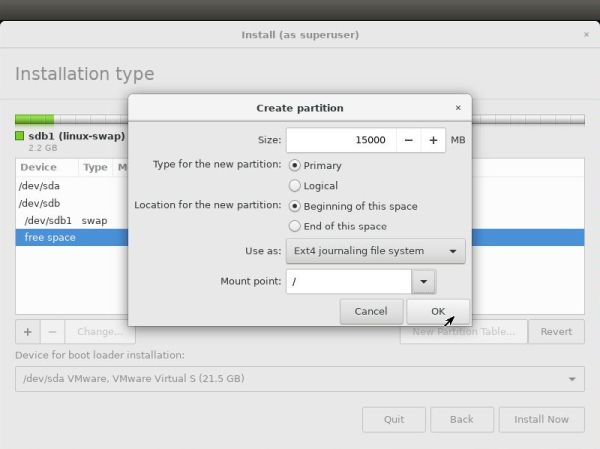
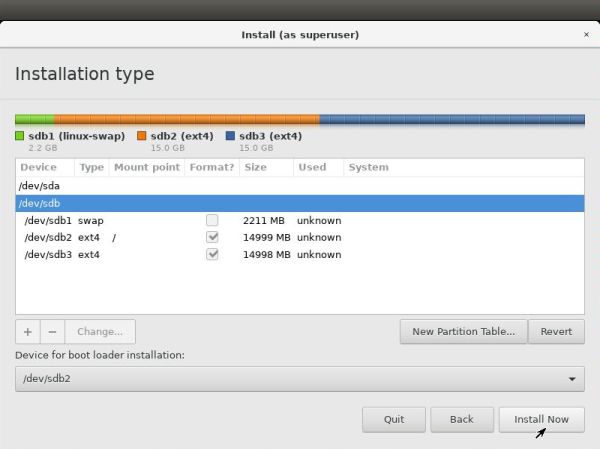
We then create two further primary partitions (both 15,000 MB in my case). They will both be formatted using the ext4 filesystem. The first, that will be the installation partition for Bodhi Linux, has to be mounted as / (screenshot on the left); the second one (where we will later install BunsenLabs Boron) must not have a mount point (no screenshot). The screenshot on the right, shows the final partition layout on the second disk. Before committing the changes, set device for the bootloader = /dev/sdb2 (we install GRUB on the Bodhi root partition, with the intention to get Bodhi booted from the boot menu of the Emmabuntüs installation).
|
|
Note, that the partitioner will warn you that no mount point has be specified for partition #3; just push the Continue button to ignore it.
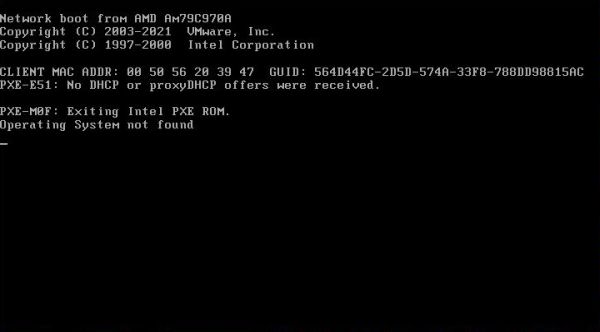
Confirm to write the partition changes to the disk and continue with the installation (local, computer name, users...). When the install is done, reboot the computer. With the DVD having been ejected, your system will not be bootable at this stage. As there is no bootloader in the MBR, the system tries to boot from the network and finally hangs with the message "No operating system found".
|
2. Installing BunsenLabs Boron.
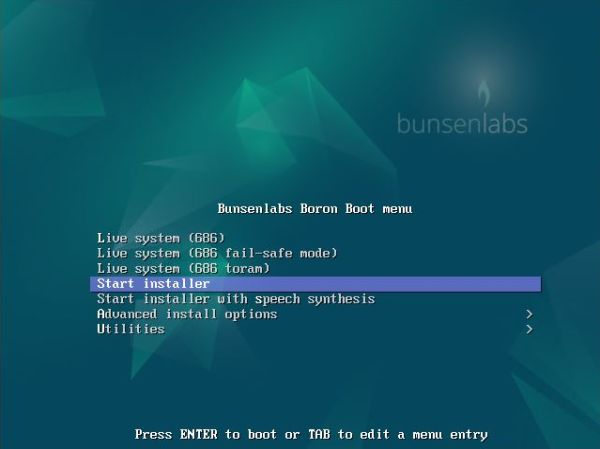
Insert the BunsenLabs Boron DVD and power-on the computer. I chose to immediately Start the installer.
|
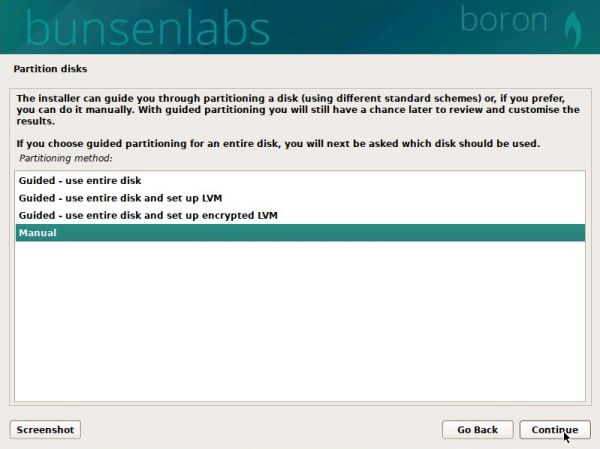
Continue the installation until you get at the Partition disks screen. Here, choose to perform a manual partitioning.
|
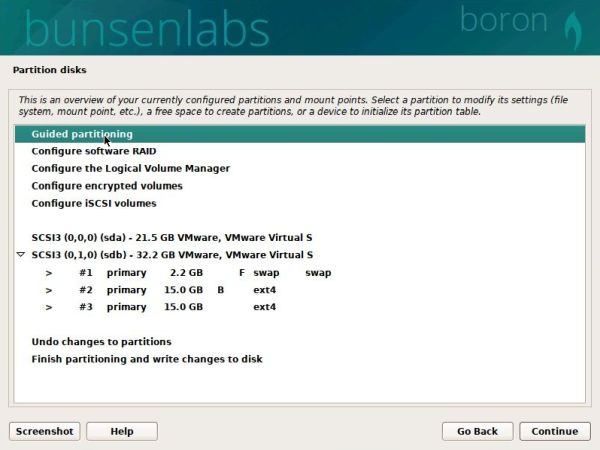
The screenshot below shows the partition layout on the two harddisks /dev/sda (no partitions for the moment) and /dev/sdb (the 3 partitions created before).
|
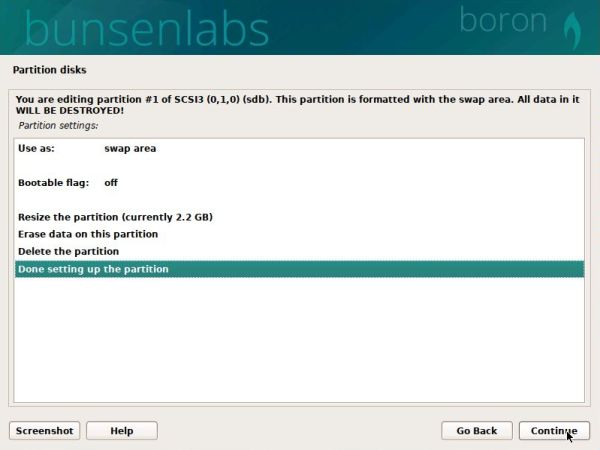
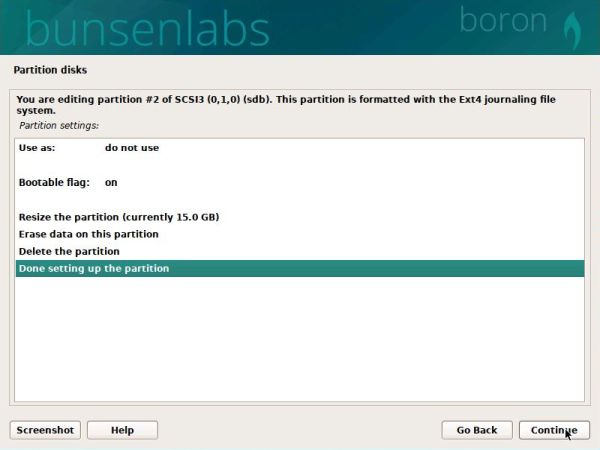
To change a partition, select it. Check that partition #1 is well used as swap (screenshot on the left). Be sure, that partition #2 usage = "do not use" (screenshot on the right). This is the partition where Bodhi Linux is installed, and of course, we must not touch it!
|
|
Note: I'm far away from being a Linux professional, and I'm not sure if using the same partition as swap area for two Linux systems is the normal way to proceed, even not sure if this is safe (?).
Now, lets change the settings of partition #3 (it's here where we will install BunsenLabs). When you select this partition on the partitions layout screen, you'll get the "edit partition" screen, as shown on the screenshot on the left: The usage of the partition is initially set to "do not use", and the boot flag is turned off. To make changes to the partition, select the settings that you want to change. Selecting the Use as settings, will give you the possibility to choose a filesystem (ext4 is the most obvious choice); I think that you should choose to reformat the partition. This partition has to be mounted as /. You'll also have to set the boot flag = on. All other settings may keep their default values (screenshot on the right).
![Linux triple boot: BunsenLabs Boron installation - Configuring the BunsenLabs root partition [1] Linux triple boot: BunsenLabs Boron installation - Configuring the BunsenLabs root partition [1]](../screenshots/lin_dualboot3n.jpg)
|
![Linux triple boot: BunsenLabs Boron installation - Configuring the BunsenLabs root partition [2] Linux triple boot: BunsenLabs Boron installation - Configuring the BunsenLabs root partition [2]](../screenshots/lin_dualboot3o.jpg)
|
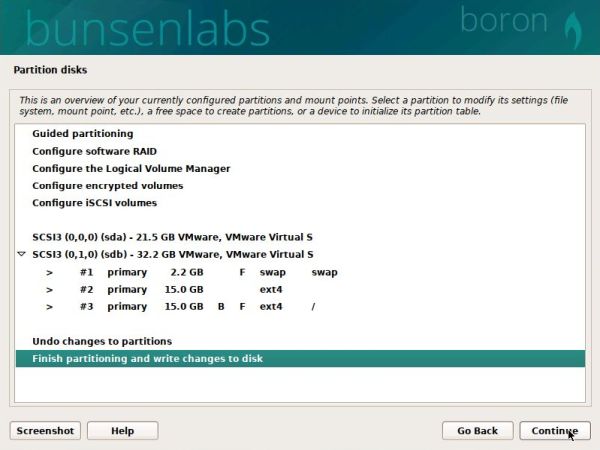
The screenshot below shows the final partition layout on the second disk. Select Finish partitioning and write partitions to disk and push the Continue button to do so (you'll have to confirm this on the next screen).
|
Continue with the installation until you get at the Install the GRUB bootloader screen. As before with Bodhi Linux, we will not install GRUB into the MBR, but on the Linux root partition (with the intention to get BunsenLabs started from the boot menu of the Emmabuntüs installation). Thus, neither /dev/sda, nor /dev/sdb will suit our needs; instead choose Enter device manually (screenshot on the left). Then, on the following screen, set device for the bootloader = /dev/sdb3 (screenshot on the right).
![Linux triple boot: BunsenLabs Boron installation - Installation of GRUB to /dev/sdb3 [1] Linux triple boot: BunsenLabs Boron installation - Installation of GRUB to /dev/sdb3 [1]](../screenshots/lin_dualboot3q.jpg)
|
![Linux triple boot: BunsenLabs Boron installation - Installation of GRUB to /dev/sdb3 [2] Linux triple boot: BunsenLabs Boron installation - Installation of GRUB to /dev/sdb3 [2]](../screenshots/lin_dualboot3r.jpg)
|
Finish the installation. As before, when trying to reboot, the system will hang with a "no operating system found" error message...
3. Installing Emmabuntüs.
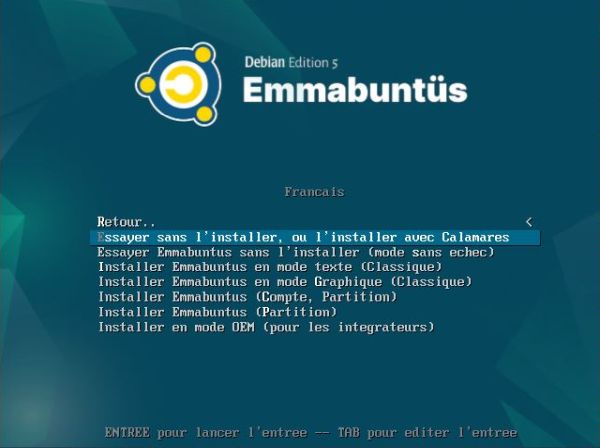
Insert the Emmabuntüs DVD and power-on the computer. You may select the language (I chose "French") before the boot menu is displayed. From this menu I chose Try without installing or install using Calamares (French: "Essayer sans sans l'installer, ou l'installer avec Calamares").
|
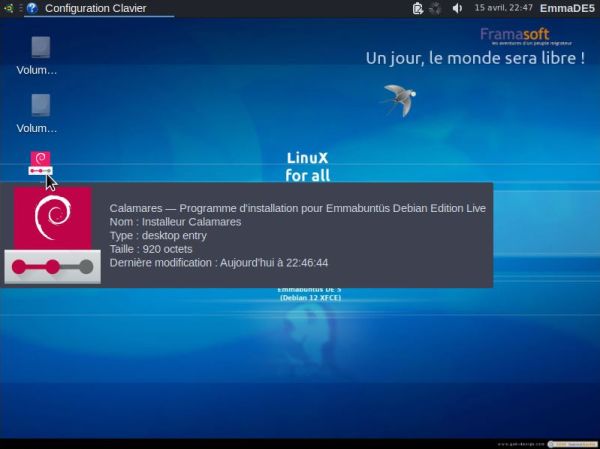
On the next screen, you have the possibility to switch to the LXQt desktop; I chose to continue using XFCE. The system boots into the Live-CD. Calamares may be launched by clicking the shortcut on the desktop.
|
Emmabuntüs offers two installation modes: OEM and personal. Choose Classic install (French: "Installation classique") to perform a personal installation.
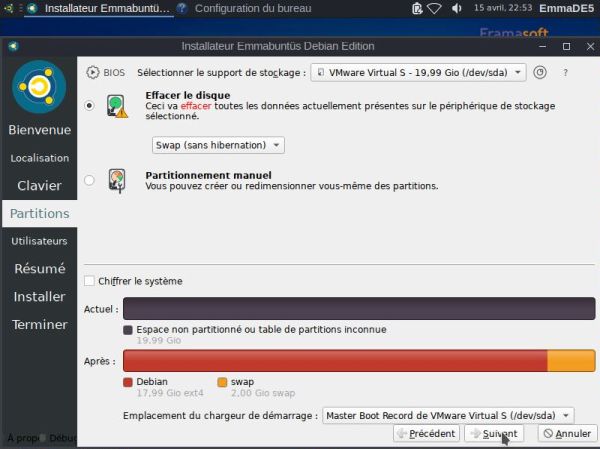
Continue with the installation until you get at the Partitions screen. Here, we can accept the default (automatic) installation: Use entire disk (French: "Effacer le disk" = wipe out the disk). Just be sure that /dev/sda is selected!. You may or may not create a swap partition; I chose to create a swap partition without hibernation (French: "Swap sans hibernation"). And (really very important!): Be sure to install the bootloader to the MBR (/dev/sda).
|
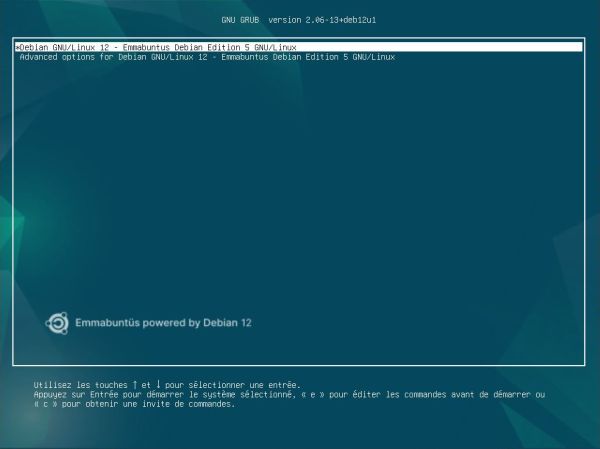
Terminate the installation, remove the DVD and reboot. This time, the computer starts up, showing the GRUB boot menu (Emmabuntüs). So far, so good, just a little problem: There are no boot menu entries for Bodhi Linux and BunsenLabs!? I don't know if this is Emmabuntüs specific, or (more probably) is due to the fact that these two OS are located on /dev/sdb. Anyway, as we will see, it's not a big deal: All we'll have to do is update the bootloader.
|
4. Customizing the multi-boot.
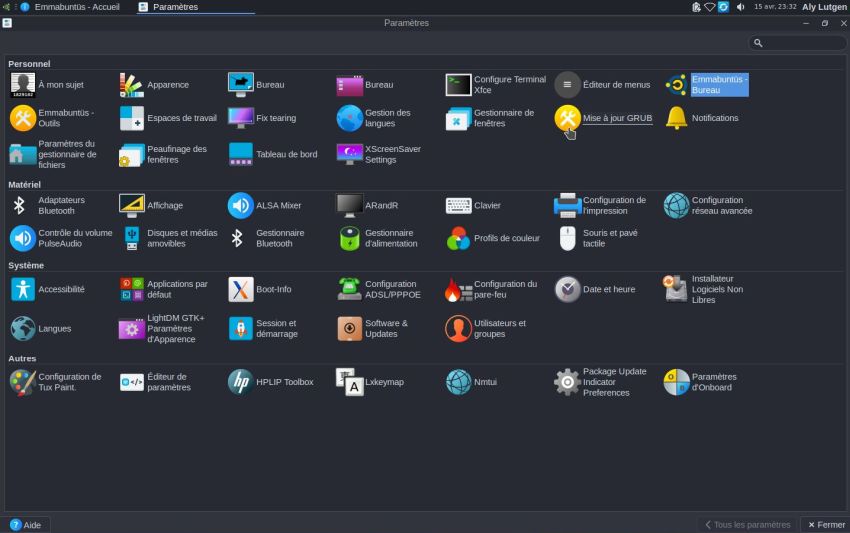
Emmabuntüs includes a launcher to update GRUB in Settings > Personal (French: "Paramètres > Personnel"). Double-click the Update GRUB (French: "Mise-à-jour GRUB") icon to run the update-grub utility.
|
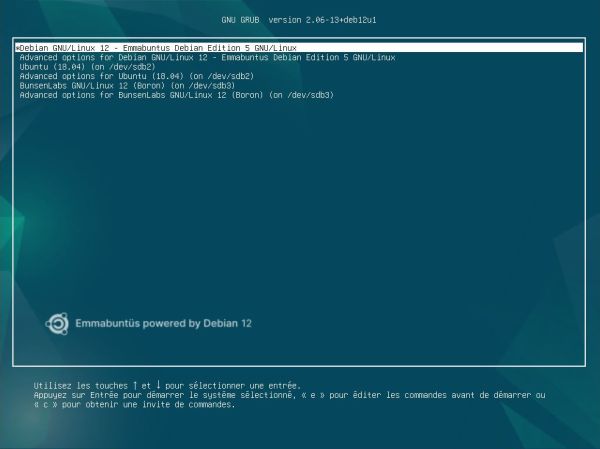
The default configuration of update-grub includes to search for other operating systems installed. This is actually done here, and you will be asked if you want to add other OS to the boot menu. Of course, you do... After GRUB update is finished, we have to reboot. And, the boot menu now includes entries for Bodhi Linux and BunsenLabs.
|
We can now start Bodhi Linux and BunsenLabs from the (Emmabuntüs) boot menu. Bodhi Linux boots up with its own boot menu (choice between Ubuntu 4.9 kernel and Ubuntu 4.9 kernel recovery mode); BunsenLabs immediately displays the login screen. We don't really want boot menus for Bodhi Linux and BunsenLabs. There is a simple way to get rid of them: Updating their respective GRUB, setting the boot menu timeout value to 0.
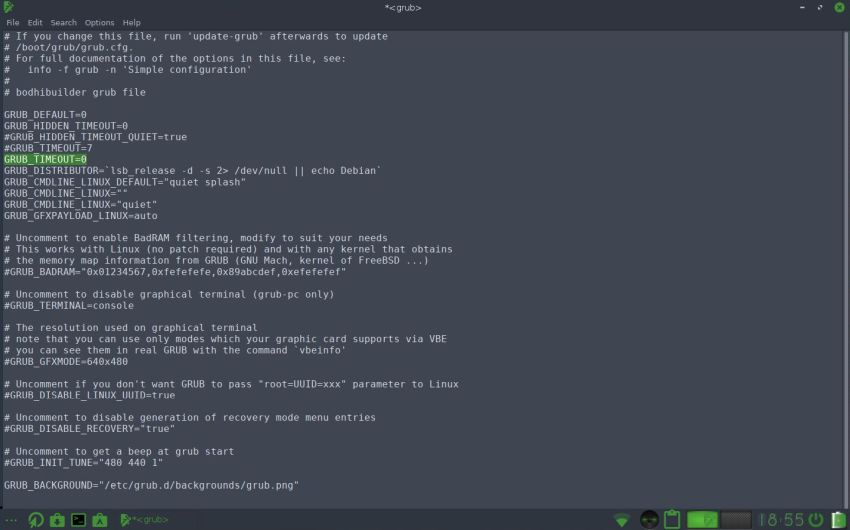
To change the boot menu timeout value, we can edit /etc/default/grub and set GRUB_TIMEOUT=0. The screenshot below shows the file /etc/default/grub opened in the default text editor of Bodhi Linux (with the value already changed).
|
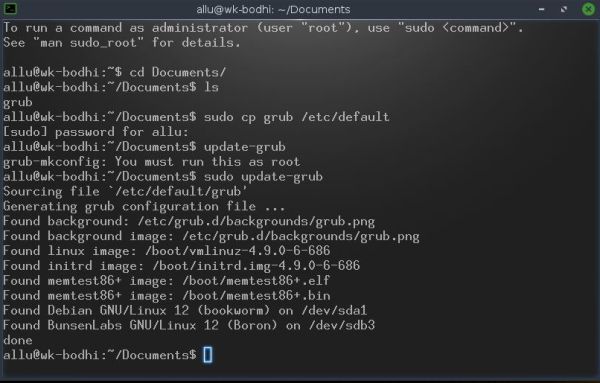
You cannot save this file to /etc/default as standard user. Instead save it to your home directory and then, as root, copy it to its destination. After this, you'll have to run update-grub to make the changes become active. The screenshot below has been taken on Bodhi Linux (it's similar for BunsenLabs).
|
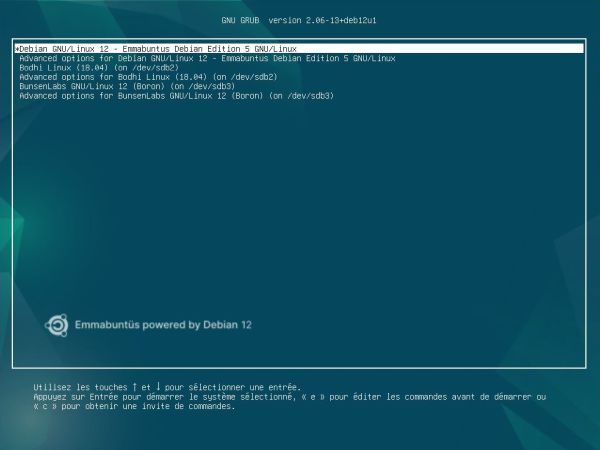
I updated /etc/default/grub on Emmabuntüs, too, setting GRUB_TIMEOUT=15. After having run update-grub, the boot menu includes the "real names" for the 3 operating systems.
|
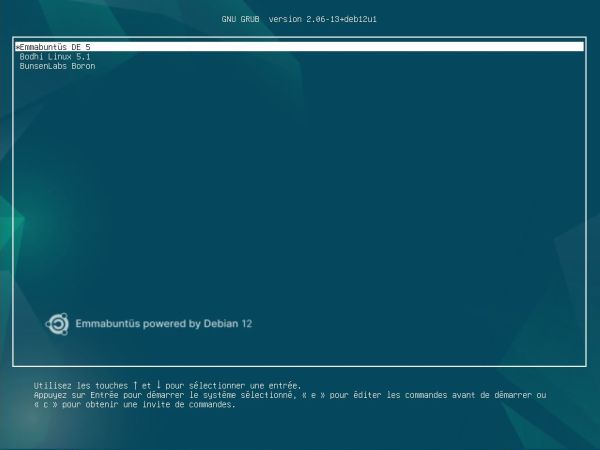
Finally, I changed the names of the boot menu entries as shown on the screenshot below. The easiest way to edit the GRUB boot menu entries is to use a tool called
GRUB Customizer, that you can install, using the command
sudo apt install grub-customizer
For details, please have a look at my Linux help text Configuring the GRUB bootloader.
|
If you find this text helpful, please, support me and this website by signing my guestbook.