Developing Rexx applications on Windows 11.
"Rexx (restructured extended executor) is a high-level programming language developed at IBM by Mike Cowlishaw. Both proprietary and open source Rexx interpreters exist for a wide range of computing platforms, and compilers exist for IBM mainframe computers. Rexx is used for scripting, application macros and application development. As a general purpose scripting language, Rexx is considered a precursor to Tcl and Python."
The paragraph above is how Rexx is described in the corresponding article of Wikipedia. The first implementation of Rexx was made freely available over IBM's world-wide internal network in late 1979 (cf. A brief History of 'Classic' Rexx at rexxla.org). So, it's very old, you may say. The strength of Rexx is that it is powerful yet easy to read, write, and maintain (cf. Why you should consider Rexx for scripting at opensource.com).
If you visit the download page of rexxinfo.org, you will notice that there are several free Rexx interpreters available. Most of them run on multiple platforms, including DOS, OS/2, Windows, Linux and macOS. I think that the best known are Regina Rexx, Open Object Rexx (object-oriented version), and NetRexx (Java-compatible version).
This tutorial is about its installation and usage of Regina Rexx (version 3.9.6 64-bit) on Windows 11; the tutorial should also apply to Windows 10, possibly even to older versions of Windows.
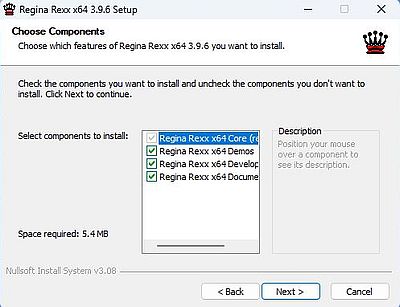
I downloaded the Windows installer from Sourceforge. The screenshot below shows the component selection; no reason not to do a full install.
|
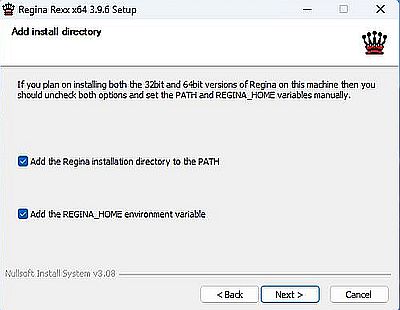
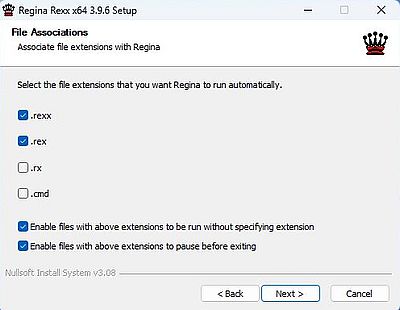
I installed the software to C:\Programs\Regina; using the default installation folder "C:\Program Files\rexx.org\Regina" shouldn't be a problem. Unless you intend to also install the 32-bit version, you should select to add the Regina Rexx installation directory to your PATH, and to set the REGINA_HOME environment variable (screenshot on the left). Associate Regina Rexx with one or more of the proposed file extensions (I would not recommend to select .cmd). Selecting the two optional settings in this dialog box is mostly for usage convenience (screenshot on the right). Note that if you intend to primarily develop GUI applications, you should let "Enable files with above extensions to pause before exiting" unchecked.
|
|
Finally, before file copy is started, you are asked if you want to install the Regina Stack service. I think that this is mostly for educational purposes (?). I did install it, but did not select to start it automatically with Windows (be aware that opening a port may be a potential security risk...).
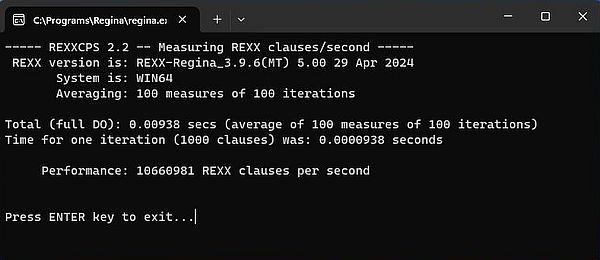
A quick test to check the Regina Rexx installation: In Windows File Explorer, browse to the "demo" folder and double-click the file rexxcps.rexx. If you have associated the file name extension .rexx with Regina and if you have checked the "Enable files with above extensions to pause after exiting", Windows Command Prompt will open, and the program will execute without closing Command Prompt when finished. The screenshot shows the program output on my Windows 11 VMware virtual machine.
|
Here is the code of a simple "Hello user" script (Rexx scripts are often called "Rexx procedures") "hello.rexx", that I placed in the folder C:\Data\Programming\Rexx.
SAY "What is your name? "
PULL name
IF name = "" THEN
SAY "Hello, World!"
ELSE
SAY "Hello," name"!"
EXIT
Notes:
- Normally, a Rexx script must begin with a comment starting at position 1 of line 1. Regina Rexx seems to allow scripts without such comment line.
- The PULL instruction transforms keyboard input to uppercase. If you want to read input as you typed it, use PARSE PULL instead.
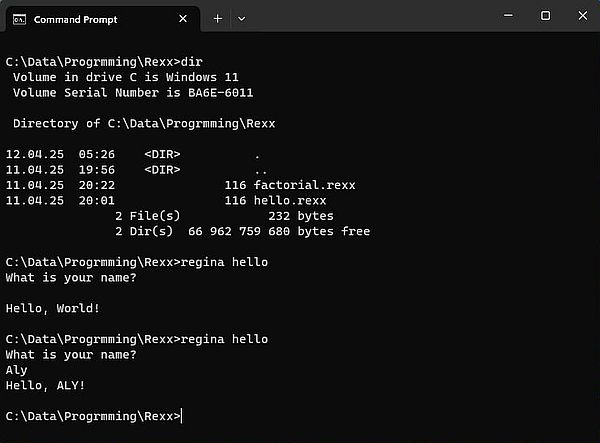
To run the script, open Command Prompt and browse to the directory containing the Rexx source file (in my case: C:\Data\Programming\Rexx),
and type the following command:
regina hello
Note that omitting the file name extension only works if you selected the corresponding option during the installation.
Here is the output of an execution of the script.
|
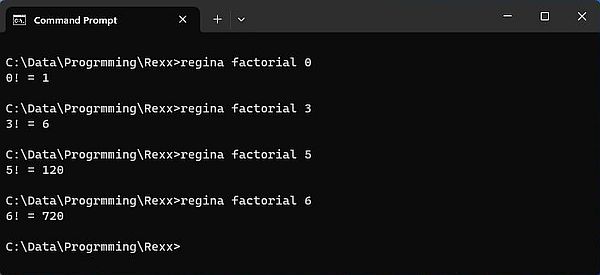
Another simple example: the script "factorial.rexx" calculates the factorial of a number given as command line argument.
ARG x
SAY x"! =" fact(x)
EXIT
fact: PROCEDURE
ARG n
IF n = 0 THEN
RETURN 1
ELSE
RETURN fact(n-1) * n
And here is the output of an execution of the script.
|
Rexx editors and IDEs.
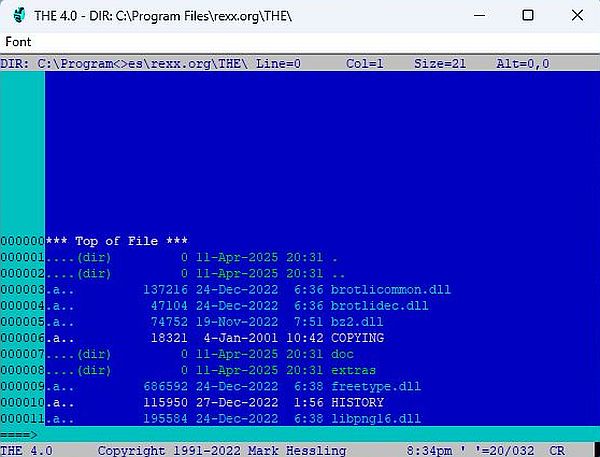
THE (The Hessling Editor) has been written by Mark Hessling, the actual maintainer of Regina Rexx. To be honest, I do not really know what to do with this "bizarre piece of software".
|
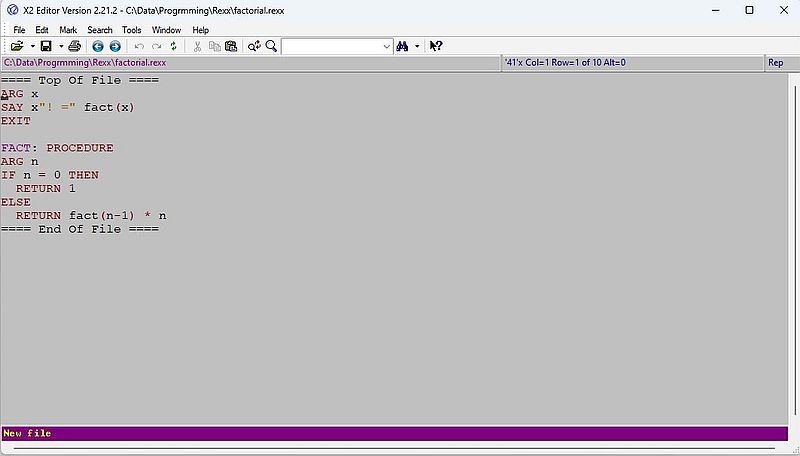
XWing (the X2 Windows GUI) has syntax highlighting for Rexx; it also allows to browse the script's functions. Not a solution for me, however. First, I did not figure out how to run the script in the editor (is this even possible?). Second, the editor uses the old keyboard shortcuts to perform a task; e.g. CTRL+J (instead of simply ENTER) to insert a new line...
|
Visual Studio Code, the free IDE by Microsoft, supports extensions for numberless programming languages. There is an extension for Rexx, but this seems to be for syntax highlighting only. Eclipse, another IDE that supports lots of programming languages, is possibly the best solution. In fact, there is a plugin called RexxDev, that provides code completion, syntax highlighting, syntax analysis, refactor, and debug. For details, please visit RexxDev and Shells at Sourceforge.
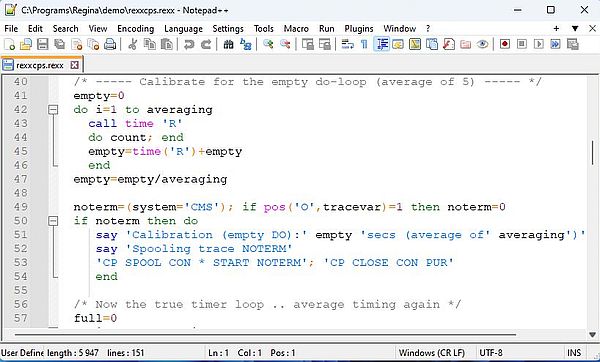
As for me, Rexx is just a try-out, I didn't install any IDE. Instead, I decided to write the code using Notepad++, and running the scripts in Windows Command Prompt. The default installation of Notepad++ has no syntax highlighting for Rexx, but there is an extension, called Open Object Rexx / NetRexx Extension for Notepad++. The installation (consisting of copying two files) is described on the website mentioned above. Not particularly intended for Regina Rexx, it seems mostly do what we expect, as you can see on the screenshot below.
|
If you use Vim with other programming languages, note that there is also a syntax highlighting plugin available for this editor.
Creating Rexx executables.
Rexx scripts are interpreted, i.e. when running a script, it's the source code that is converted into binary code and executed. The source code can also be compiled
into a tokenised format. This is done using the -c switch:
regina -c <source-file-name>
A file saved using tokenised format can be executed using the -e switch:
regina -e <tokenised-format-file-name>
Regina Rexx does not include a compiler able to create a native Windows executable. However, there is a tool called Rexx/Wrapper. This tool wraps Rexx source or tokenised code into an executable. The Rexx source code can be optionally compressed and encoded to ensure that the original Rexx code cannot be viewed (unless you have the original encryption key). This doesn't make Rexx/Wrapper being a compiler. The tool does not compile the Rexx code into native machine code; but the Rexx code is still interpreted by a Rexx interpreter. For further details (and the download link), visit the Rexx/Wrapper page at Sourceforge.
Rexx/Wrapper comes as a ZIP archive, that you may unpack into any directory that you want (ex: C:\Programs\rexxwrapper24_w32). You should then add this directory to your PATH. To use the software, you need (besides a Rexx interpreter) a C compiler; gcc is supposed to work on Windows.
The directory with your source (or tokenised format) file being the current one, you can run the program interactively by typing
regina rexxwrap.cmd
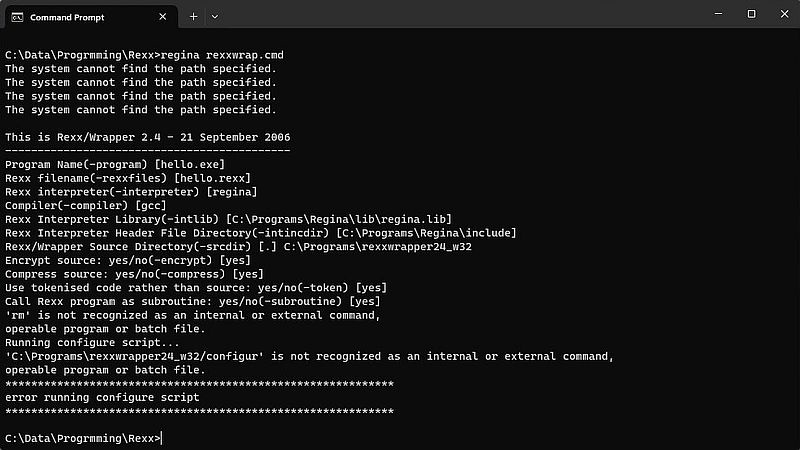
I did not succeed to make Rexx/Wrapper work on my Windows 11. The rexxwrap.cmd script aborted with the error message error running configure script. The screenshot shows the full output (of the second or third run) of the rexxwrap.cmd script.
|
Accessing MySQL databases.
Rexx extensions are software that add specific functionality to the Rexx programming language by loading external libraries that include the new Rexx functions. One of the most interesting of these extensions is Rexx/SQL, that provides Rexx programmers with a consistent, simple, yet powerful interface to SQL databases. Multiple connections to different databases from different vendors can be made in the one Rexx program. Multiple statements can be open on each database connection at the one time.
There are several SQL related external libraries available for Regina Rexx (as well as for Open Object Rexx). At this moment (April 2025), one of these libraries allows the direct access to a MySQL database using the MySQL client. This is also the case for SQLite. For other databases, you'll have to use ODBC. To download the MySQL library files, visit Rexx/SQL Files at Sourceforge. Do not push the green Download button, but open the rexxsql directory, and then the current release subdirectory (in my case the directory 2.6). Finally, choose the MySQL file for Regina Rexx 64-bit; in my case this file is called rxsql26B3_my_w64_Regina.zip.
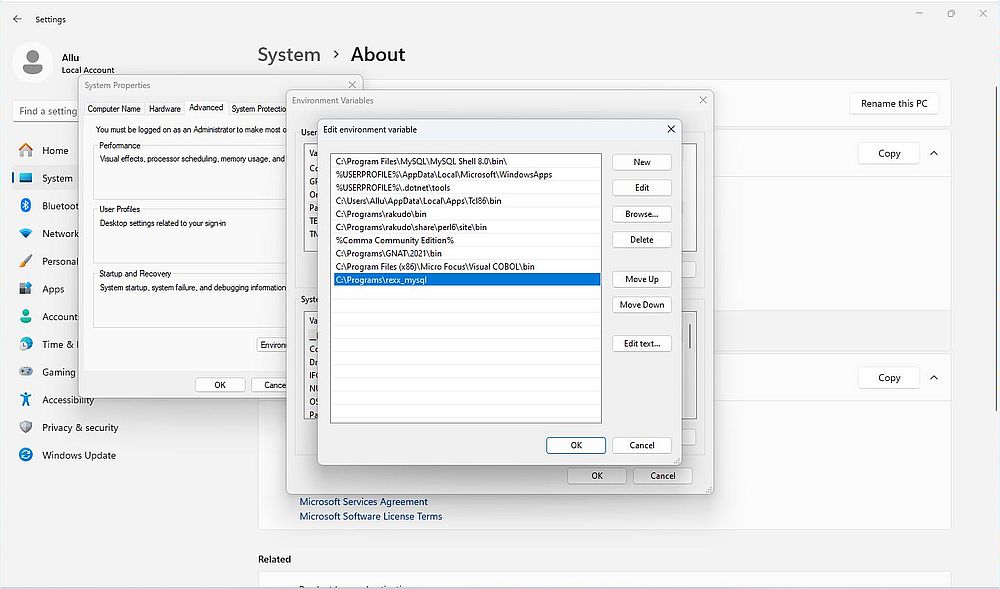
Unpack the download archive to a folder of your choice; I chose C:\Programs\rexx_mysql. To add this folder to your PATH, proceed as follows. Open Windows 11 Applications and choose Settings. In the Settings window, select System > About, and on that page, click the Advanced System Settings link. In the opening dialog box, push the Environment Variables button. In the list of the system variables, select Path and push the Edit button. With the actual Path directories displayed, push Add, then use the Browse button to browse to the Rexx/SQL installation directory.
|
It's obvious that using this software requires that you have a MySQL (or MariaDB, I suppose) server installed and running. You find details about installing MySQL in my tutorial Web development environment setup on MS Windows: MySQL database server. On my Windows 11, I actually use MySQL 8.0.22, that I installed using the all-in-one MySQL Installer, that also installed the "world" database, used in the program samples further down in the text.
Rexx/SQL includes a simple script called simple.cmd. To test access to your MySQL server do the following: In Command Prompt, cd to the
Rexx/SQL installation directory, then run the command
regina simple.cmd user=<user-name> pass=<password> data=<database>
User name and password are the credentials of a MySQL user who has (at least) read access to the database that you connect to. Use data=world
if you have this database installed.
Did it work? Probably not, and just as me, you probably got the error message Failed to load external library "libmysql". If you followed my tutorial concerning the connection to MySQL using Lazarus/Free Pascal, you know about this little problem: The connection is done by using the MySQL client, and Windows can't find libmysql.dll, located (by default) in the directory "C:\Program Files\MySQL\MySQL Server 8.0\lib". To resolve the issue, just copy the file libmysql.dll to the Rexx/SQL directory (in my case: C:\Programs\rexx_mysql). With this done, rerunning the command above should succeed with display of a "Connect succeeded!" message and the display of the version number of Regina, Rexx/SQL, and MySQL.
To use the functions of the Rexx/SQL library, you'll have to add the following two lines to your Rexx scripts:
Call RxFuncAdd "SQLLoadFuncs", "rexxsql", "SQLLoadFuncs"
Call SQLLoadFuncs
You find a description of the Rexx/SQL functions in the Rexx/SQL - A Rexx interface to SQL databases article on Sourceforge. To note that most of these functions return 0 if they succeed, otherwise a negative error code.
My sample script "mysql.rexx" reads and displays the number of records in the "city" table of the "world" database. Here is the code:
/* Test connection to MySQL server */
Call RxFuncAdd "SQLLoadFuncs", "rexxsql", "SQLLoadFuncs"
Call SQLLoadFuncs
If SQLConnect( "c1", "allu", "password", "world", "localhost") < 0 Then
Do
Say "MySQL error: The connection failed!"
Exit 1
End
If SQLPrepare("q1", "Select count(*) as count from city") < 0 Then
Do
Say "MySQL error: The query failed for SQLPrepare!"
Call SQLDisconnect("c1")
Exit 1
End
If SQLOpen("q1") < 0 Then
Do
Say "MySQL error: The query failed for SQLOpen!"
Call SQLClose("q1")
Call SQLDisconnect("c1")
Exit 1
End
rc = SQLFetch('q1')
If rc < 0 Then
Do
Say "MySQL error: The query failed for SQLFetch!"
Call SQLClose("q1")
Call SQLDisconnect("c1")
Exit 1
End
Say "Number of cities =" q1.count
Call SQLClose("q1")
Call SQLDisconnect("c1")
Return 0
The screenshot shows the script output.
![Regina Rexx on Windows 11: Rexx/SQL - Simple script accessing the MySQL database 'world' [1] Regina Rexx on Windows 11: Rexx/SQL - Simple script accessing the MySQL database 'world' [1]](../screenshots/rexx11.jpg)
|
My sample script "mysql2.rexx" shows how to handle multiple row returns in Rexx. The script reads and displays the cities in Guatemala (from
the "city" table of the "world" database). Here is the code:
/* Test connection to MySQL server */
Call RxFuncAdd "SQLLoadFuncs", "rexxsql", "SQLLoadFuncs"
Call SQLLoadFuncs
If SQLConnect( "c1", "allu", "password", "world", "localhost") < 0 Then
Do
Say "MySQL error: The connection failed!"
Exit 1
End
If SQLPrepare("q1", "SELECT Name, District, Population FROM city WHERE CountryCode = 'GTM' ORDER BY Name") < 0 Then
Do
Say "MySQL error: The query failed for SQLPrepare!"
Call SQLDisconnect("c1")
Exit 1
End
If SQLOpen("q1") < 0 Then
Do
Say "MySQL error: The query failed for SQLOpen!"
Call SQLClose("q1")
Call SQLDisconnect("c1")
Exit 1
End
Say "Cities in Guatemala:"
c = 0
Do Forever
rc = SQLFetch('q1')
If rc < 0 Then
Do
Say "MySQL error: The query failed for SQLFetch!"
Call SQLClose("q1")
Call SQLDisconnect("c1")
Exit 1
End
If rc = 0 Then
Leave
Say q1.Name "("q1.District"):" q1.Population
c = c + 1
End
If c = 0 Then
Say "No cities found..."
Else
Say "Number of cities = " c
Call SQLClose("q1")
Call SQLDisconnect("c1")
Return 0
And here is the screenshot of the script output.
![Regina Rexx on Windows 11: Rexx/SQL - Simple script accessing the MySQL database 'world' [2] Regina Rexx on Windows 11: Rexx/SQL - Simple script accessing the MySQL database 'world' [2]](../screenshots/rexx12.jpg)
|
Rexx GUI development.
Like other scripting languages (Perl, Python, Ruby, Raku...), Rexx is primarily intended for command line development. However, the creation of Windows desktop applications is also possible. I suppose that you guessed that this involves another Rexx extension. Rexx/DW provides Rexx programmers with a lightweight, cross-platform GUI package. Rexx/DW uses Dynamic Windows to provide the cross-platform GUI that runs natively on Windows, OS/2 and GTK+. To download the DW library, visit Rexx/DW Files at Sourceforge. Open the rexxdw directory, and then the current release subdirectory (in my case, this is the directory 2.1. Finally, choose the file for Regina Rexx 64-bit; in my case, this file is called rexxdw21w64_Regina.exe.
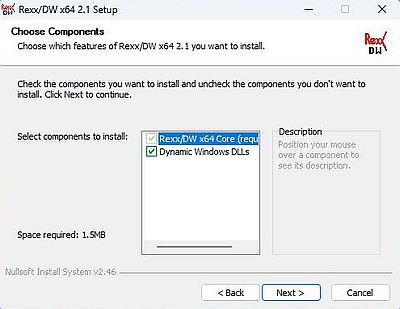
To install the software, run the downloaded file. The screenshot below shows the component selection. I suppose that, besides the core, you must install the Dynamic Windows DLLs, too (?).
|
The default installation directory is "C:\Program Files\rexx.org\Regina Extensions". Be sure that the option to add the Rexx/DW installation folder to the PATH is checked.
The Rexx/DW documentation is included in HTML format. You can also download the Rexx-DW Reference in PDF format.
To test the software, either browse to the "demo" subdirectory in Windows File Explorer and double-click the file "rexxdw.rexx", or
cd to this folder in Command Prompt, and type
regina rexxdw
Note: When running a Rexx GUI application, there are always two windows that will open up: First, a Command Prompt, with normally nothing but a blinking cursor, and second the application window itself. Closing the Command Prompt window will also terminate the application and thus closing the application window (I'm not sure if you should do this?). If the application has been launched from File Explorer, closing its window, will terminate the command line program. If the Regina Rexx installation option "Enable files with above extensions to pause after exiting" has not been selected, the Command Prompt window will also close. If it has been selected, you'll have to press the ENTER key to close it.
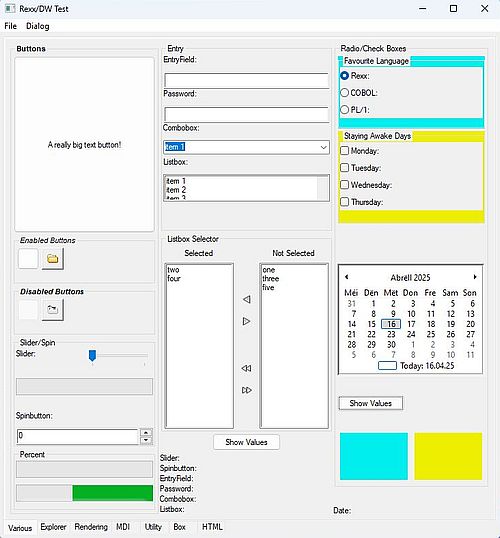
As you can see on the screenshot, the "rexxdw" demo is a huge application with all kind of visual components. It seemed not to work all correctly on my Windows 11. Selecting a menu item had no effect; the same for some buttons. Problems with the application, problems on Windows 11, or maybe that I missed something (?).
|
All this is really nice, however, I think that with the resources provided by the installation of Rexx/DW, programming beginners, and even people having some programming experience will have difficulties to start creating Rexx desktop applications. In fact, the only example provided is this huge demo application, and I searched in vain to find further, simpler examples on the Internet. Also, the Rexx/DW documentation describes in detail the constants, widgets, call-backs, etc, but there isn't any simple, easy to understand description of how to create a Rexx GUI application. A step by step tutorial with elementary program samples would, without any doubt, be a precious help.
Including this here is outside the scope of this tutorial. Also, I have not the time to learn about Rexx/DW in depth. The following paragraphs describe my first trials to create a Rexx/DW application. I'm not sure if all that I say is really all correct (please, don't blame me if it isn't; I never used Rexx or a Rexx/DW-like library before). The point is that the two very simple program samples work correctly, and I think that they may be a good starting point for creating your own Windows desktop applications using the Rexx programming language.
The first thing to do is to load the Rexx/DW library. This is done by adding the following two lines to the Rexx scripts:
Call RxFuncAdd 'DW_LoadFuncs', 'rexxdw', 'DW_LoadFuncs'
Call dw_loadfuncs
I'm not sure, but I think that before using the library functions, you'll have to initialize the DW environment:
Call dw_init
Also not sure, but the typical last statements of a Rexx/DW script seem to be the following:
Call dw_shutdown
Exit 0
Return 0
The fundamental building blocks of a Rexx/DW program consist of two major components; widgets and callbacks. Widgets are the visual components of the GUI, such as windows, menus and buttons. Callbacks are event handlers, i.e. routines that carry out a given behavior, such as closing a window, displaying a dialog box, doing some calculations and displaying the result in an entry or text field. Callbacks are normal Rexx subroutines.
The general structure of a Rexx/DW application includes the following:
- Initialization of global variables; examples: the screen size and the style of the main window.
- Creation of the main window and other widgets. Packing of the widgets, i.e. defining there layout within the GUI window.
- Connection of the callbacks, i.e. associating a callback routine with a given event that occurs on a given widget; example: defining the Rexx subroutine to be executed when the main window is closed, when a given button is clicked.
- Display of the main window.
- Call of the event loop handler to dispatch the events to the appropriate callbacks.
- Termination of the application when the event loop handler has exited.
During the setup of the GUI (everything before calling the event loop handler), the event handling routines have to be disabled. This may be done by the assignment
!global.!allowcallbacks = 0
immediately following the Call dw_init statement. And then, starting all of your callback routines with the statement
If !global.!allowcallbacks = 0 Then Return 1
Returning 1 informs Dynamic Windows that all processing has been handled for the particular event, and Dynamic Windows will not execute its default event handling code. On the other hand, if callbacks are enabled, the code in the callback routine has to be executed (as response to a given event on a given widget), and when done you'll have to return 0 to inform Dynamic Windows that it should execute its default event handling code.
Let's use this theoretical knowledge to create a simple window.
The following statements set the screen width and height and define the style to be used for our window (the values used in the style definition are pre-declared
constants; cf. the documentation for details):
!global.!screen_width = dw_screen_width()
!global.!screen_height = dw_screen_height()
!global.!style = dw_or( !REXXDW.!DW_FCF_SYSMENU, !REXXDW.!DW_FCF_TITLEBAR, !REXXDW.!DW_FCF_SHELLPOSITION, !REXXDW.!DW_FCF_TASKLIST, !REXXDW.!DW_FCF_DLGBORDER )
To create a new window, we call the function dw_window_new(). Again we use some pre-declared constants, but we also use the window style
defined before. "Rexx/DW simple window" is a custom string being used as window title.
!global.!mainwindow = dw_window_new( !REXXDW.!DW_DESKTOP, 'Rexx/DW simple window', dw_or( !global.!style, !REXXDW.!DW_FCF_SIZEBORDER, !REXXDW.!DW_FCF_MINMAX ) )
Rexx/DW is an event driven application. This means that internally various events occur (ex: a button being pushed, a keyboard key being pressed). Rexx/DW allows us to call a given function (callback) when a given event occurs on a given widget. Each widget has certain valid events associated with it. In our code, we have to associate a particular event with a widget. This is done by calling DW_signal_connect(). This associates an event on a particular widget with a callback routine, so that when the particular event occurs on that widget this procedure is executed and certain parameters are passed to it.
A possible event on the window, that we are creating, is the window being closed by the user (the user clicking on the 'close window' icon in the window's title bar).
Such event is pre-declared by the constant DW_DELETE_EVENT. Let's associate this event on our window with a callback named "QuitCallback":
Call dw_signal_connect !global.!mainwindow, !REXXDW.!DW_DELETE_EVENT, 'QuitCallback', !global.!mainwindow
This line of code means: If the user closes the window, the Rexx function "QuitCallback" will be called.
We have now all that is needed to display the window (with a given size at a given position on the screen):
Call dw_window_set_pos_size !global.!mainwindow, 100, 100, 500, 500
Call dw_window_show !global.!mainwindow
This line of code displays a window of 500×500 pixels at screen position (100, 100).
The creation of the GUI is finished and we can now enable the callbacks and call the event loop handler. Here is the code, copied from the demo
script:
!global.!allowcallbacks = 1
If !REXXDW.!HAVE_REXXCALLBACK Then
Call dw_main
Else
Do Forever
cmd = dw_main_iteration()
If cmd \= '' Then
Interpret 'Call' cmd
End
Why not simply call DW_main()? The reason is that there are two event loop handlers available and the one to use depends on whether the Rexx interpreter used supports or not the RexxCallback() API. Thus, DW_main() is used for interpreters that support RexxCallback(), whereas DW_main_iteration() is used for those interpreters that don't.
After the event loop handler has exited and before terminating the application, we'll have to destroy our window:
Call dw_window_destroy !global.!mainwindow
Remains the "QuitCallback" subroutine. All it has to do is to exit the event loop handler, what is done by calling DW_main_quit().
QuitCallback:
If !global.!allowcallbacks = 0 Then Return 1
Call dw_main_quit
Return 0
Note: The actual usage of DW_main() or DW_main_iteration() has an effect on which Rexx variables may or may not be in scope. The (probably) best way to avoid any problems consists in always using PROCEDURE EXPOSE (<global-variables>) on procedures. Doing so, you are sure that any variables you use within your procedure will have not effect on others outside the procedure without that you explicitly list them.
Here is the complete code of our simple window creation script:
/* Rexx/DW simple window */
Call RxFuncAdd 'DW_LoadFuncs', 'rexxdw', 'DW_LoadFuncs'
Call dw_loadfuncs
Call dw_init
!global.!allowcallbacks = 0
!global.!screen_width = dw_screen_width()
!global.!screen_height = dw_screen_height()
!global.!style = dw_or( !REXXDW.!DW_FCF_SYSMENU, !REXXDW.!DW_FCF_TITLEBAR, !REXXDW.!DW_FCF_SHELLPOSITION, !REXXDW.!DW_FCF_TASKLIST, !REXXDW.!DW_FCF_DLGBORDER )
!global.!mainwindow = dw_window_new( !REXXDW.!DW_DESKTOP, 'Rexx/DW simple window', dw_or( !global.!style, !REXXDW.!DW_FCF_SIZEBORDER, !REXXDW.!DW_FCF_MINMAX ) )
Call dw_signal_connect !global.!mainwindow, !REXXDW.!DW_DELETE_EVENT, 'QuitCallback', !global.!mainwindow
Call dw_window_set_pos_size !global.!mainwindow, 100, 100, 500, 500
Call dw_window_show !global.!mainwindow
!global.!allowcallbacks = 1
If !REXXDW.!HAVE_REXXCALLBACK Then
Call dw_main
Else
Do Forever
cmd = dw_main_iteration()
If cmd \= '' Then
Interpret 'Call' cmd
End
Call dw_window_destroy !global.!mainwindow
Call dw_shutdown
Exit 0
Return 0
QuitCallback:
If !global.!allowcallbacks = 0 Then Return 1
Call dw_main_quit
Return 0
Here is the output of the script (the GUI created).
![Regina Rexx on Windows 11: Rexx/DW - Simple window [1] Regina Rexx on Windows 11: Rexx/DW - Simple window [1]](../screenshots/rexx15.jpg)
|
That's not really what you expected, I suppose. In fact, as a difference with, for example, Lazarus, a Rexx/DW window is just a frame, not a "filled area". Thus, the area inside the window's borders is empty, and what we see on the screenshot is my desktop wallpaper and some shortcut icons.
To "fill" the window (and place widgets like entry fields or buttons), we have to create some kind of "container", that is used to layout the GUI display. Boxes allow to pack widgets at given positions. A box can be horizontal or vertical, which determines the arrangement of the widgets packed into it. So, to pack two widgets side-by-side, you would create a horizontal box, create the two widgets, and pack these into the box.
The following code (to be placed after the dw_window_new() statement of our program above) creates a box expanding to the whole size of the
window. Its only role here is to "fill" the empty window.
box = dw_box_new( !REXXDW.!DW_VERT )
Call dw_box_pack_start !global.!mainwindow, box, 0, 0, !REXXDW.!DW_EXPAND_HORZ, !REXXDW.!DW_EXPAND_VERT, 0
And here is the output of the modified script.
![Regina Rexx on Windows 11: Rexx/DW - Simple window [2] Regina Rexx on Windows 11: Rexx/DW - Simple window [2]](../screenshots/rexx16.jpg)
|
As second (and final) example, let's extend our GUI by adding a simple menu, with just one item to quit the application.
Adding a menu to a window requires the following steps:
- Creation of a menubar.
- Creation of a menu.
- Appending menuitems to the menu.
- Defining the callbacks for the menu items.
- Appending the menu to the menubar.
Here is the code of the new version of our simple window creation script. The lines displayed with a bold font create the "File" menu with the menu item "Quit",
that is associated with the "QuitCallback" procedure, also used when the user closes the GUI window.
/* Rexx/DW simple window */
Call RxFuncAdd 'DW_LoadFuncs', 'rexxdw', 'DW_LoadFuncs'
Call dw_loadfuncs
Call dw_init
!global.!allowcallbacks = 0
!global.!screen_width = dw_screen_width()
!global.!screen_height = dw_screen_height()
!global.!style = dw_or( !REXXDW.!DW_FCF_SYSMENU, !REXXDW.!DW_FCF_TITLEBAR, !REXXDW.!DW_FCF_SHELLPOSITION, !REXXDW.!DW_FCF_TASKLIST, !REXXDW.!DW_FCF_DLGBORDER )
!global.!mainwindow = dw_window_new( !REXXDW.!DW_DESKTOP, 'Rexx/DW simple window', dw_or( !global.!style, !REXXDW.!DW_FCF_SIZEBORDER, !REXXDW.!DW_FCF_MINMAX ) )
box = dw_box_new( !REXXDW.!DW_VERT )
Call dw_box_pack_start !global.!mainwindow, box, 0, 0, !REXXDW.!DW_EXPAND_HORZ, !REXXDW.!DW_EXPAND_VERT, 0
mainmenubar = dw_menubar_new( !global.!mainwindow )
menu = dw_menu_new( 0 )
menuitem = dw_menu_append_item( menu, '~Quit', 1011, 0, !REXXDW.!DW_MENU_END, !REXXDW.!DW_MENU_NOT_CHECKABLE, 0 )
Call dw_signal_connect menuitem, !REXXDW.!DW_CLICKED_EVENT, 'QuitCallback', 'dir'
Call dw_menu_append_item mainmenubar, '~File', 1010, 0, !REXXDW.!DW_MENU_END, !REXXDW.!DW_MENU_NOT_CHECKABLE, menu
Call dw_signal_connect !global.!mainwindow, !REXXDW.!DW_DELETE_EVENT, 'QuitCallback', !global.!mainwindow
Call dw_window_set_pos_size !global.!mainwindow, 100, 100, 500, 500
Call dw_window_show !global.!mainwindow
!global.!allowcallbacks = 1
If !REXXDW.!HAVE_REXXCALLBACK Then
Call dw_main
Else
Do Forever
cmd = dw_main_iteration()
If cmd \= '' Then
Interpret 'Call' cmd
End
Call dw_window_destroy !global.!mainwindow
Call dw_shutdown
Exit 0
Return 0
QuitCallback:
If !global.!allowcallbacks = 0 Then Return 1
Call dw_main_quit
Return 0
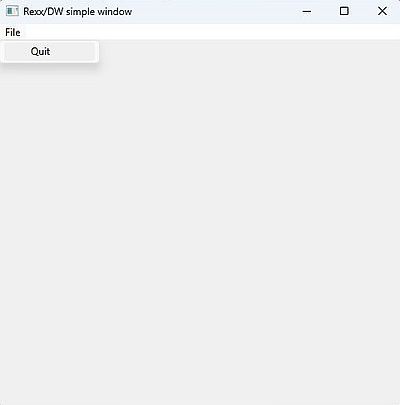
Note: The tilde (~) placed in front of a letter of a menu or menuitem title associates this letter with the action associated with the menu(item). In our example, hitting "f" on the keyboard opens the "File" menu, hitting "q" terminates the application.
Script output (simple window with simple menubar):
|
This terminates my tutorial about Rexx/DW. It's certain that it is not professional and maybe not all what I say is really all correct, but the two program samples work correctly and I think that the explanations given could be helpful for Rexx/DW newbies (with or without having developed in Rexx before) when starting to create their first Rexx GUI applications. At least, I hope so...
Tutorial samples download.
Click the following link to download the sample program sources from my website.
Further Rexx extensions.
And for those who are serious about this rather interesting programming language, here is an overview of other extensions for Rexx:
- Rexx/Curses provides Rexx programmers with an interface to the curses library.
- Rexx/Tk is a Rexx extension library providing access to the Tk Graphic User Interface Toolkit.
- Rexx/gd is a Rexx extension which wraps the functionality of the libgd library.
- RxSock is an interface for TCP/IP sockets.
- Rexx/CURL is an external Rexx function package providing an interface to the cURL package.
- Rexx/PDF is a Rexx interface to the libharu PDF library.
- Rexx/CSV provides Rexx programmers with functions to simplify reading and writing CSV files.
If you find this text helpful, please, support me and this website by signing my guestbook.