Developing Raku applications on Windows 11.
"Raku is a programming language. It is designed to be easily learned, read, and written by humans and is inspired by natural language. It allows the beginner to write in "baby Raku", while giving the experienced programmer freedom of expression, from concise to poetic. Raku is gradually typed. It mostly follows the paradigm of dynamically typed languages in that it accepts programs whose type safety it can’t guarantee during compilation. However, unlike many dynamic languages, it accepts and enforces type constraints. Where possible, the compiler uses type annotations to make decisions at compile time that would otherwise only be possible at runtime. You can write imperative, object-oriented, and functional programs in Raku. Declarative programming is supported through features like multiple dispatch, subtyping, and the regex and grammar engine."
The paragraph above is how Raku is described in the book Raku Fundamentals: A Primer with Examples, Projects, and Case Studies, copyright © 2020 by Moritz Lenz, Fürth, Bayern, Germany (book that I found as PDF on the Internet).
Raku started as Perl 6, the name was changed to Raku in 2019. Besides the obvious Perl influence, it contains inspirations from Ruby, Haskell, Smalltalk, and many other languages. My personal first impression is that it is extremely powerful, allowing to do a lots of things with a minimum of code, and, also very interesting, to do things in a lots of different ways.
Rakudo is a production ready implementation of Raku, written in NQP ("Not Quite Perl"), running on the dedicated MoarVM ("Metamodel on a Runtime") virtual machine. MoarVM is available for Windows, macOS and Linux (and some other operating systems). Rakudo intends to have monthly releases. Rakudo Star, released every 3 month, is Rakudo bundled with documentation and a selection of useful modules (in particular, the installer module zef). Rakudo Star is the easiest way to install Rakudo. This tutorial is about its installation and usage on Windows 11 (I suppose that the tutorial applies to Windows 10, too). The version, that I actually use is Rakudo Star 2024.05. You can download the Windows 64-bit installer from the rakudo.org website.
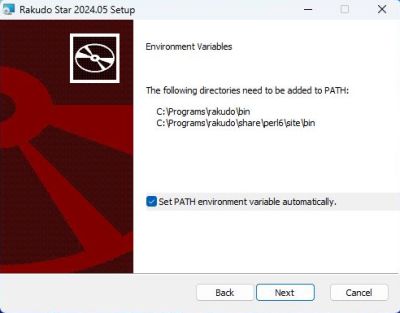
The setup program is a typical Windows installer. As always when the default installation directory is immediately beneath the C: root (C:\rakudo in this case), I change it; here, I chose C:\Programs\rakudo. Be sure that the PATH environment variable is automatically modified by the installer, in order to add the directories with the Rakudo executables.
|
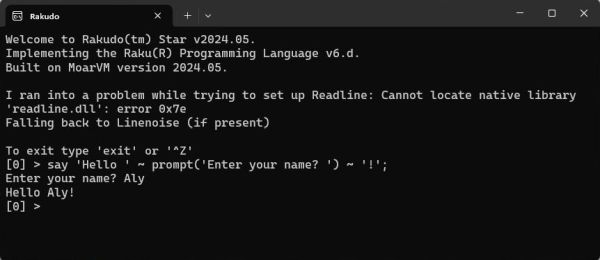
When the installation is finished, you'll find a launcher for the Rakudo shell in the Windows Start menu. The shell starts with the error message Cannot locate native library 'readline.dll'. As far as I understand, readline is only available for Linux and macOS; on Windows Linenoise will be used instead. The shell allows to enter Rakudo commands (as for example exit), as well as Raku code, that is directly interpreted. The screenshot shows the shell startup and the execution of some Raku code.
|
There was a (commercial) IDE for Raku, called Comma, and there was a free community edition of this software. I say "was" because the development of this software has been discontinued. However, you can still download the last release of the Comma IDE (available for Windows, macOS and Linux).
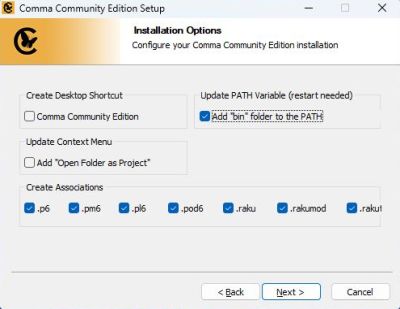
During installation, you can associate all or some of the Raku and Perl 6 file extensions with Comma. You can also add the Comma bin folder to the PATH environment variable.
|
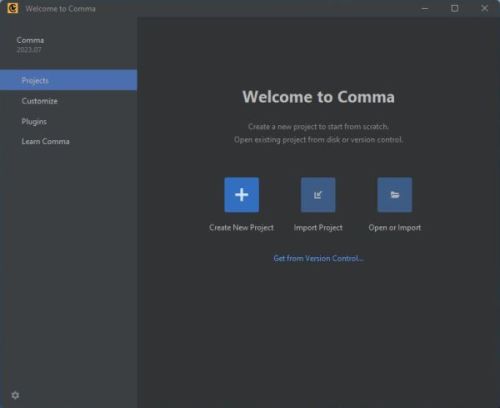
You should reboot your computer when the installation is finished. The screenshot shows the Welcome window of the IDE.
|
I did not take the time to have a look at the Comma documentation. If I had done it, I probably wouldn't have had the (little) problems that I encountered when trying to create my first Raku projects using the IDE. Please, note that the following paragraphs describe the experiences that I made using Comma, just the way I made them...
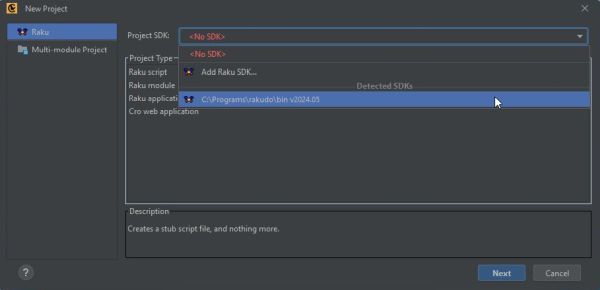
First, I created the directory C:\Data\Programming\Raku as directory for my Raku projects. Then, in that directory, I created the subdirectory "hello" as project folder for a simple "Hello World" script. Running Comma, in the Welcome window, choose Create new project. The first time, that you do this, you'll get the error message No SDK. Click the Add Raku SDK... link, to make Comma search for installed SDKs. In our case, it should find Raku v2024.05. Select it as SDK to be used in Comma.
|
With the SDK defined, you can create a new Raku project; as project type, choose Raku script (screenshot on the left). In the next Window, choose a project name. This name has to be the same as the one of your project folder (in our case: "hello") (screenshot on the right).
![Rakudo on Windows 11: Comma IDE - Creating a Raku Script project [1] Rakudo on Windows 11: Comma IDE - Creating a Raku Script project [1]](../screenshots/raku6a.jpg)
|
![Rakudo on Windows 11: Comma IDE - Creating a Raku Script project [2] Rakudo on Windows 11: Comma IDE - Creating a Raku Script project [2]](../screenshots/raku6b.jpg)
|
The first time that you create a project, you have to manually set the project directory. Use the Browse button (the 3 dots icon) next to project location, in order to browse to the directory that contains the project folder (in our case: C:\Data\Programming\Raku). All other paths will automatically be adapted (screenshot). Note, that for further projects, the correct project location is filled in automatically. If the project folder itself does not exist, it will be created (using the project name as folder name).
![Rakudo on Windows 11: Comma IDE - Creating a Raku Script project [3] Rakudo on Windows 11: Comma IDE - Creating a Raku Script project [3]](../screenshots/raku7.jpg)
|
The screenshot below shows the new project (with all automatically generated files) opened in Comma.
![Rakudo on Windows 11: Comma IDE - Creating a Raku Script project [4] Rakudo on Windows 11: Comma IDE - Creating a Raku Script project [4]](../screenshots/raku8.jpg)
|
Here is the code of my "Hello World" Raku script.
my $name = prompt "What's your name? ";
if ($name) {
say "Hello, $name!";
}
else {
say "Hello, World!";
}
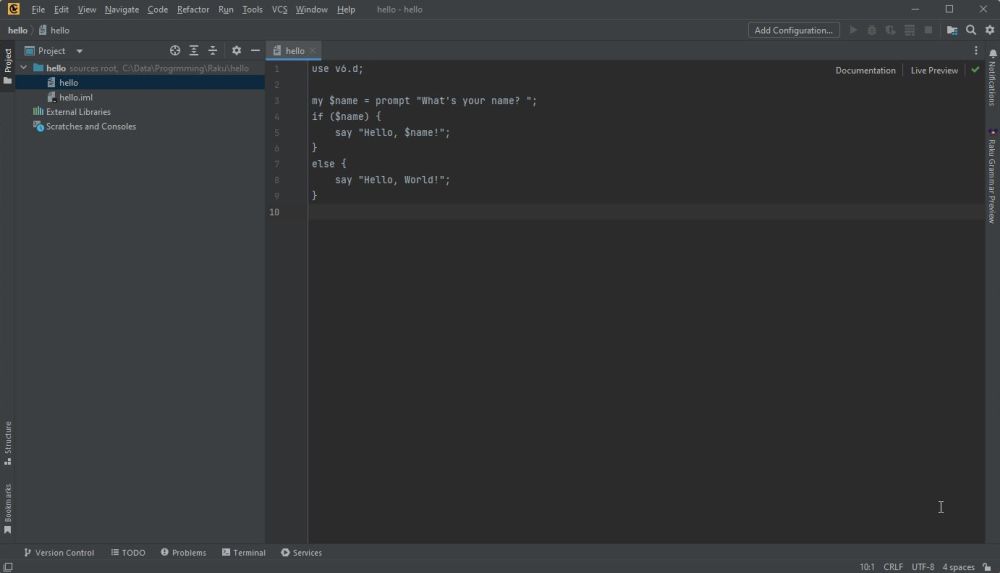
I entered this code as content of the file "hello" in the Comma editor. Note, that I removed the line #!/usr/bin/env raku. It's obviously for Linux, and as for Perl, there is no shebang line needed on Windows. The line use v6.d; is not mandatory, but it's good practice to include the Raku version. I do not use a MAIN sub. It may be used (similarly as in C/C++), or not; not sure if you should always use it, or only if it is needed (?).
|
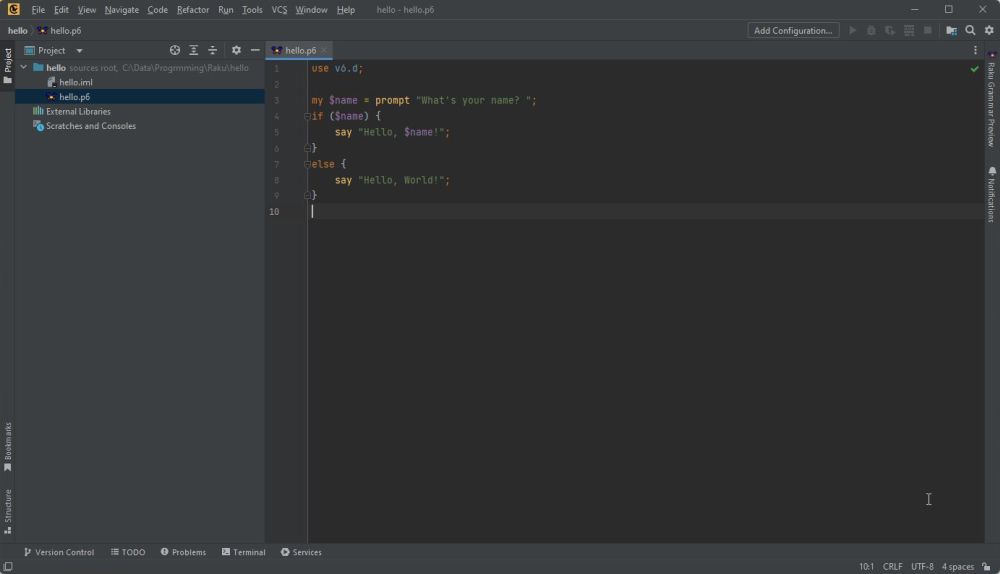
Where is the highlighting gone, you probably ask. This is one of the mentioned problems, that I encountered. In fact, after having saved the project, there is no more highlighting. I suppose that this is due to the fact that the "hello" script file has no file extension. I did not try to solve this problem, but actually use the following work-around. First, I close Comma, then I change the file name in Windows File Explorer (adding the extension). The next time that you open the project in Comma, the script file will appear with file extension in the left pane, and the Raku source code in the right pane will be highlighted.
|
Note: With my first Raku project, I used the file extension .p6 (found with the code examples, that I took as base for my script). Later, I learned that this extension is depreciated, and the correct file extension to use actually is .raku.
To run the script in Comma, choose Run > Run from the menu bar. For a new project, the opening Run dialog box contains one single choice: edit configuration. Selecting this option, opens the Run/Debug Configuration window. In this window, click the Add new run configuration... link. Another new small window opens, where you may choose between Raku and Raku test. I suppose that the first one is to run the script, the second one to run it with debugging (?).
![Rakudo on Windows 11: Comma IDE - Creating a new run/debug configuration [1] Rakudo on Windows 11: Comma IDE - Creating a new run/debug configuration [1]](../screenshots/raku11.jpg)
|
At the bottom of the Run - Unnamed window, that opens now, you probably see a red-font error message that says: Invalid data: Main script path is absent. Maybe, the reason for this is, that I renamed the script (by adding the file extension)? What you have to do is simple: click the folder icon at the right edge of the "Script" edit field; this opens a Select script dialog box, where you can browse to the script (in our case hello.p6 in the C:\Data\Programming\Raku\hello folder). Pushing the Apply button, will save the configuration with the project (if you don't want the name "Unnamed", enter another one in the "Name" edit field). Thus, the next time that you choose to run the project, you have directly access to an item of this name in the Run menu (and also in the Run dialog box, opened when you choose Run > Run); choosing this item, immediately runs the script.
![Rakudo on Windows 11: Comma IDE - Creating a new run/debug configuration [2] Rakudo on Windows 11: Comma IDE - Creating a new run/debug configuration [2]](../screenshots/raku12.jpg)
|
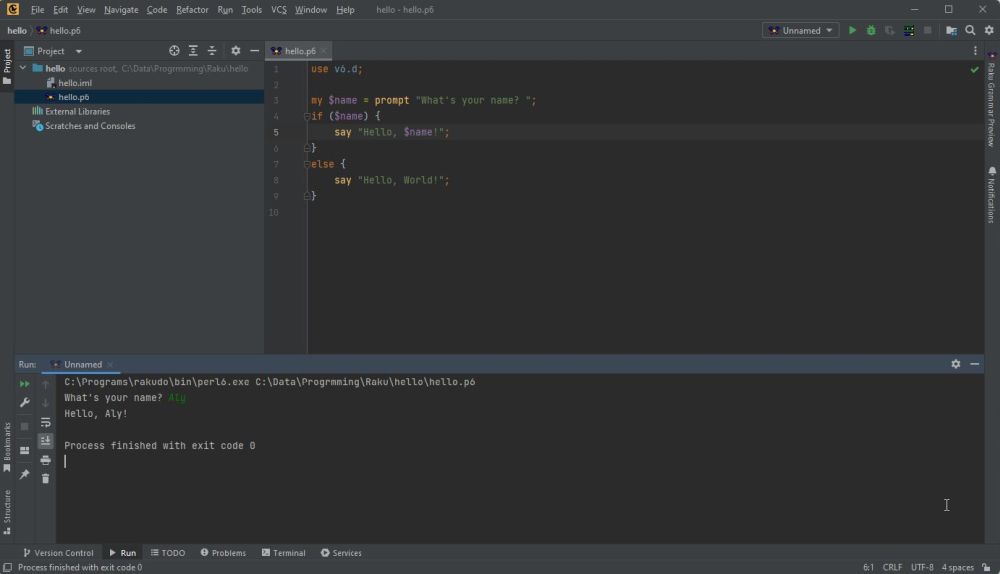
Pushing the Run button in the configuration window will execute the project (the script, in our case).
|
Here is the code of a simple "check for palindrome" Raku script.
my $word;
repeat {
$word = prompt "Enter a word ? ";
if ($word) {
if ($word eq $word.flip) {
say "This word is a palindrome";
}
else {
say "This word isn't a palindrome";
}
}
} until $word eq "";
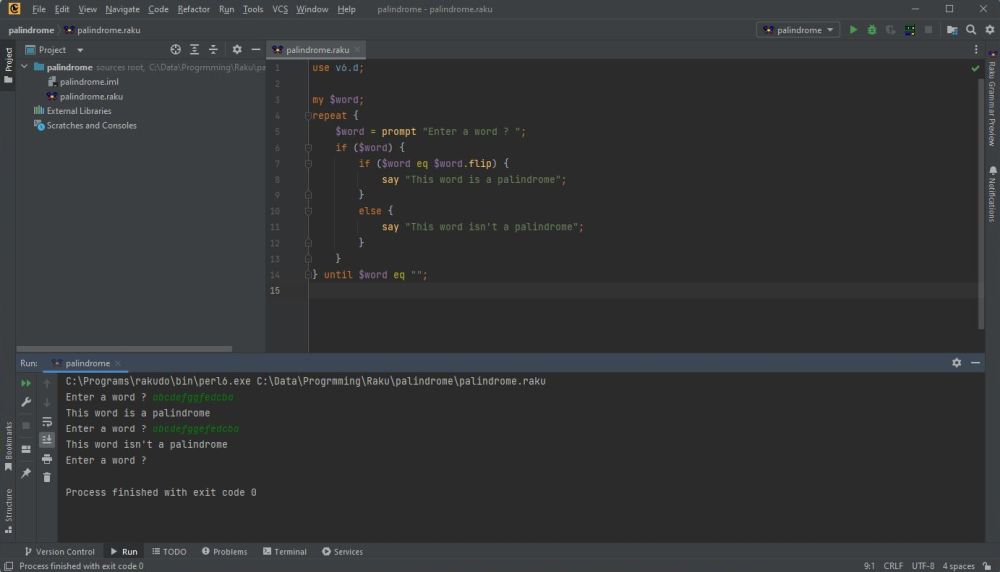
And the screenshot of the execution of the script in Comma.
|
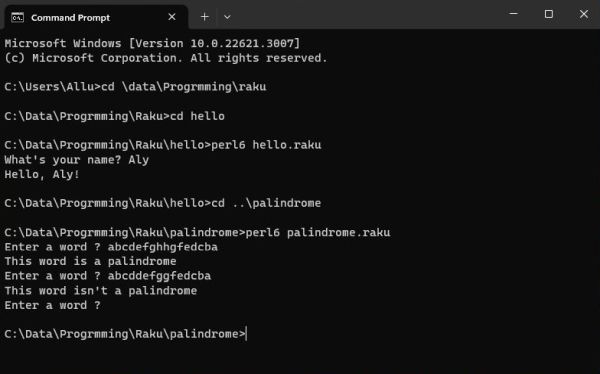
The screenshot below shows the execution of the scripts hello.raku (as I said, I renamed it...) and palindrome.raku in Windows Command Prompt. Note, that to invoke the Raku interpreter on Windows, you may either use raku.exe, or (as done here) perl6.exe.
|
To terminate this tutorial, here is my own first Raku script. The script has to be launched with the name of a file, that contains one or more DNA sequences in FASTA
format. The files are supposed to be valid FASTA files, and to contain valid DNA sequences, with all bases being either A, C, G, or T. The script counts these 4 bases
for each of the sequences found in the file and displays these counts together with the sequences' FASTA header and their lengths. Here is the code:
sub read_sequences($file) {
my %sequences;
my $header = "";
for $file.IO.lines.map(*.trim-trailing) {
if .starts-with(">") {
$header = .substr(1,);
}
else {
%sequences{$header}.push: $_;
}
}
%sequences{$_} .= join for %sequences.keys;
return %sequences;
}
sub count_bases($file) {
my %sequences = read_sequences($file);
for (sort keys %sequences) {
my $sequence = %sequences{$_};
say "$_ (", chars($sequence), " bases):";
say $sequence.comb.Bag.hash;
}
}
sub MAIN($file = "") {
if ($file) {
count_bases($file);
}
else {
say "Usage: basecount <filename>";
}
}
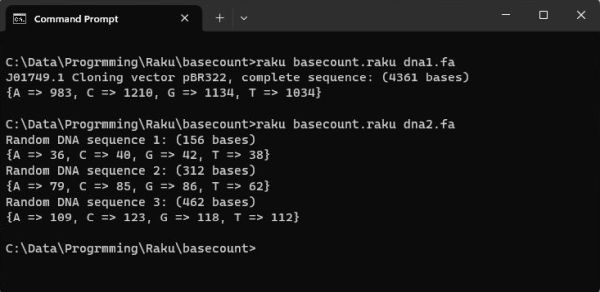
And here is the output of the script run in Windows Command Prompt and using as input the files dna1.fa and dna2.fa, also contained in the ZIP archive of the script download.
|
If you find this text helpful, please, support me and this website by signing my guestbook.