Modern COBOL development using Microfocus Visual COBOL.
COBOL (Common Business-Oriented Language) is one of the oldest and most widely used programming languages in the world. It was created in 1959 by a group of computer scientists who wanted to design a language that could be easily understood by business users and run on different machines. Since then, COBOL has been adopted by many industries, especially in the financial sector, government agencies, and retail businesses, to handle large amounts of data and transactions.
The success of COBOL up to today is impressive. Here, some facts, as published in the article COBOL
Today at the COBOL. Cowboys website:
There are several reasons why this "very old" programming language still plays a dominant role in the IT world in 2024, as published in the article
Importance of COBOL in 2023 at the Linked in
website:.
Some other reasons to use COBOL, as published in the article COBOL - still standing the test of time
at the opentext website:
You must also consider that for most societies it is financially impossible to rewrite the existing COBOL applications in some other language, especially that the estimated cost of one line of COBOL is lots less than for example one line of Java. Also, when working with critical data, replacing the existing applications, that are known to work correctly in hundreds of tested circumstances, with new ones, could result in very bad surprises. Finally, if COBOL survived during more than half of a decade, it's due to its adaptability. COBOL evolved, and continues to evolve, according to the needs of the day by welcoming new phrases, new meanings, even letters, and by slowly retiring anything no longer used. Thanks to the efforts of Micro Focus and their product called Visual COBOL, COBOL has become a modern programming language, supporting object-oriented programming and enabling you to write COBOL code that takes full advantage of new operating systems and platforms such as Microsoft's .NET framework, .NET Core, and the Java Virtual Machine. Even more: It has become possible to deploy COBOL applications, written decades ago, to .NET, JVM, and the cloud!
The bad news is that Visual COBOL is commercial, and such licenses are all but not cheap. The good news is that there is a free 1-year trial version. It is limited to one user on one computer, i.e. you cannot run the executables created on some other machine. Thus, useless for developing real COBOL applications, but an amazing product for educational purposes. And of course, for all those of us, who worked in COBOL development long years ago, the possibility to "go back to our roots" during 365 days...
Note: If you find product references or Internet links with the designation "OpenText" where you would have expected "Micro Focus", the reason for this is that Micro Focus has been bought by OpenText...
Microfocus Visual COBOL Personal Edition offers COBOL integration and development tools in Visual Studio, as well as in Eclipse. This tutorial is about the installation and usage of Visual COBOL for Visual Studio Personal Edition 9.0 on Windows 11. I suppose that it would also apply to Windows 10.
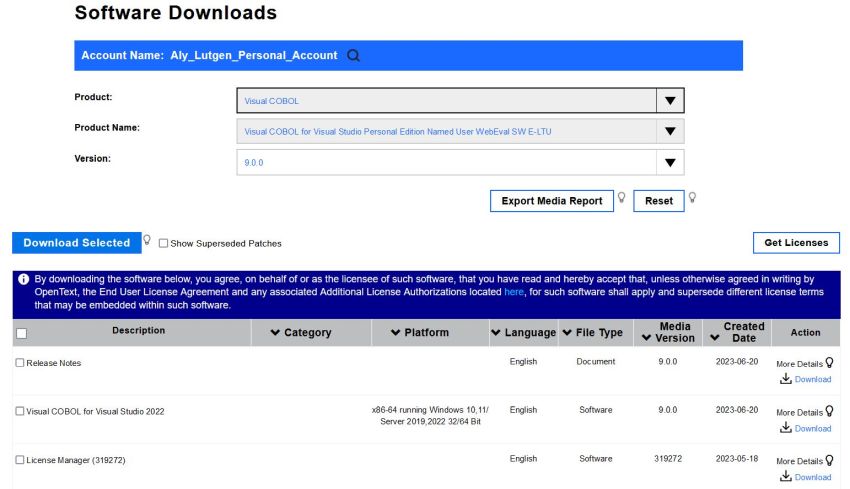
The installation of Visual COBOL requires several steps, the first one being the request of a free trial. This may be done at the Visual COBOL Personal Edition page of the Micro Focus website. Choose the Visual COBOL for Visual Studio Personal Edition release. You'll have to create an account; among others, your name, email, and phone number have to be filled in. In the confirmation email, you'll find a link to the accounts login page at my.microfocus.com. On the "Products and Trials > Free Trials" page, you can download the software.
|
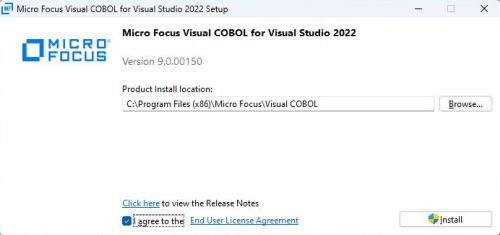
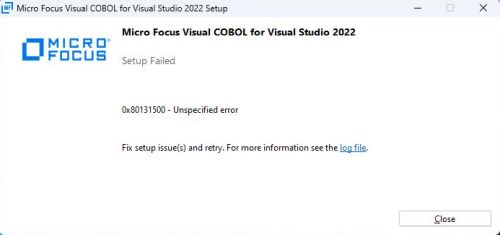
I downloaded the Personal Edition for Visual studio 2022, that of course has to be installed on the computer where you intend to install Visual COBOL. The screenshot on the left shows the start-up of the setup program, the screenshot on the right shows how my first trial to install the software failed with the error message Setup failed: 0x80131500 - Unspecified error.
|
|
I think that this problem is due to the fact that some Visual Studio extensions have to be downloaded, and I wasn't connected to the Internet when performing the installation. Thus, to succeed the installation, an active Internet connection is required!
If you have a look at the My OpenText screenshot above, you can see that besides the COBOL development environment, there is also a download link for downloading the License Manager. You don't need to download this software; License Manager is automatically installed when installing Visual COBOL for Visual Studio Personal Edition.
The next step consists in performing the license activation. For this, you'll have to sign in to your account. Visual COBOL for Visual Studio Personal Edition should be listed on the My Trials page. Push the blue Activate button to start the activation process.
![Micro Focus Visual Cobol Windows 11 - Activating the 1-year trial version license [1] Micro Focus Visual Cobol Windows 11 - Activating the 1-year trial version license [1]](../screenshots/mfcobol3.jpg)
|
The license activation requires some more information to be filled in: "Target name" normally is the name of the computer, where you have installed Visual COBOL. You may enter some notes, describing the license and confirm your email address. Finally, you have to choose a version of the software (version 9.0 in my case).
![Micro Focus Visual Cobol Windows 11 - Activating the 1-year trial version license [2] Micro Focus Visual Cobol Windows 11 - Activating the 1-year trial version license [2]](../screenshots/mfcobol4.jpg)
|
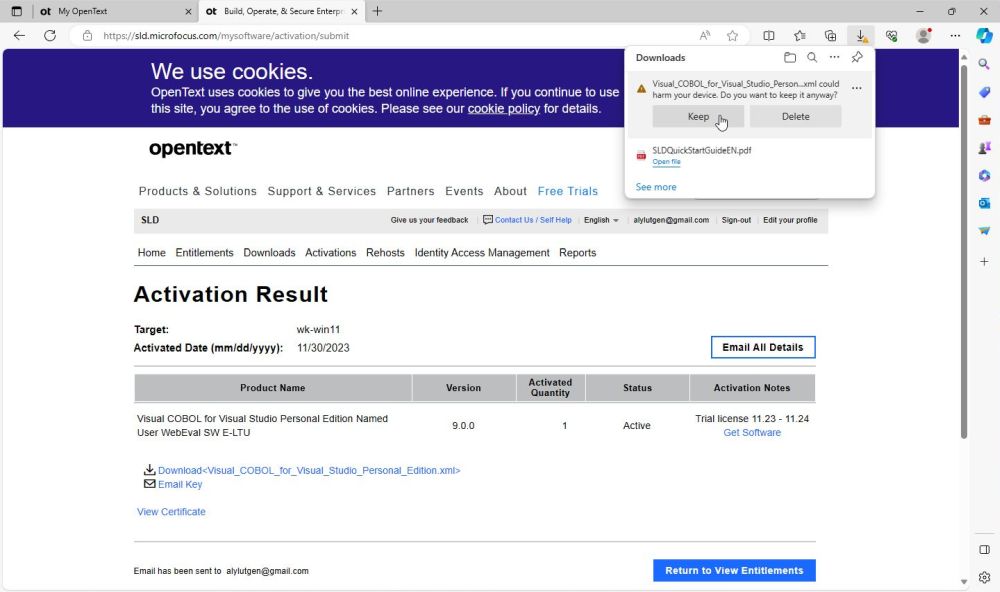
After having confirmed the activation details, the Activation Results page is displayed. Here you can download the license file (in XML format), that you need to locally activate your Visual COBOL copy. As you can see on the screenshot below, downloading this file may be blocked (by Windows, or by the antivirus software?), except if you explicitly allow it. Anyway, you also have the possibility to let you send an email with the activation details, including the XML file as attachment.
|
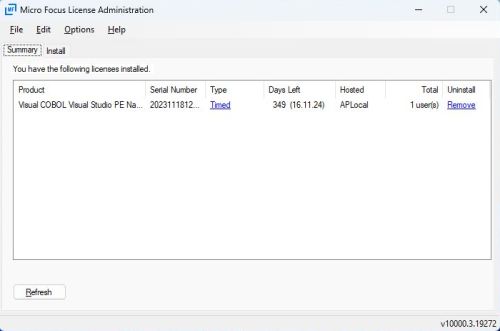
Activating the license on the local computer where Visual COBOL is installed is simple. Run License Manager, and in the Install tab, use the Browse button to find the XML license file that you downloaded, or got by email. Then, push the Install licenses button. A message in green, telling you that the license has been successfully added should be displayed. And if you change to the Summary tab, you can view the license details.
|
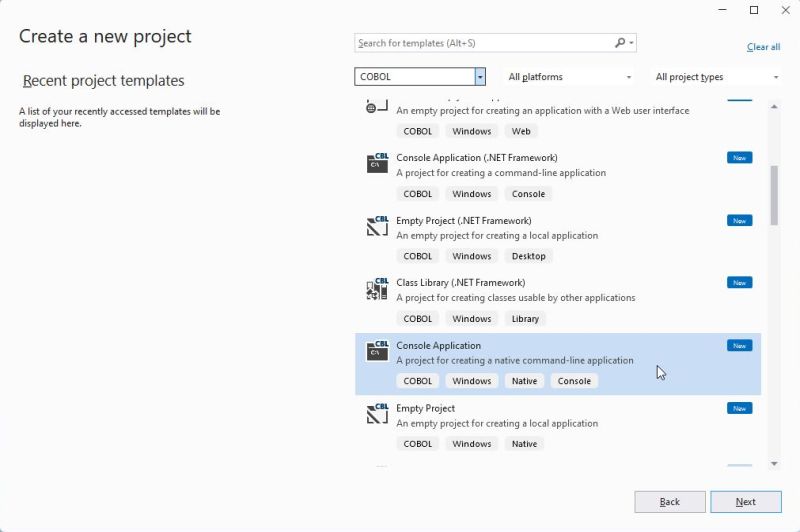
If you run Visual Studio, and choose to create a new project, entering "COBOL" in the search box will show you all the different kinds of COBOL projects, that you can build. We'll see several examples in the following paragraphs.
|
Native command line applications.
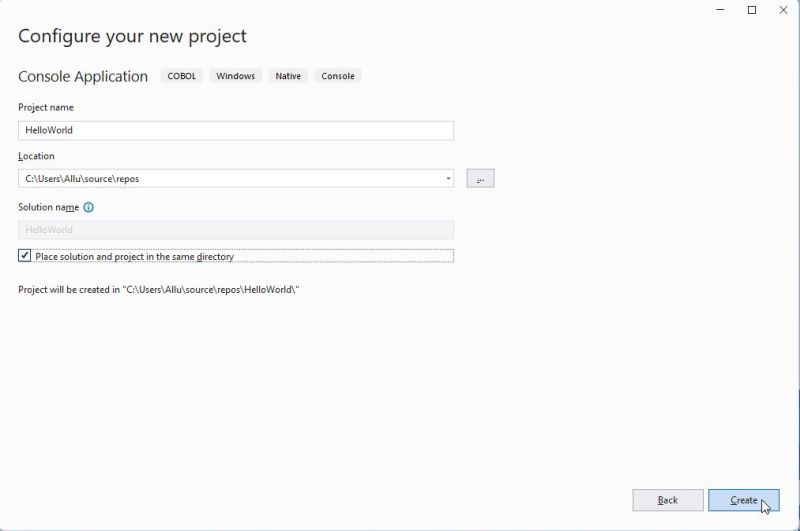
On the entry page of Visual Studio, choose to create a new project, and then select to create a COBOL Console Application project. On the Configure your new project page, give the project a name (I chose "HelloWorld"), and (for simplicity and appropriate for most cases), select the "Place solution and project in the same directory" check box. This will create the project folder C:\Users\<user-name>\source\repos\<project-name>.
|
Visual Studio creates a COBOL source skeleton, with (in the project folder) a source file called "Program1.cbl". You can rename this file by right-clicking it in Solution Explorer (top-right pane in the IDE) and choosing Rename from the opening context menu. I renamed my COBOL source file to "hello.cbl", then I replaced the template code by the following (all standard COBOL) code:
identification division.
program-id. Hello.
procedure division.
display 'HELLO WORLD from COBOL!'.
end program Hello.
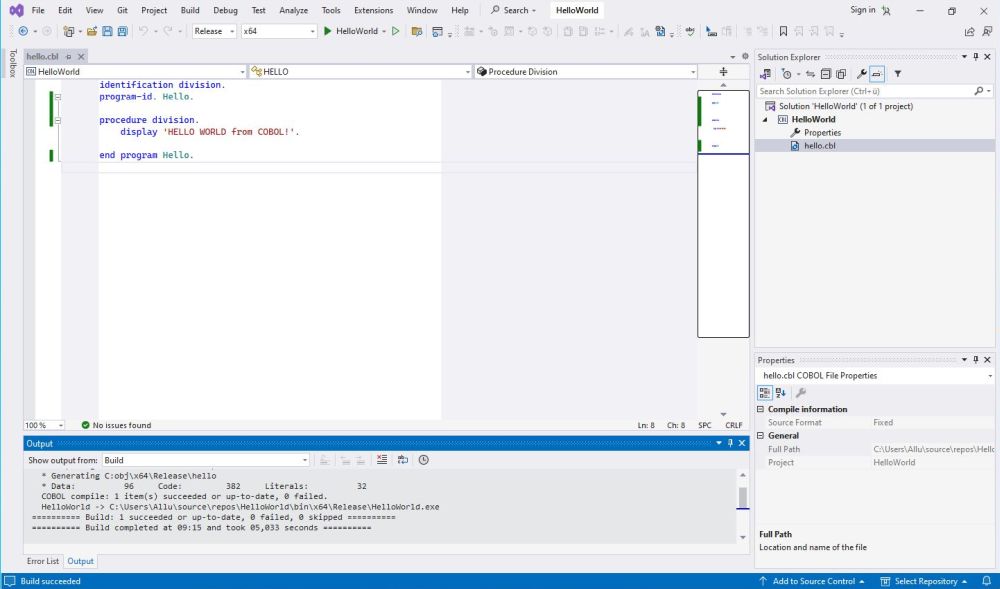
By default, the build type is set to "Debug"; you can change this by choosing "Release" in the corresponding combo box. The target platform is set by default to "x64" (i.e. Windows 64-bit), what is ok. To build the solution, choose Build > Build solution from the menu bar. The screenshot shows the output produced by the build process.
|
You'll find the executable in C:\Users\<user-name>\source\repos\<project-name>\bin\x64\Release. Note that the executeble's name is the same as the solution name, that is, with the configuration that we use, the same name as the project name that you specified when creating the project (here "HelloWorld").
I decided to put all my COBOL executables in a common directory (actually C:\Data\Programming\Executables). But, when trying to run the program from there, I got the error message DLL cblrtsm.dll not found. This is not surprising: The dynamic link libraries needed by the COBOL executables are located in a subdirectory of the Visual COBOL installation folder (actually C:\Program Files (x86)\Micro Focus\Visual COBOL\bin64), and Windows cannot find them there. The simplest way to solve the issue is to copy the DLL to the directory that contains the executable.
Note: Other DLLs that may be needed (depending on the application type, in particular cblviom.dll and cblintm.dll.
With the DLL copied, you can run the program in Windows Command Prompt.
![Micro Focus Visual Cobol Windows 11 - Running a COBOL Console Application in Command Prompt [1] Micro Focus Visual Cobol Windows 11 - Running a COBOL Console Application in Command Prompt [1]](../screenshots/mfcobol10.jpg)
|
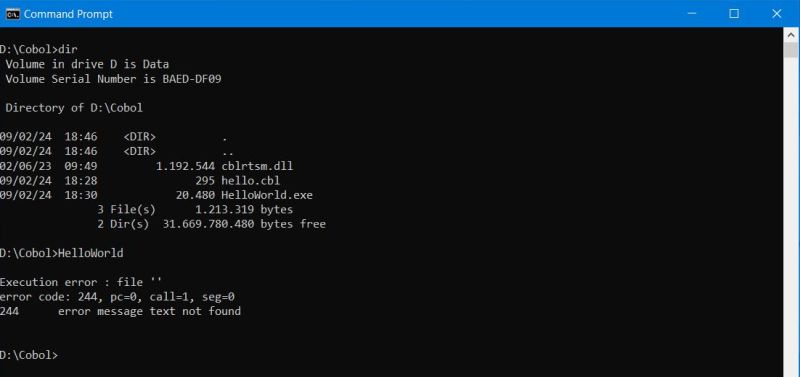
On the other hand, trying to run the program on my Windows 10 failed. Remember, what I said at the beginning of the tutorial: The trial license is limited to one computer, thus you can't run the programs created with Visual COBOL on another machine!
|
Here is another example of native COBOL command line application. It shows the usage of the instruction string to eliminate the spaces at the end of a pic x() variable (such variables have a fixed length, so when displaying them, all these spaces are displayed as well).
identification division.
program-id. Hello3.
data division.
working-storage section.
77 Name pic X(25) value spaces.
77 Greeting pic X(33).
procedure division.
display 'Please, enter your name? ' no advancing.
accept Name.
if Name = spaces
move "World!" to Name
end-if.
string "Hello " delimited by size,
Name delimited by space, "!"
into Greeting.
display Greeting.
stop run.
end program hello3.
Here is the program output in Windows Command Prompt.
![Micro Focus Visual Cobol Windows 11 - Running a COBOL Console Application in Command Prompt [2] Micro Focus Visual Cobol Windows 11 - Running a COBOL Console Application in Command Prompt [2]](../screenshots/mfcobol12.jpg)
|
Command line applications with screen section.
This is still native COBOL, so the procedure to create the project is the same as before. If you are acquainted with writing COBOL programs on a PC, you should know how to use the screen section, and have no difficulties to understand the following code. Otherwise, have a look at a COBOL book...
identification division.
program-id. Hello.
data division.
working-storage section.
01 user-info.
05 user-name-in pic x(25) value spaces.
05 user-country-in pic x(25) value spaces.
05 user-profession-in pic x(25) value spaces.
05 user-name-out.
10 user-name-hello pic x(6) value spaces.
10 user-name pic x(25) value spaces.
05 user-profession pic x(25) value spaces.
05 user-country-out.
10 user-country-from pic x(5) value spaces.
10 user-country pic x(25) value spaces.
05 last-line pic x value space.
screen section.
01 screen-data.
05 value "User greeting screen" blank screen line 1 col 10
foreground-color is 15.
05 value "Name" line 4 col 10.
05 name-input line 4 col 22
pic x(25) using user-name-in.
05 value "Country" line 5 col 10.
05 country-input line 5 col 22
pic x(25) using user-country-in.
05 value "Profession" line 6 col 10.
05 profession-input line 6 col 22
pic x(25) using user-profession-in.
05 name-output-hello line 9 col 10
pic x(5) from user-name-hello.
05 name-output line 9 col 16 pic x(25) from user-name
foreground-color is 14.
05 profession-output line 10 col 10
pic x(25) from user-profession.
05 county-output-from line 11 col 10
pic x(4) from user-country-from.
05 country-output line 11 col 15
pic x(25) from user-country.
05 last-line-output line 14 col 1
pic X from last-line.
procedure division.
display screen-data.
accept screen-data.
move "Hello" to user-name-hello.
if user-name-in = spaces
move "Unknown user" to user-name
else
move user-name-in to user-name.
if user-profession-in = spaces
move "no profession" to user-profession
else
move user-profession-in to user-profession.
move "from" to user-country-from.
if user-country-in = spaces
move "an unknown country" to user-country
else
move user-country-in to user-country.
move space to last-line.
display screen-data.
end program Hello.
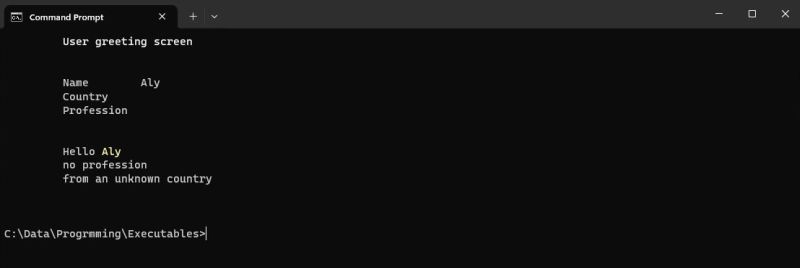
Program output in Windows Command Prompt.
|
Object-oriented command line applications.
OO-COBOL, that sounds a little bit weird, doesn't it? But, thanks to Micro Focus, COBOL is adaptable, and I guess that a modern programming language is supposed to support OO.
Create a new project, choosing COBOL Console Application (.NET Framework) as project type. As you can see on the screenshot below, I chose "HelloUser2" as project name, and as before selected the checkbox to place solution and project in the same directory. For this type of project, you'll also have to select a given version of .NET; the default, .NET Framework 4.7.2 works fine.
![Micro Focus Visual Cobol Windows 11 - Visual Studio: Creating a .NET COBOL Console Application [1] Micro Focus Visual Cobol Windows 11 - Visual Studio: Creating a .NET COBOL Console Application [1]](../screenshots/mfcobol14.jpg)
|
This creates the project "HelloUser2", and just as before, creates a COBOL program template file, called by default "Program1.cbl", that I renamed to "Hello.cbl". When renaming the file, you will be asked if you also want to rename all instances of this code element; do so (for the current project only). I also (manually) changed the program name in the COBOL source. The screenshot shows the source of Hello.cbl at this stage. Note the "special" program identification for this kind of project: program-id. Hello as "HelloUser2.Hello".
![Micro Focus Visual Cobol Windows 11 - Visual Studio: Creating a .NET COBOL Console Application [2] Micro Focus Visual Cobol Windows 11 - Visual Studio: Creating a .NET COBOL Console Application [2]](../screenshots/mfcobol15.jpg)
|
In order to use object-oriented programming, we have to define a class. From the menu, choose Project > Add new item, and in the opening Add New Item window, select COBOL class. Push the Add button to add the new file to the project.
![Micro Focus Visual Cobol Windows 11 - Visual Studio: Creating a .NET COBOL Console Application [3] Micro Focus Visual Cobol Windows 11 - Visual Studio: Creating a .NET COBOL Console Application [3]](../screenshots/mfcobol16.jpg)
|
This creates a new template file, called by default "Class1.cbl", that I renamed to "HelloUser.cbl". When renaming the file, you will be asked if you also want to rename all instances of this code element; do so (for the current project only).
![Micro Focus Visual Cobol Windows 11 - Visual Studio: Creating a .NET COBOL Console Application [4] Micro Focus Visual Cobol Windows 11 - Visual Studio: Creating a .NET COBOL Console Application [4]](../screenshots/mfcobol17.jpg)
|
The application logic has to be implemented as a method of our newly created class (file HelloUser.cbl). I called my method "SayHello" and its code is shown below. Note, the need of declaring a new type of section, the local-storage section. Also note that with .NET projects, there are new data types for variable declarations available, in particular the data type string, similar to this data type in other programming languages. Assigning a value to a string variable is not done with a move instruction, but with the new instruction set. Finally, note the new operator & that allows to easily concatenate strings.
class-id HelloUser2.HelloUser.
method-id SayHello static.
local-storage section.
77 UserName string.
procedure division.
display "Please, enter your name? " no advancing.
accept UserName.
if UserName = ""
set UserName = "World".
display "Hello " & UserName & "!".
end method.
end class.
The code in the main program (Hello.cbl) consists of invoking a method of our class (here, the method "SayHello"). Here is the code of my main program.
program-id. Hello as "HelloUser2.Hello".
procedure division.
invoke type HelloUser::SayHello().
end program Hello.
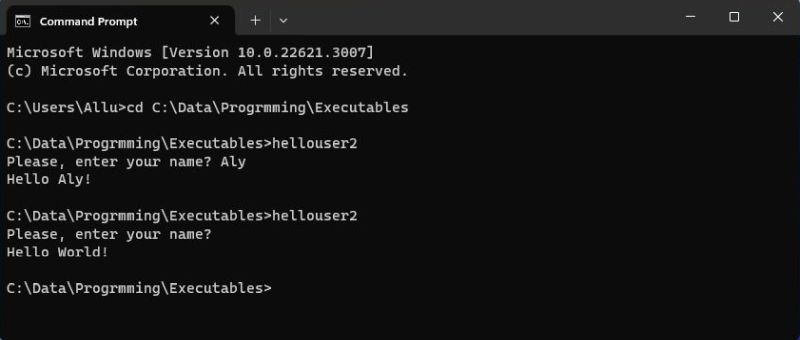
I replaced the code templates of the COBOL files by the code above, then built the solution. As before, I copied the executable (HelloUser2.exe) to C:\Data\Programming\Executables, and run it in Command Prompt. The screenshot shows the program output.
|
Windows GUI applications.
Create a new project, choosing COBOL Windows Forms Application (.NET Framework) as project type. I named this project "HelloWorld2", and as before, selected .NET Framework 4.7.2 as .NET version. The screenshot shows the project in Visual Studio, immediately after its creation.
![Micro Focus Visual Cobol Windows 11 - Visual Studio: Creating a Windows Forms (.NET) COBOL Application [1] Micro Focus Visual Cobol Windows 11 - Visual Studio: Creating a Windows Forms (.NET) COBOL Application [1]](../screenshots/mfcobol19.jpg)
|
To switch between the display of the source code and the form design view, you can use the menu commands View > Code resp. View > Designer. Another possibility is to use the items from the Windows menu. To display the code of a given COBOL source file, select this file in Solution Explorer (top-right pane).
The form design is stored in a file with default name Form1.Designer.cbl. This file is automatically generated and you can just let it as it is.
![Micro Focus Visual Cobol Windows 11 - Visual Studio: Creating a Windows Forms (.NET) COBOL Application [2] Micro Focus Visual Cobol Windows 11 - Visual Studio: Creating a Windows Forms (.NET) COBOL Application [2]](../screenshots/mfcobol20.jpg)
|
The file Main.cbl contains the class definition of <project-name>.Main (in our case "HelloWorld2.Main"). This class is used to initialize the environment and launch the application. Here is the code of my Main.cbl. Again, this is all automatically generated and there is no need to modify the code.
class-id HelloWorld2.Main.
method-id Main static
attribute System.STAThread.
local-storage section.
01 mainForm type HelloWorld2.Form1.
procedure division.
set mainForm to new HelloWorld2.Form1()
invoke type System.Windows.Forms.Application::EnableVisualStyles()
invoke type System.Windows.Forms.Application::Run(mainForm)
goback.
end method.
end class.
In Designer view, selecting a component on the form will display its properties in the bottom-right pane. Using the buttons in the tool bar of this pane, you can switch between Properties and Events. The only property, that I changed for my form itself, was the property Text, that is used to set the form title (window title in the running application). I set this property to "Hello World".
To add new components to the form, choose View > Toolbox from the menu. This will display a window with all available components. To create a new component, just drag and drop the corresponding item from the toolbox window to the form. The screenshot shows, how I created a new button, that in the button's property sheet I renamed to "btSayHello" and the caption of which (Text property) I set to "Say Hello".
![Micro Focus Visual Cobol Windows 11 - Visual Studio: Creating a Windows Forms (.NET) COBOL Application [3] Micro Focus Visual Cobol Windows 11 - Visual Studio: Creating a Windows Forms (.NET) COBOL Application [3]](../screenshots/mfcobol21.jpg)
|
Moving the mouse over a component changes the mouse pointer into a crosshair; use drag and drop to move the component to a different location on the form. To move a component to a given position (as for example centered within the form, or aligned with other components), select it and choose one of the items of the Format menu. To resize a component, drag one of the handles available at its borders.
After having created the button, I created a textbox (this corresponds to an edit field in Lazarus), named it tbHello, resized and re positioned it, changed the font size and style, and set it to read-only and without tab-stop. I also resized the form itself. The screenshot below shows the final form layout.
![Micro Focus Visual Cobol Windows 11 - Visual Studio: Creating a Windows Forms (.NET) COBOL Application [4] Micro Focus Visual Cobol Windows 11 - Visual Studio: Creating a Windows Forms (.NET) COBOL Application [4]](../screenshots/mfcobol22.jpg)
|
The screenshot also shows how to associate an event with the button. With the button selected, in the bottom-right pane, use the second button on the toolbar to switch from Properties to Events. Then double-click on Click in order to define an on-click event.
Doing so, creates the method header for the button on-click event. The code is written to a file, that I didn't mention so far, and that by default is called Form1.cbl. Partially generated by Visual Studio, it's in this file, where we'll have to insert the code of the application logic. Here is the code of my Form1.cbl. The statement in bold corresponds to the code that will be executed when the method "btSayHello_Click" is invoked (when the user pushes the button). This code (having to be entered manually, of course), simply moves the string "HELLO WORLD!" to the text box (that is empty, when the application starts up).
class-id HelloWorld2.Form1 is partial
inherits type System.Windows.Forms.Form.
working-storage section.
method-id NEW.
procedure division.
invoke self::InitializeComponent
goback.
end method.
method-id btSayHello_Click final private.
procedure division using by value sender as object e as type System.EventArgs.
move "HELLO WORLD!" to self::tbHello::Text.
end method.
end class.
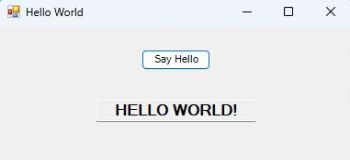
Building the solution creates the executable HelloWorld2.exe, that is a Windows desktop application, that you can launch by double-click. The screenshot shows the application execution on my Windows 11 (actually after I had pushed the "Say Hello" button).
|
As further examples of COBOL programming, you might want to have a look at my articles Handling indexed-sequential files in COBOL and Accessing a MySQL database with Microfocus Visual COBOL.
If you find this text helpful, please, support me and this website by signing my guestbook.