Modern Fortran development using Intel Fortran.
The first FORTRAN compilers have been released long, long time ago, but FORTRAN continues to be developed and to be used in "real world" applications. The best proof of the importance of this programming language is that the development suite from Intel actually includes a FORTRAN compiler. The Intel Fortran Compiler can be downloaded and installed in two ways:
- As part of the Intel oneAPI HPC Toolkit.
- As a standalone package.
Installation on Windows 8.1.
With Visual Studio 2019 installed, I succeeded to install the Intel oneAPI Base Toolkit 2022.2.0 and the Intel oneAPI HPC Toolkit 2022.2.0 (including Fortran) on Windows 8.1. Running the offline installers, you have first to specify a temporary directory to extract the installation files. Then, the installation requirements are checked and setup automatically started. With both toolkits, I got the warning that compatibility issues may occur. The 2022 version has not been tested on Windows 8.1, and product functionality may not meet expectations. How far this version of oneAPI in general and the Fortran compilers in particular are supported on Windows 8.1, I can't say. I never tried it out...
Note: The base toolkit is not absolutely needed to use the HPC toolkit, and there is no sense to install it on a machine with limited disk space. In fact, the oneAPI base package is huge: the required space is told to be 30 GB (!).
During installation of the base toolkit on my VMware virtual machine I got the warning that no relevant GPU driver was found. This is obvious, and you can ignore the message; the product can still be used with the CPU.
Also with the base toolkit, I also got several messages that Windows has blocked the installation of a not digitally signed driver. The setup process was not affected by these issues. No idea, how much effect it has on developing Fortran applications.
Except for the possible compatibility issues, the HPC toolkit installed without causing any problems.
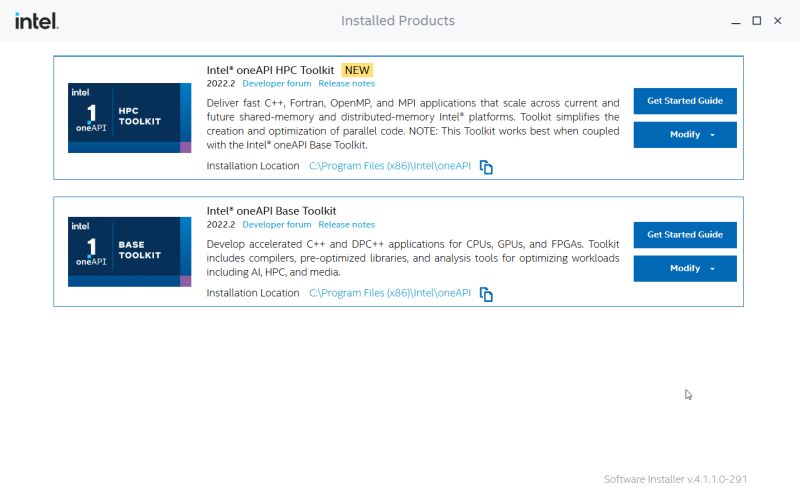
The installation of both packages was actually done by the Intel Software Installer, that can be used to modify the installed products, as well as to access the online documentation. The screenshot shows the Intel software installed on my Windows 8.1.
|
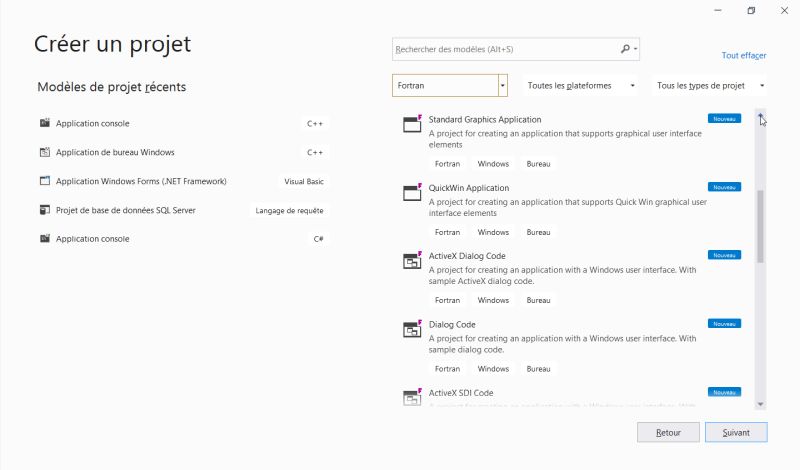
The available Fortran projects have been added to the project list in Visual Studio. The screenshot below shows some of them (if Visual Studio is in French here, it's because my Windows 8.1 is a French language version).
|
Installation on Windows 11.
With Visual Studio 2022 installed, the installation of both the base and the HPC toolkits (version 2024.0.1) failed on my Windows 11 VMware virtual machine. After the installation files have been extracted, and the system requirements have been checked, the installer starts up as an empty white window. This is not a VMware problem. The issue is discussed in dozens of posts. Some of them say that the problem is at Microsoft's. Proposed solutions include to reinstall Visual Studio, to exchange some DLL by an older version, to buy another graphics card... No idea, what the working solution is. After several trials I gave up, and decided to install the standalone version of the Fortran compilers.
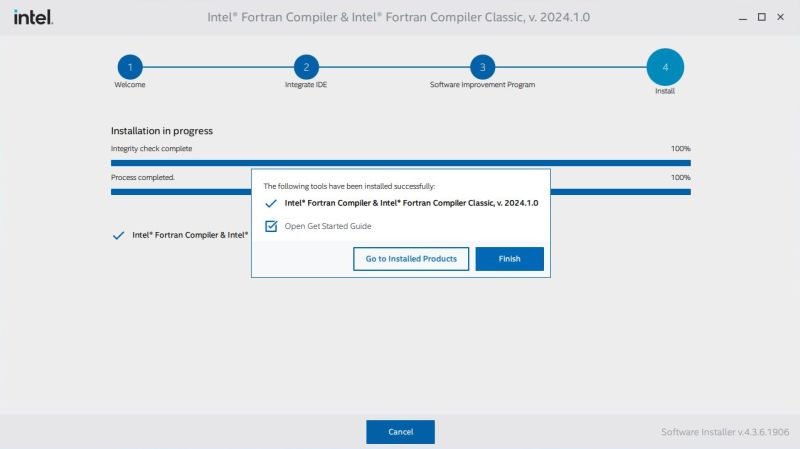
The installation of Intel Fortran Compiler & Intel Fortran Compiler Classic 2024.0.2 failed with another empty white window. Finally, using the offline installer of Intel Fortran Compiler & Intel Fortran Compiler Classic 2024.1.0, I succeeded. Here is the download link of the Intel Fortran standalone installer.
Notes:
- Even when using the offline installer, an active Internet connection is required. I suppose that this is because the installer needs to download some additional Visual Studio components.
- As version 2024.0.2 of the standalone package failed in the same way as the oneAPI packages, whereas version 24.1.0 succeeded, it is possible that Intel has resolved the issue, and that the actual versions of the oneAPI packages install correctly on Windows 11 (?).
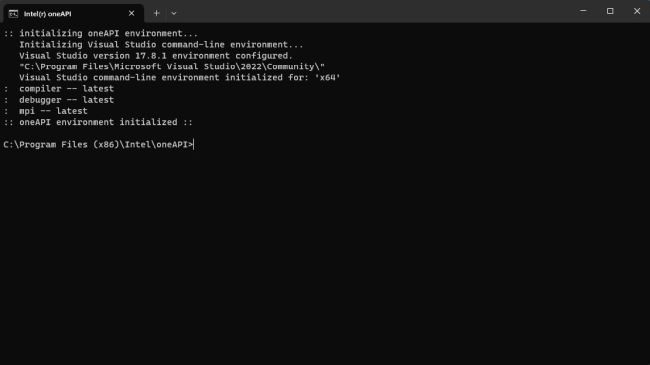
The installer creates two shortcuts in the Windows Start menu. These are command line oneAPI environments for 32-bit resp. 64-bit development. I did not try these out...
|
The first time that you use Visual Studio after the installation of the Intel software, the integration of Intel Fortran into Visual Studio is launched. Be patient, this may take a (very) long time...
|
Building Intel Fortran applications.
Here are the (usual) steps to build an Intel Fortran program or application in Visual Studio:
- On the main Visual Studio page, choose to create a new project
- On the opening Create a new project page, select a project type (among those available for Fortran).
- Enter a project name. With Place solution and project in the same directory selected, this will, by default, create the folder C:\Users\<user-name>\source\repos\<project-name>. It's in that folder that all files concerning this project will be paced.
- When the new solution is created, choose to add a new Fortran form-free file (by choosing Project > Add new item... from the menu bar). A new file with the extension .f90 is created in the project directory and added in Visual Studio Solution Explorer. You can rename the file (I guess that it should have the same name as the one stated in the source program statement) from the context menu that opens if you right-click it in Solution Explorer.
- Depending on the project type, this Fortran source file may or may not contain some template code. Anyway, it opens in the Visual Studio source editor, and you can enter your source code now.
- To build the program, set a target (e.g. x64, release), then choose Build > Build solution from the menu bar.
- The source file is stored in the project folder itself. The executable will be created in <project-name>\target; e.g. <project-name>\x64\Release. Note, that in Visual Studio the name of the executable created is the name of the solution (that may be different from the name of the source file).
The screenshots below show how I created a project of type "Empty project"; this type is used to create a native Fortran command line program.
![Intel Fortran on Windows 11 - Visual Studio: Creating a Fortran command line project [I] Intel Fortran on Windows 11 - Visual Studio: Creating a Fortran command line project [I]](../screenshots/intelfortran5a.jpg)
|
![Intel Fortran on Windows 11 - Visual Studio: Creating a Fortran command line project [II] Intel Fortran on Windows 11 - Visual Studio: Creating a Fortran command line project [II]](../screenshots/intelfortran5b.jpg)
|
I then added a new Fortran 90 file, called pascals_triangle.f90, to the project. Here is the code (taken from the Rosetta Code website).
PROGRAM Pascals_Triangle
CALL Print_Triangle(20)
END PROGRAM Pascals_Triangle
SUBROUTINE Print_Triangle(n)
IMPLICIT NONE
INTEGER, INTENT(IN) :: n
INTEGER :: c, i, j, k, spaces
DO i = 0, n-1
c = 1
spaces = 3 * (n - 1 - i)
DO j = 1, spaces
WRITE(*,"(A)", ADVANCE="NO") " "
END DO
DO k = 0, i
WRITE(*,"(I6)", ADVANCE="NO") c
c = c * (i - k) / (k + 1)
END DO
WRITE(*,*)
END DO
END SUBROUTINE Print_Triangle
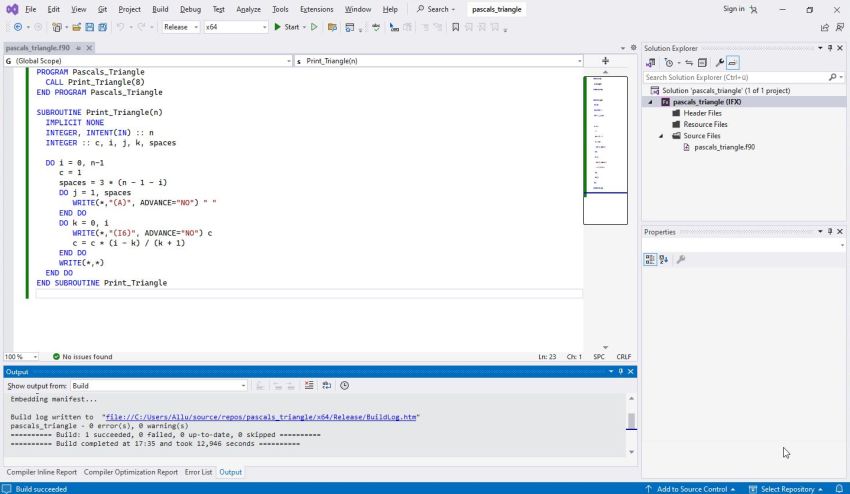
The screenshot shows the successful build in Visual Studio.
|
In order to run the executable from a custom directory, respectively in order to run the executable on another computer, the files libifcoremd.dll and libmmd.dll are necessary. You can find these DLLs in the directory "C:\Program Files (x86)\Intel\oneAPI\compiler\2024.1\bin", where it is supposed that you use version 2024.1, and that you installed the product to the default directory. The simplest way to make the Fortran programs work is to copy the DLLs together with the executable.
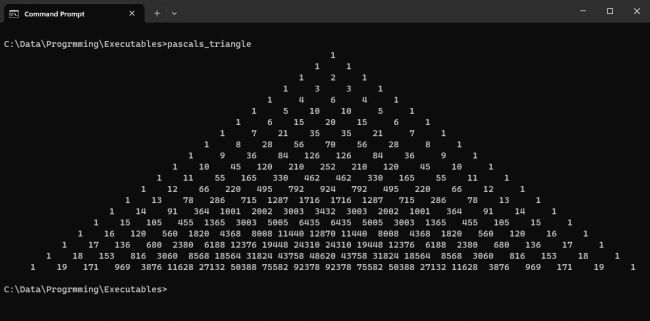
The screenshot shows the execution of pascals_triangle.exe (note that in the source above, as on the screenshot n=20, whereas in the original code, and also in the previous screenshot n=8).
|
Fortran QuickWin and Standard Graphics applications.
With Fortran QuickWin projects, you create an application consisting of a window with title bar, menu bar, status bar, and (if necessary) scrollbars. Optional child windows may also be created. The window content may be copied as text, as well as as bitmap. Closing the window terminates the program.
Fortran Standard Graphics applications are some kind of simplified QuickWin application. There is a single window, appearing similar to Command Prompt, but actually being a graphics window, with possibility to set its resolution and other properties. Such applications also give access to basic graphics routines, such as setting a color, or drawing a line.
Both Fortran QuickWin and Standard Graphics applications must include a use ifqwin statement immediately following the program statement.
The following program (a modification of the "qwtest.f90" QuickWin sample listed in "Using Intel Visual Fortran to Create and Build Windows-Based Applications" creates 3 windows with some text within. Note, that these windows may be written to, just as if they were standard files.
program QuickWin
use ifqwin
open(11, file="user")
write(11, *) "This is the first window, opened at unit 11"
open(12, file="user")
write(12, *) "This is the second window, opened at unit 12"
open(13, file="user")
write(13, *) "This is the third window, opened at unit 13"
write(13, *)
write(13, *) "The 3 windows can be read and written with normal Fortran"
write(13, *) "I/O statements. The size of each window on the screen can be"
write(13, *) "modified by SETWSIZEQQ. The size of the virtual window"
write(13, *) "(i.e. a data buffer) can be modified by SETWINDOWCONFIG."
read(13, *)
end
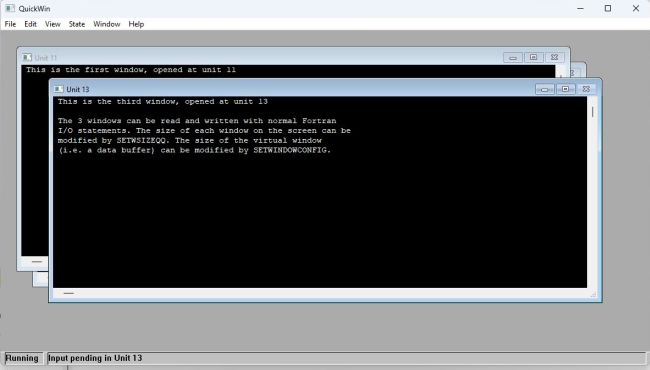
The screenshot shows the execution of quickwin.exe.
|
The next program is an example of a Fortran Standard Graphics application. Based on the sample sine.f90 listed in "Using Intel Visual Fortran to Create and Build Windows-Based Applications", it draws the sine and cosine curves for x-values from 0 to 2π.
! Illustration of QuickWin basic graphics commands: Sine and cosine curves
! Based on example in Intel FORTRAN compiler documentation
PROGRAM trigo
USE IFQWIN
LOGICAL modestatus
INTEGER(2) maxx, maxy
TYPE (windowconfig) myscreen
COMMON maxx, maxy
myscreen.numxpixels=-1
myscreen.numypixels=-1
myscreen.numtextcols=-1
myscreen.numtextrows=-1
myscreen.numcolors=-1
myscreen.fontsize=-1
myscreen.title = " "C
modestatus=SETWINDOWCONFIG(myscreen)
! Determine the maximum dimensions
modestatus=GETWINDOWCONFIG(myscreen)
maxx = myscreen.numxpixels - 1
maxy = myscreen.numypixels - 1
CALL axes( )
CALL sinecurve( )
CALL cosinecurve( )
END
! Function newx: Determine independent coordinate system x-coordinate
INTEGER(2) FUNCTION newx(xcoord)
INTEGER(2) xcoord, maxx, maxy
REAL(4) coord
COMMON maxx, maxy
coord = maxx / 1000.0
coord = xcoord * coord + 0.5
newx = coord
END FUNCTION
! Function newy: Determine independent coordinate system y-coordinate
INTEGER(2) FUNCTION newy(ycoord)
INTEGER(2) ycoord, maxx, maxy
REAL(4) coord
COMMON maxx, maxy
coord = maxy / 1000.0
coord = 500 + ycoord * coord + 0.5
newy = coord
END FUNCTION
! Subroutine axes: Draw x- and y-axis
SUBROUTINE axes( )
USE IFQWIN
INTEGER(2) status
TYPE(xycoord) xy
EXTERNAL newx, newy
CALL MOVETO(newx(INT2(0)), newy(INT2(0)), xy)
status = LINETO(newx(INT2(1000)), newy(INT2(0)))
CALL MOVETO(newx(INT2(500)), newy(INT2(-500)), xy)
status = LINETO(newx(INT2(500)), newy(INT2(500)))
END SUBROUTINE
! Subroutine sinecurve: Draw sine curve
SUBROUTINE sinecurve( )
USE IFQWIN
INTEGER(2) newx, newy, screenx, screeny, i, dummy
INTEGER(4) color
REAL rad
EXTERNAL newx, newy
PARAMETER(PI = 3.14159)
! Calculate each position and display it on the screen
color = #0000FF ! red
DO i = 0, 999, 3
rad = -SIN(PI * i / 250.0)
screenx = newx(i)
screeny = newy(INT2(rad * 250.0))
dummy = SETPIXELRGB(screenx, screeny, color)
END DO
END SUBROUTINE
! Subroutine cosinecurve: Draw cosine curve
SUBROUTINE cosinecurve( )
USE IFQWIN
INTEGER(2) newx, newy, screenx, screeny, i, dummy
INTEGER(4) color
REAL rad
EXTERNAL newx, newy
PARAMETER(PI = 3.14159)
! Calculate each position and display it on the screen
color = #00FFFF ! yellow
DO i = 0, 999, 3
rad = -COS(PI * i / 250.0)
screenx = newx(i)
screeny = newy(INT2(rad * 250.0))
dummy = SETPIXELRGB(screenx, screeny, color)
END DO
END SUBROUTINE
Note: I draw the y-axis at x=0, considering the functions being drawn from -2π to 2π, what isn't the case (the curve being displayed from 0 to 2π). This is ok, however, as both sine and cosine have a periodicity of 2π.
Using dialog boxes for application controls.
Dialog boxes are a user-friendly way to solicit application control. As your application executes, you can make a dialog box appear on the screen and the user can click on a dialog box control to enter data or choose what happens next. Using the dialog routines provided with Intel Fortran, you can add dialog boxes to your application. These routines define dialog boxes and their controls (scroll bars, buttons, and so on), and call your subroutines to respond to user selections.
In the following example we'll use a modal dialog box. This type of dialog box may be used with any Fortran project type (in our case with a command line program). Note, that when a program displays a modal dialog, the user must explicitly enter data and close the dialog box before the application resumes execution.
The program sample "HelloDlg" is really elementary, but it shows the general way to proceed in order to create an application using a modal dialog box. Our dialog box should contain the text "Hello World" and an "OK" button that simply terminates the application.
Lets start by creating an empty project (I called it "HelloDlg") and adding a Fortran 90 source file (hello.f90). Then, choose the menu command Project > Add new item... a second time. As file type choose resource file (.rc).
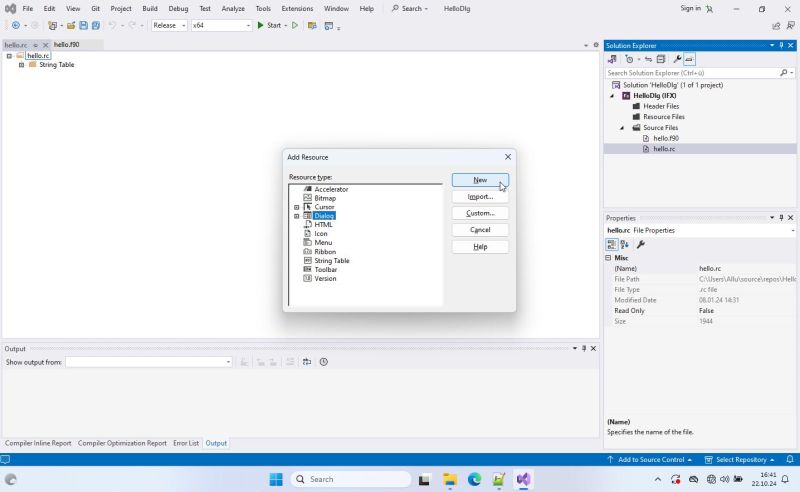
With the resource file selected, choose Edit > Add resource... This opens the Add resource window. From the components list, choose Dialog and push the New button.
|
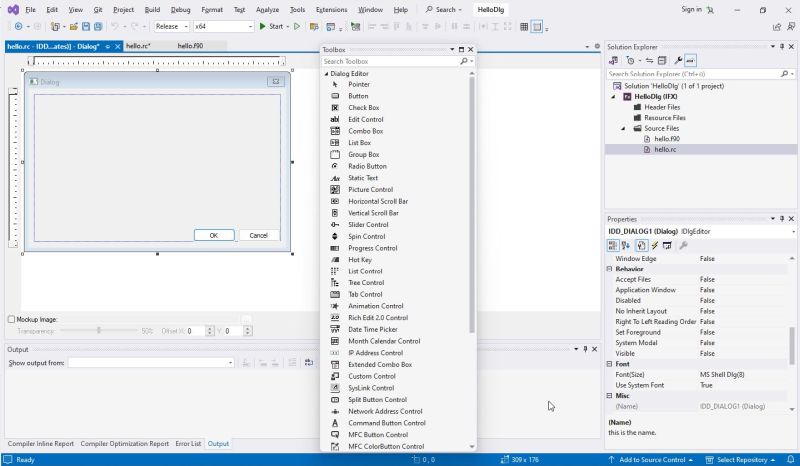
An empty dialog box with by default an "OK" and a "Cancel" button is displayed. To open the Dialog editor toolbox (the Dialog editor is one of the available resource editors), choose View > Toolbox from the menu bar.
|
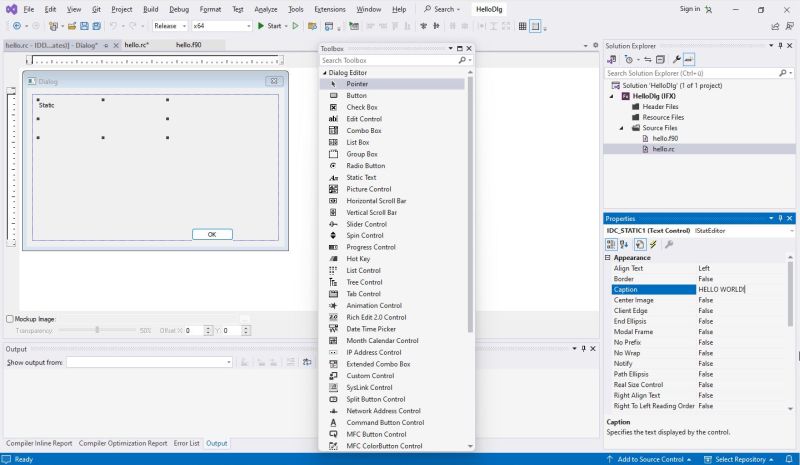
As we don't want a "Cancel" button, right-click this component, and from the opening context menu choose Delete. Then, drag a static text component to the dialog box. In the static text's properties sheet, set the caption to "HELLO WORLD!".
|
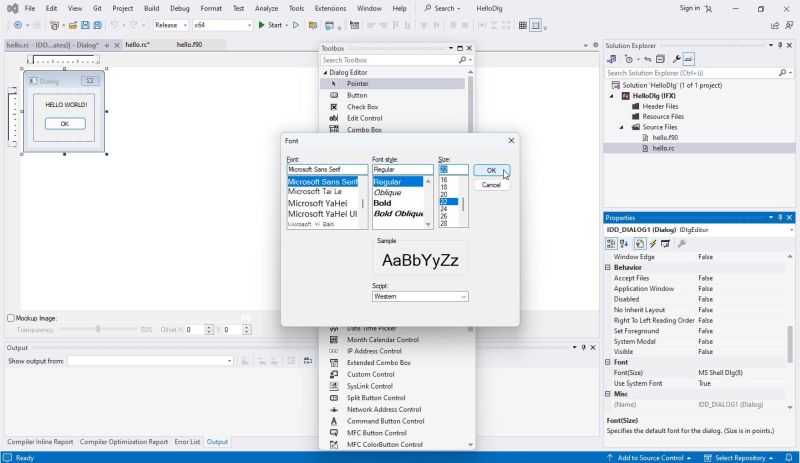
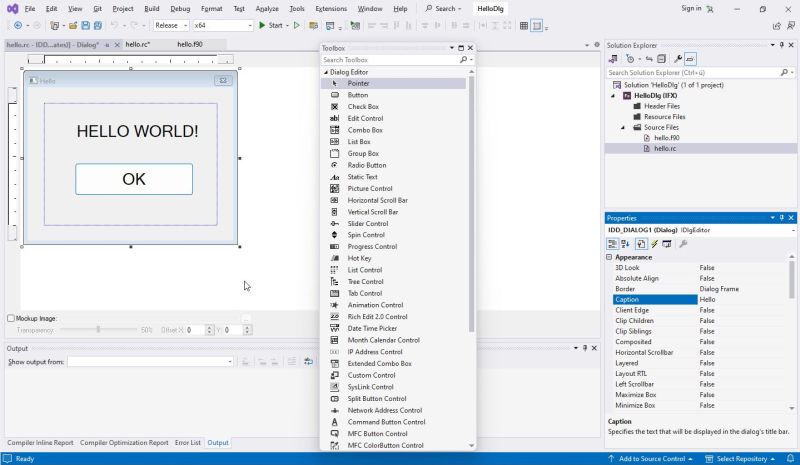
Resize the dialog box, center the static text vertically and vertically align the button and the static text. Also, set the alignment of the static text caption to "Center". In order to get a bigger dialog box with a bigger greeting message, just change the font size of the static text. All components, including the dialog box itself will be resized. The first screenshot shows the dialog box before resizing, the second one shows the dialog box after the resize has been done.
|
|
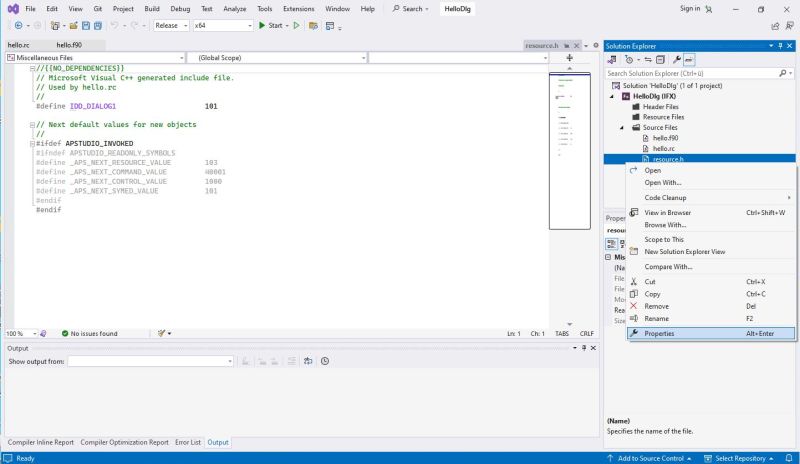
Choose File > Save All from the menu bar. Then, choose Project > Add existing item.... In the Open file dialog box, select the file resource.h. Right-click this file in Solution Explorer, and from the opening context menu choose Properties.
|
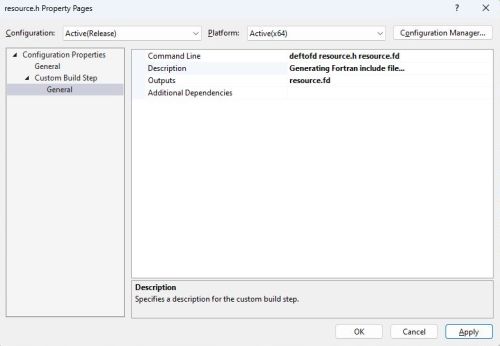
Set the resource file's properties as follows (cf. the Intel Fortran documentation for explanations):
- Command line: deftofd resource.h resource.fd.
- Description: something like Generating Fortran include file.
- Output: resource.fd.
|
Terminated with the resource, remains to write the Fortran source code of the program hello.f90. As the program does nothing (just waiting for the user to push the "OK" button), this code is nothing else but the standard code of a typical "dialog" application. Here it is:
program hellodlg
use iflogm
include 'resource.fd'
type (dialog) dlg
logical lret
integer iret
lret = dlginit(idd_dialog1, dlg)
iret = dlgmodal(dlg)
call dlguninit(dlg)
end
A "dialog" application must include the statement use iflogm to access the dialog routines, and it must include the .fd file that the Resource Editor has created. The statement lret = dlginit(idd_dialog1, dlg) associates the dialog type with the dialog (idd_dialog1 in this example) defined in the resource and include files; the statement call dlguninit(dlg) frees the resources from the dialog. Finally, the statement iret = dlgmodal(dlg) is used to create a modal dialog box.
Note: Other "dialog" functions are: dlgset (to initialize a control), dlgsetsub (to set the callback routines to be executed when a user manipulates a control), dlgget to retrieve control information. You find a simple example, showing how this works, in chapter 5 of Using Intel Visual Fortran to Create and Build Windows-Based Applications.
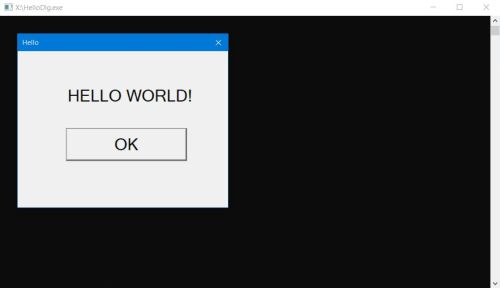
The screenshot shows the execution of HelloDlg.exe (on my Windows 10 actually; the two DLLs libifcoremd.dll and libmmd.dll having been copied from the Fortran installation on my Windows 11).
|
Building Windows GUI applications.
We can build graphical Windows desktop applications with Intel Fortran, as we can with Visual Basic, or Free Pascal. There are several project types available in Visual Studio to do so. SDI (Single Document Interface) applications can display a single window, MDI (Multiple Document Interface) applications can have several windows. ActiveX support may be added for SDI, MDI, but also for "dialog" applications. I did not (yet) try out the build of GUI applications. Maybe that, one day, I'll write a tutorial about it...
If you find this text helpful, please, support me and this website by signing my guestbook.