Modern Ada development using GNAT from AdaCore.
Similar to FORTRAN for scientific and COBOL for business applications, Ada is an "old" programming language that is still under active development and in use in modern times, in particular in the development of critical real time applications, such as military, avionics and air traffic control, commercial rockets (ex: the Ariane 4 and 5), satellites and other space systems, railway transport and banking. "Ada is a state-of-the art programming language that development teams worldwide are using for critical software: from microkernels and small-footprint, real-time embedded systems to large-scale enterprise applications, and everything in between", the language is described on the AdaCore website.
GNAT is a free-software compiler for the Ada programming language which forms part of the GNU Compiler Collection (GCC). It supports all versions of the language, i.e. Ada 2012, Ada 2005, Ada 95 and Ada 83. GNAT is actually distributed by AdaCore, and available as a complete Ada development environment. GNAT Pro, including support by AdaCore, is intended for commercial developers writing proprietary software. GNAT Community Edition is intended for developers, hobbyists and students developing open source GPL software.
This tutorial is about the installation of GNAT Community Edition 2021 on Windows 11. The tutorial should apply to Windows 10, too.
Note: In May 2022, AdaCore announced the end of the GNAT Community release in favor of a cleaner and more familiar ecosystem for the Ada and SPARK programming languages, managed by the community: the Alire source-based package manager. This means that if you want or need the very latest version of GNAT, this tutorial is not a solution for you. Neither is it if you intend to do serious Ada development in the future (as the newly released libraries will probably not work with your compiler). On the other hand, the last release of the community edition is only some years old, and this distribution has the advantage to be a very easy to install "all-in-one" package, including the GNAT compiler, the GDB debugger, the GNAT Studio IDE, SPARK support with GNATprove, and several pre-built libraries. For educational or hobby usage, as well as for the development of Ada applications in 2024, there is no real reason not to consider the installation and usage of the Community Edition.
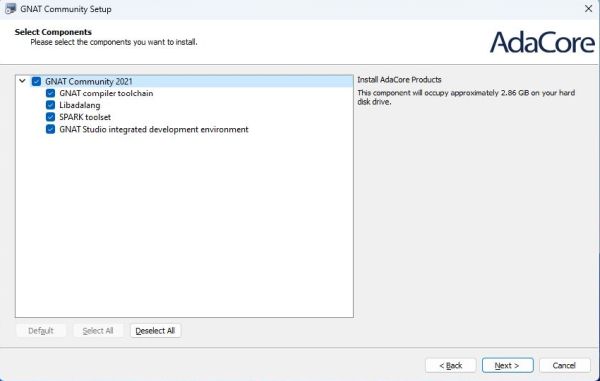
GNAT Community Edition 2021 can be downloaded as Windows installer from the AdaCore download webpage. You should register the file extensions .ads, .adb, and .gpr with Ada. No reason not to install all included components.
|
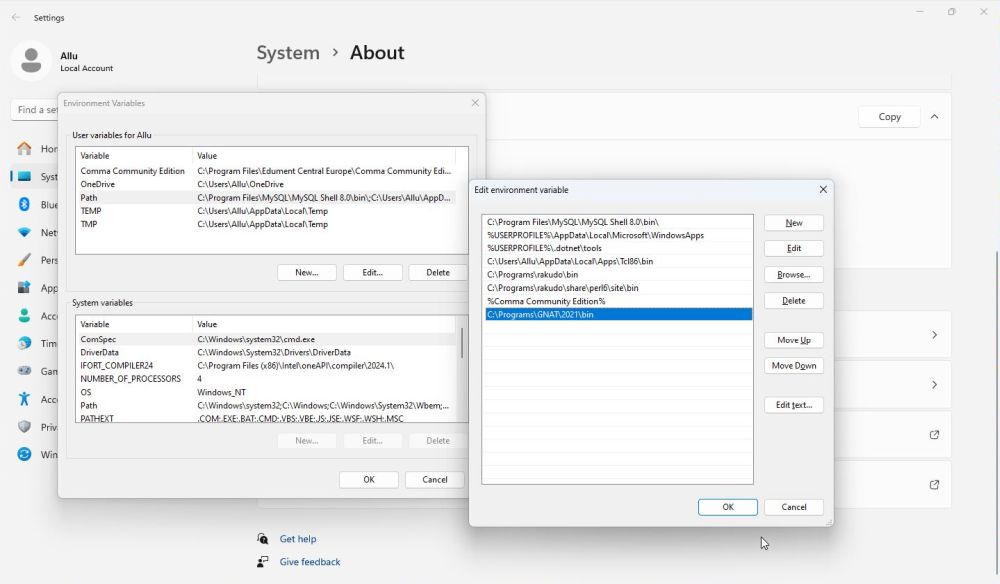
To use the tools from the command line, you'll have to add the directory <gnat-installation-folder>\2021\bin to the PATH environment variable. The screenshot shows how I did that on my Windows 11 (with GNAT installed in the custom directory C:\Programs\GNAT).
|
To develop AdaCore GNAT applications, launch GNAT Studio from the Windows Start menu. The first time that it is started, the configuration of the IDE shows up. Change the settings as you like. After configuration is done, the IDE starts up. To create a simple Ada command line program, choose Create new project.
![AdaCore GNAT Community Edition on Windows 11 - GNAT Studio: Creating a new command line project [1] AdaCore GNAT Community Edition on Windows 11 - GNAT Studio: Creating a new command line project [1]](../screenshots/gnat3.jpg)
|
On the next two screens, you choose the project type, in our case Simple Ada program (screenshot on the left), resp. the project folder (in my case C:\Data\Programming\Ada\Hello) and a name for the project and for "Main" (I named my project "hello" and let the default name for "Main": "main" (screenshot on the right).
![AdaCore GNAT Community Edition on Windows 11 - GNAT Studio: Creating a new command line project [2] AdaCore GNAT Community Edition on Windows 11 - GNAT Studio: Creating a new command line project [2]](../screenshots/gnat4a.jpg)
|
![AdaCore GNAT Community Edition on Windows 11 - GNAT Studio: Creating a new command line project [3] AdaCore GNAT Community Edition on Windows 11 - GNAT Studio: Creating a new command line project [3]](../screenshots/gnat4b.jpg)
|
This creates the Ada body file main.adb in the directory Hello\src (subdirectory of the project folder). Here is the Ada code of a simple
'Hello World' program:
with Ada.Text_IO; use Ada.Text_IO;
procedure Main is
begin
Put_Line ("Hello World from Ada!");
null;
end Main;
To build the program, use the menu command Build > Project > Build All. The Build All window opens; normally you can accept all defaults.
![AdaCore GNAT Community Edition on Windows 11 - GNAT Studio: Building a command line project [1] AdaCore GNAT Community Edition on Windows 11 - GNAT Studio: Building a command line project [1]](../screenshots/gnat5.jpg)
|
To perform the build, push the Execute button.
![AdaCore GNAT Community Edition on Windows 11 - GNAT Studio: Building a command line project [2] AdaCore GNAT Community Edition on Windows 11 - GNAT Studio: Building a command line project [2]](../screenshots/gnat6.jpg)
|
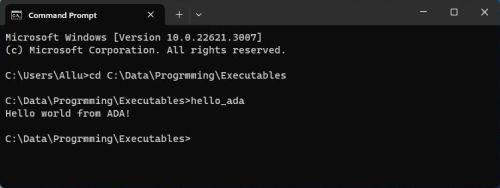
After the successful build, you find the executable main.exe in the directory Hello\obj (subdirectory of the project folder). You can run it in the IDE, or from the IDE in an external terminal. The screenshot shows how I ran it from "some other" directory in Windows Command Prompt (after having copied it to there and having renamed it to hello_ada.exe).
|
Here is another example of simple Ada command line program: display_date displays today's date in the form dd.mm.yyyy
with Ada.Text_IO;
with Ada.Integer_Text_IO;
with Ada.Calendar;
procedure Display_Date is
Now: Ada.Calendar.Time;
Year: Ada.Calendar.Year_Number;
Month: Ada.Calendar.Month_Number;
Day: Ada.Calendar.Day_Number;
begin
Now := Ada.Calendar.Clock;
Day := Ada.Calendar.Day (Date => Now);
Month := Ada.Calendar.Month(Date => Now);
Year := Ada.Calendar.Year (Date => Now);
Ada.Text_IO.Put (Item => "Today's date is ");
if Day < 10 then
Ada.Text_IO.Put (Item => '0');
end if;
Ada.Integer_Text_IO.Put (Item => Day, Width => 1);
Ada.Text_IO.Put (Item => '.');
if Month < 10 then
Ada.Text_IO.Put (Item => '0');
end if;
Ada.Integer_Text_IO.Put (Item => Month, Width => 1);
Ada.Text_IO.Put (Item => '.');
Ada.Integer_Text_IO.Put (Item => Year, Width => 1);
Ada.Text_IO.New_Line;
end Display_Date;
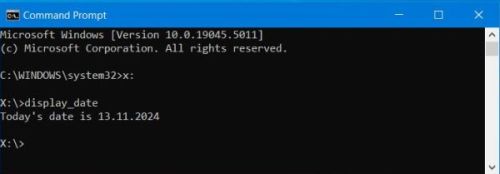
And here the program output, actually on my Windows 10 (what shows that command line programs built with AdaCore Gnat contain all that they need to be run from any directory, or on another Windows 64-bit computer).
|
Text positioning and coloring in the console (as is done with the functions and procedures of the Crt unit in Free Pascal) can be done (as in any whatever programming language) using the ANSI escape sequences. You can find examples of Ada screen handling routines in the book Ada 95 - Problem Solving and Program Design, by M. B. Feldman, The George Washington University, and E. B. Koffman, Temple University. The book is available as PDF on the Internet. To note, that support for the ANSI escape sequences is very limited on Windows 10. It is possible to use them from within a batch file, but using the text-output instructions of programming languages like C, FORTRAN, and also Ada, will just display the sequence as text. There are possibilities to solve this issue. However, I think that the simplest way to proceed is simply to use some third party console application instead of Command Prompt; the shells included with MySYS2 (cf. my tutorial about GCC/GFortran development for details), for example, works fine. To note that Windows 11 Command Prompt fully supports the ANSI escape sequences.
Building GUI applications with GtkAda.
"GtkAda provides comprehensive bindings to:
- Gtk+, the high-level GUI library.
- Glib, a collection of utilities.
- Cairo, an advanced 2D graphics library.
- Pango, a font-manipulation library.
The paragraph above is the description of the software given on the AdaCore website. You can download the Windows installer of GtkAda 2021 (to be used with GNAT Community Edition 2021) from the AdaCore download webpage.
The default installation directory is C:\GtkAda. I changed it to C:\Programs\GNAT\GtkAda, with GNAT installed in C:\Programs\GNAT\2021.
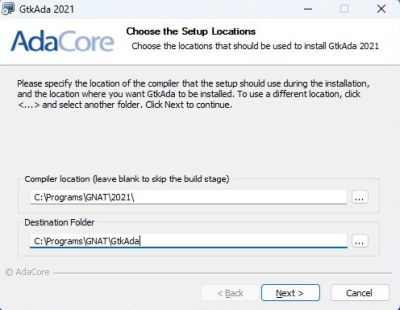
|
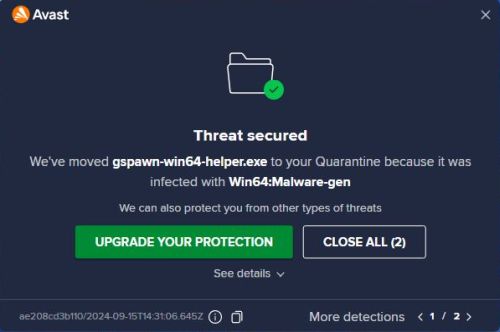
Alert of Avast Antivirus Free during file copy: gspawn-win64-helper.exe infected with Win64:Malware-gen. I did not investigate this issue, supposing that it must be a false positive (?). Anyway, the file was moved to quarantine, installation continued and finished successfully and the now missing file seems not to affect the usage of GtkAda.
|
Installation continues with the build of the libraries using the GNAT 2021 compiler. At the "Completing the GtkAda 2021 Setup Wizard" page, you should make sure that the checkbox "Make GtkAda libraries visible on the PATH" is selected.
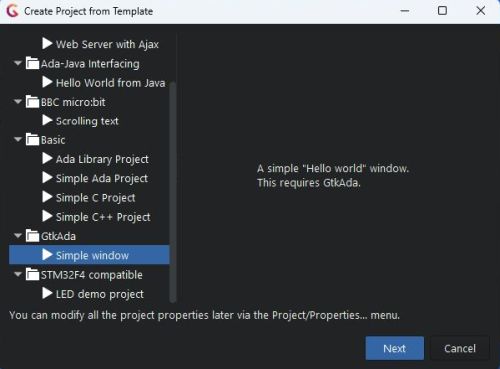
To build a GtkAda application, you'll have to create a GtkAda Simple window project.
|
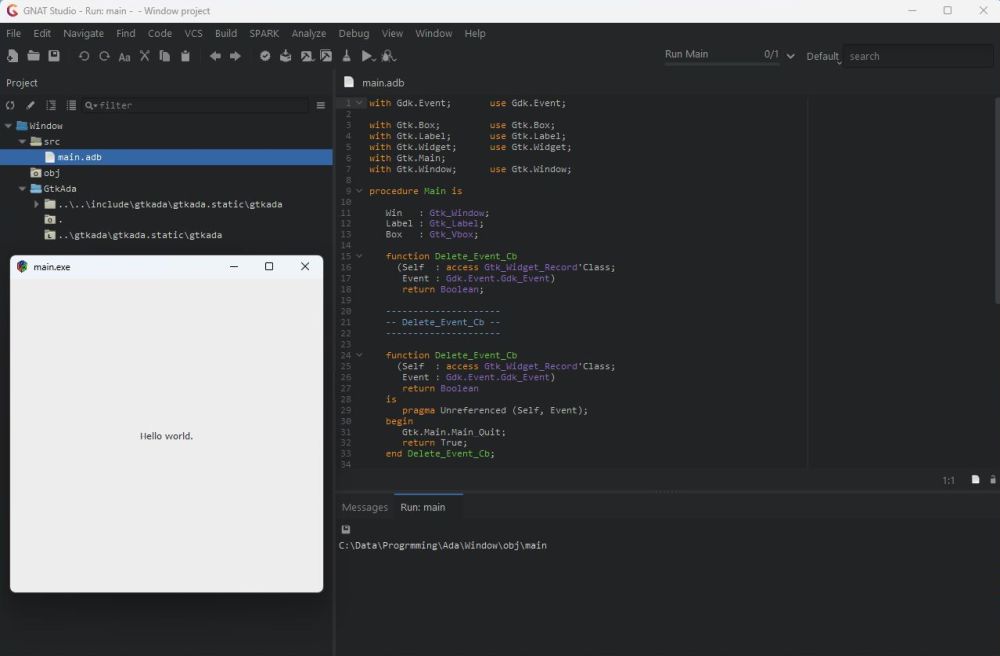
This will create a GtkAda folder with the necessary files in the project directory, and the Ada body file main.adb will contain a code template for GtkAda applications. The template is in fact a working 'Hello World' GUI application, that you can build and run from within the IDE.
|
Running a GNAT GUI application from a custom folder or on another computer will not work by simply copying the executable. In fact, several DLLs and other files are needed. According to the documentation, on Windows, you'll need to distribute the following files and directories along with your application, and respect the original directory set up:
- bin/*.dll
- etc/
- lib/gtk-2.0/
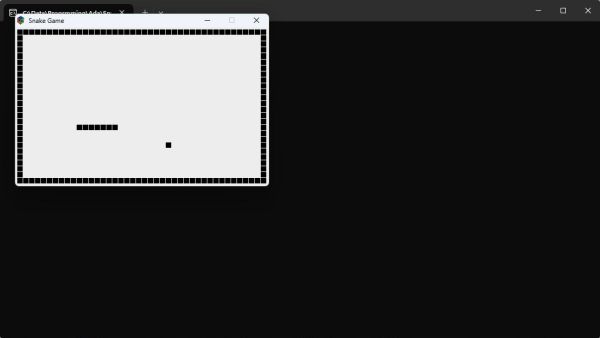
To further try out GtkAda, you might want to download Snake-Ada, a very simple implementation of the classic Snake game using GtkAda, and published by David Hildenbrand on github. As loading the project into GNAT Studio using the Open project option on the IDE main page did fail, I created a new GtkAda project, replaced the template code by the content of the source file main.adb from the Snake project. Then, I closed the IDE and copied the other application source files to the project's "src" directory. Reopening GNAT Studio, all sources were listed in the Project tab, and the project did build and executes successfully (I also ran it successfully on my Windows 10, after having copied all the files mentioned above to that machine).
|
Using Glade3 to create GtkAda GUIs.
"GtkAda now comes with support for the GUI builder Glade-3. Glade-3 provides a graphical interface for designing windows and dialogs. The interface description is saved in an XML file which can be loaded at run-time by your GtkAda application. With this approach, there is no need to write or generate Ada code to describe the interface, all is needed is to write the callbacks for various actions", they write on the AdaCore website.
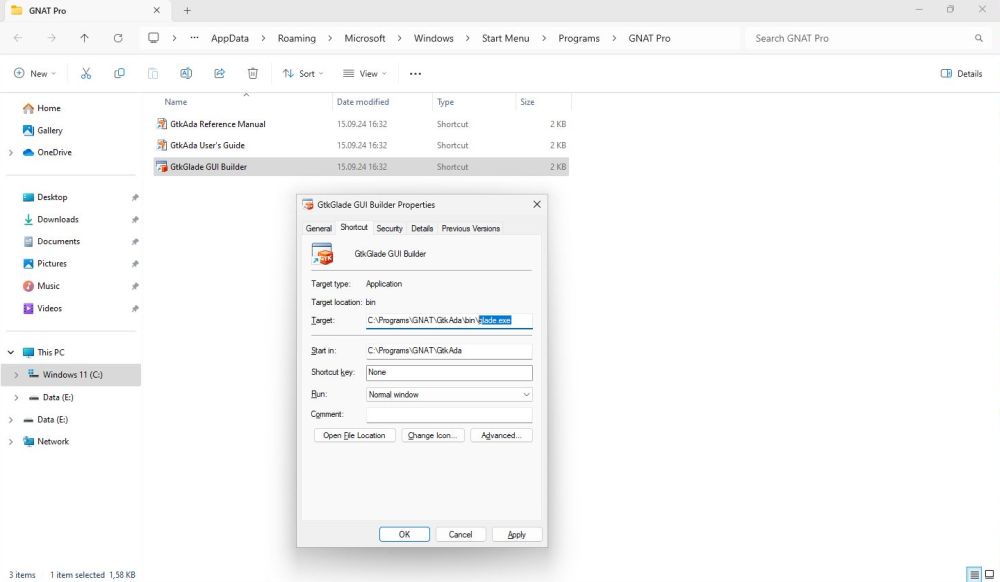
The GtkAda installation files include Glade3 and the installer creates a shortcut for Glade3 in the Windows Start menu. However, when you try to launch the application, you'll get the error message that glade-2.exe has been changed or moved and that the shortcut therefor doesn't work. Do not try to fix the problem using the corresponding button in the dialog box; the executable to use, proposed by Windows, has nothing to do with Glade3.
The problem is not that there is no executable, but it's Glade3 (and not Glade2) that has been installed, and the name of its executable actually is "glade.exe" (and not "glade-2.exe"). Use the properties sheet of the shortcut to change the target name, as shown on the screenshot below.
|
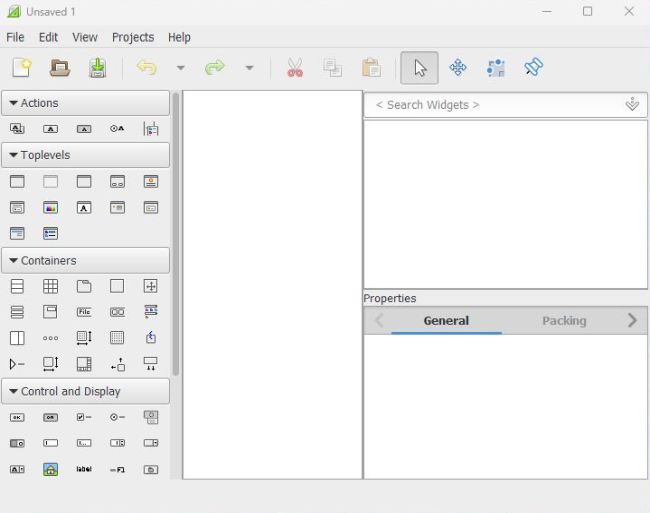
The screenshot below shows the drag-and-drop GUI builder application Glade3. As I did not try it out, I cannot say how easy or difficult it is to create a GUI and to use this GUI within a GtkAda application.
|
If you find this text helpful, please, support me and this website by signing my guestbook.