Introduction to developing .NET applications.
The .NET Framework is a proprietary software framework developed by Microsoft that runs primarily on Microsoft Windows. It provides a comprehensive programming model and runtime environment for building and running various types of applications, written in one of several supported programming languages. The .NET Framework is included by default in all Windows releases and will continue to be included with future releases of Windows and continue to receive security updates in the near future.
In 2014, Microsoft introduced .NET Core (sometimes called .NET platform), an open-source, cross-platform successor to the .NET Framework, distributed by way of the .NET Foundation, and released the source code under an MIT license. .NET Core is available for Windows, Linux, and macOS, what means that it makes it possible to create .NET applications, that are portable among these operating systems.
The .NET SDK is a collection of command line tools that may be used to create .NET applications. It is available for Windows, Linux and macOS. This tutorial is about its installation and usage on Windows 11. The tutorial should apply as such to Windows 10, too; parts of it should also apply to other platforms.
Note: To run a .NET application on a given operating system, the .NET runtime, corresponding to the SDK used to build the application, must be present on that computer. If, for example, you use Visual Studio 2019 on Windows 8.1 to build an application based on the old .NET 3.1 Framework, this application will not run on Windows 10, unless you install the .NET 3.1 runtime.
Installing the .NET SDK.
You can download the .NET SDK from dotnet.microsoft.com. I installed the long-time support .NET 8.0 SDK (64-bit); later, when updating Visual Studio for web development, the .NET 9.0 SDK (64-bit) was installed; it's with this version that the sample programs of this tutorial have been built.
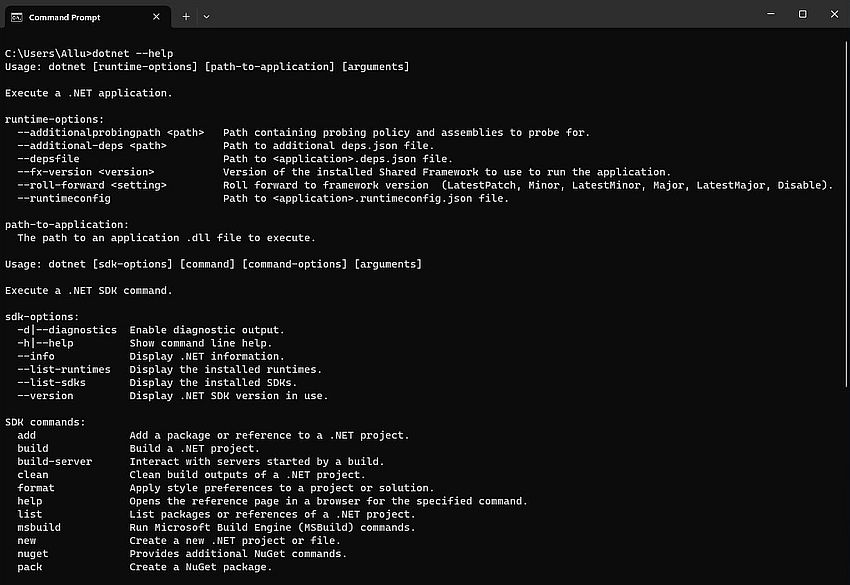
The installation of the SDK will not create any shortcuts in Windows Start menu. It is available via the command line program dotnet.exe; the installation directory has automatically been added to the PATH environment variable by the installer. You can run dotnet.exe without any command line parameters. Doing so, a short program usage note will be displayed. You are in particular told to use dotnet --info to display information about the .NET SDK installation, and to use dotnet --help to display an overview of the commands available. The screenshot shows the first part of the help screen.
|
With the .NET SDK, you can build the following types of applications:
- Console applications: Text based programs, that run in Windows Command Prompt (or a Linux or macOS terminal).
- WinForms applications: Desktop applications based on WinForms, a GUI framework included as part of .NET. WinForms is only available on Windows due to its tight integration with the Win32/64 API (it may be possible to run a WinForms applications on Linux using Wine).
- WPF (Windows Presentation Foundation) applications. WPF is a graphical subsystem by Microsoft for creating user interfaces in Windows-based applications. It is part of .NET, providing a collection of features for building interactive user interfaces for desktop applications. WPF applications work exclusively on Windows.
- Web applications: Applications designed for the Internet based on ASP.NET Core, an open-source web-application framework, that actually is a portable redesign of ASP.NET (part of the proprietary .NET Framework). These applications may thus be run on Windows, Linux, and macOS.
To develop applications using the .NET SDK, you are free to choose one of the following programming languages:
- C#
- Visual Basic.NET (VB.NET)
- F#
Creating a .NET Console application.
To create a .NET console application, cd to the directory where you want to create the project (I use C:\Data\Programming\dotNET), and
run the following command:
dotnet new console --language <language> --output <project-name>
Notes:
- You can use -lang instead of --language, -o instead of --output.
- Possible language options are: C#, VB, F#. If you omit the language parameter, C# will be used.
- The project name that you specify as command line parameter will also be the name of the folder (subfolder of the current directory), where the project files will be stored (project folder).
.NET Console project using C#.
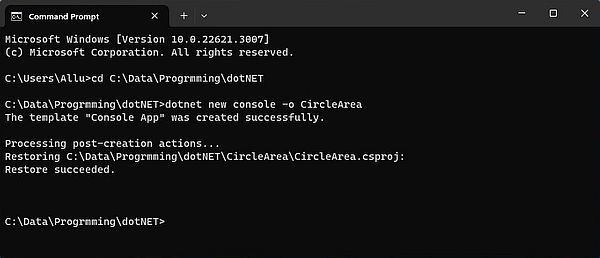
Here is the command to create a Console project called "CircleArea" using the default language C#:
dotnet new console -o CircleArea
The screenshot shows the output of dotnet.exe.
|
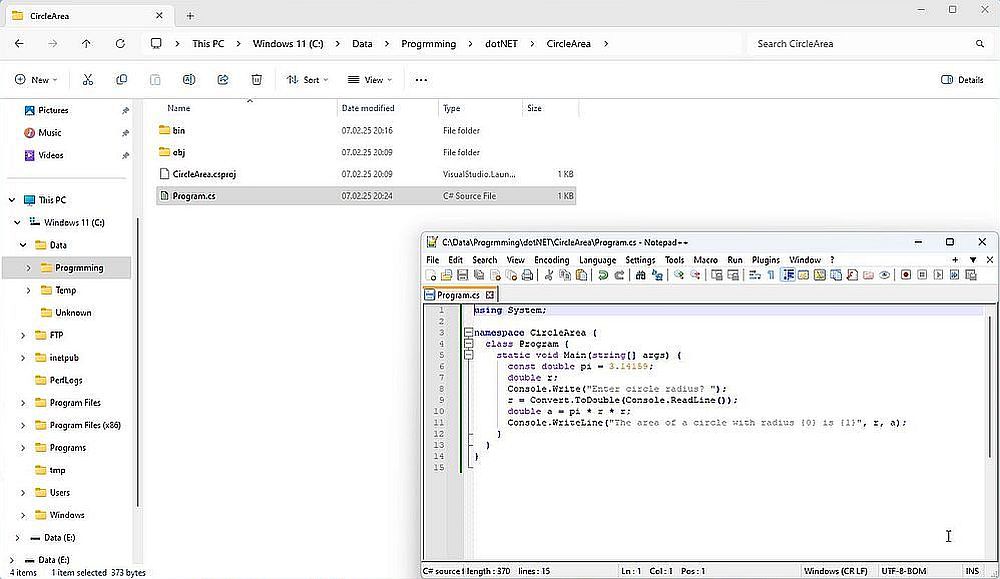
This will create a project folder with same name as the project and some files and folders. Among these (in the project folder itself), the
most important for us is Program.cs, the main C# source file. This file actually contains the code of a simple "Hello World" program, that we
could build in order to quickly test our .NET SDK installation. Instead, I replaced the content of Program.cs by the following C# code:
using System;
namespace CircleArea {
class Program {
static void Main(string[] args) {
const double pi = 3.14159;
double r;
Console.Write("Enter circle radius? ");
r = Convert.ToDouble(Console.ReadLine());
double a = pi * r * r;
Console.WriteLine("The area of a circle with radius {0} is {1}", r, a);
}
}
}
The screenshot shows the project folder and the C# source file Program.cs opened in Notepad++.
|
Note: The "bin" folder isn't normally there at this stage. If it appears here, it's because I took the screenshot after having built the project...
To build the project, cd into the project directory and run the command
dotnet build [-c <configuration>]
Configuration options are Debug (default), and Release. The folder into which the build output files will be placed
depends on this option: the folder will either be <project-dir>\bin\Debug or <project-dir>\bin\Release. To get a list of available options of the
build command, run
dotnet build --help
The screenshot shows the output of dotnet.exe, when building the "CircleArea" project.

|
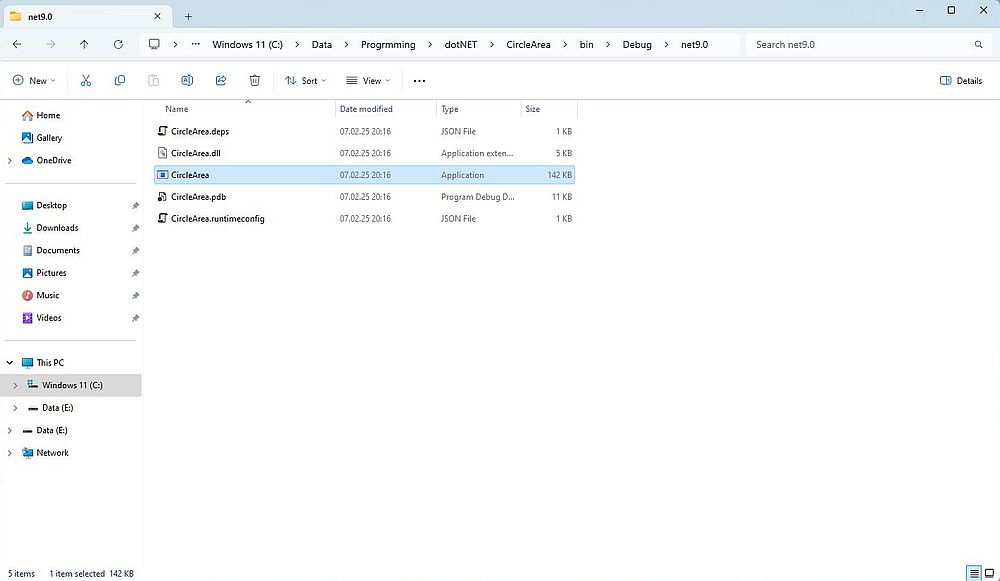
With the configuration and build options as described in the paragraphs above, you will find the executable CircleArea.exe, the associated DLL CircleArea.dll, and some other files in the folder CircleArea\bin\Debug\net9.0.
|
To run the executable created by the build, from the project directory, run the command
dotnet run
Or, doing it the "classic way": cd to the directory, where the executable is located and run it by just entering its name. In our case, you can just type: circlearea.
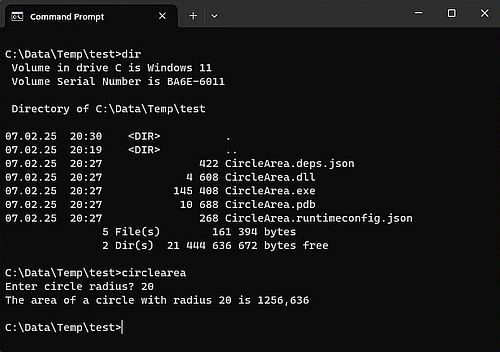
If you copy the executable to some random directory and try to run it, you will get an error message telling you that the DLL has not been found, and copying the DLL with the executable will still generate an error concerning missing files. In fact, all files created by the build in the directory containing the executable, have to be kept together in order to successfully run the program. The screenshot below shows how I ran CircleArea from C:\Data\Temp\test, after having copied all files located in CircleArea\bin\Debug\net9.0 to there.
|
Copying all files located in the directory containing the executable may even not be enough. If the program requires external dependencies, these have to be copied,
too. For user convenience, .NET includes a command that copies all files, required to publish a project, into the directory
bin\Release\<dotnet-version>\publish, in our case: CircleArea\bin\Release\net9.0\publish. To publish a project, from the project directory, run the command
dotnet publish
and distribute the publish folder created.
.NET Console project using VB.NET.
Creating a Console project in Visual Basic is similar to creating one in C#, thus I will not repeat the details here. To create a VB.NET Console project called
"Palindrome", run
dotnet new console -lang vb -o Palindrome
A skeleton Visual Basic program called Program.vb will be created in the project directory. I replaced its content by the following VB code (a simple program to
check if a string, entered by the user, is or is not a palindrome):
Imports System
Module Program
Function IsPalindrome(s0 As String) As Boolean
Dim s1 = s0.ToLower().Replace(" ", "")
Return StrReverse(s1) = s1
End Function
Sub Main()
Dim s As String
Console.Write("Enter a string? ")
s = Console.ReadLine()
If IsPalindrome(s) Then
Console.WriteLine("This is a palindrome")
Else
Console.WriteLine("This is not a palindrome")
End If
End Sub
End Module
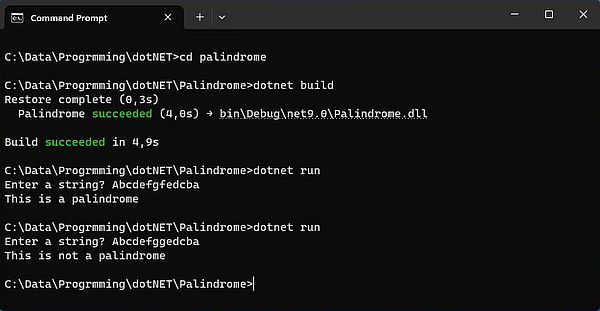
You can build the project using dotnet build and run it using dotnet run.
|
And, as for C#, to be able to run the program on another computer, use dotnet publish to create the "publish" folder, that will contain all files that are necessary to run the application.
.NET Console project using F#.
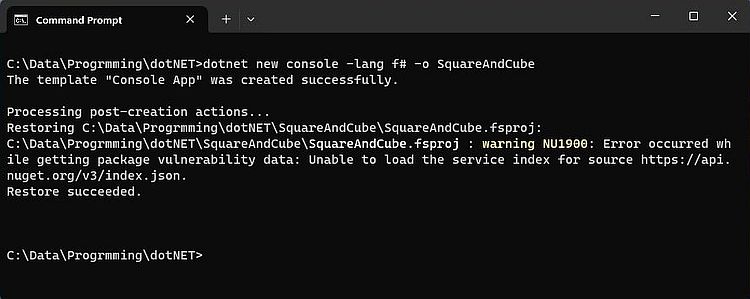
Creating an F# Console project called "SquareAndCube" is done by running the command
dotnet new console -lang f# -o SquareAndCube
On my system, the project was created, but with a warning NU1900. I tried to fix the issue by applying several of the "solutions" found on different Internet sites; without success! Anyway, it's just a warning, and the build succeeds (with the same warning). Also, I have not planed to really use F#...
|
A skeleton F# program called Program.fs was created in the project directory. I replaced its content by the following F# code (calculation of the square and cube of a
number entered by the user):
module SquareAndCube
open System
let square x = x * x
let cube x = x * x * x
[<EntryPoint>]
let main args =
printf "Enter a number? "
let sn = System.Console.ReadLine()
let n = System.Int32.Parse(sn)
printfn "The square of %d is: %d" n (square n)
printfn "The cube of %d is: %d" n (cube n)
0
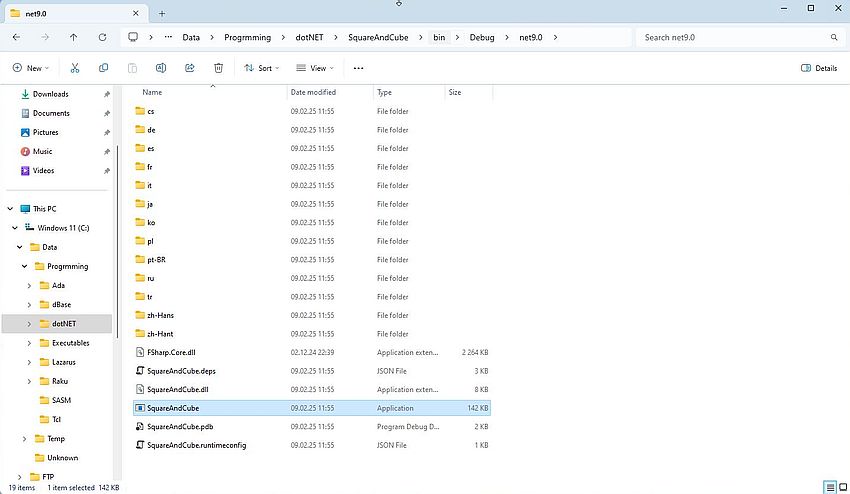
As said above, running the command dotnet build succeeds with the same warning as during the project creation (it is also the case when using dotnet run and dotnet publish). It creates a whole bunch of files and folders, among them, the executable SquareAndCube.exe, and the DLL SquareAndCube.dll.
|
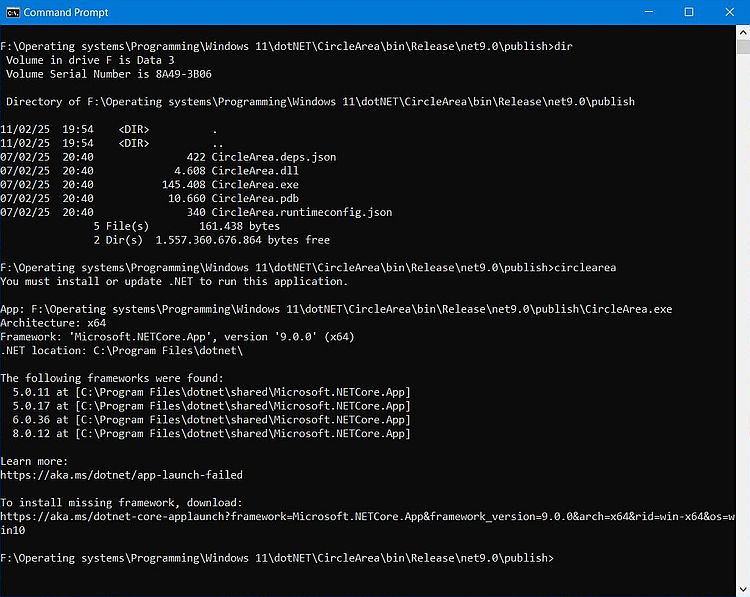
To run .NET programs, as created here, on another computer, the .NET runtime corresponding to the SDK with which the build has been done (in our case the .NET Core 9.0 Runtime), has to be installed on that computer. Trying to run CircleArea.exe on my Windows 10 laptop results in the error message You must install or update .NET to run this application.
|
Wouldn't it be great if, instead of having to distribute a whole bunch of files and folders, we could do it by packing the whole in one single file? And is it not sometimes desirable to distribute the application independently from the .NET frameworks installed on the end-user's machine? All this is possible, of course. All that we have to do is add some command line options to the dotnet publish command.
To create a single file executable, use the command
dotnet publish -p:PublishSingleFile=true
To include all dependencies into a single file executable, use the command
dotnet publish -p:PublishSingleFile=true -p:IncludeNativeLibrariesForSelfExtract=true
And finally, to be sure that dotnet.exe understands that we want to get a a self contained .NET application, use
the command
dotnet publish -p:PublishSingleFile=true -p:IncludeNativeLibrariesForSelfExtract=true -p:selfcontained=true
Using the last of these commands with the CircleArea project, creates two files: the ca 69 MB executable CircleArea.exe and a file called CircleArea.pdb. These files will be located in the directory CircleArea\bin\Release\net9.0\win-x64\publish. Running this CircleArea.exe on my Windows 10 succeeds without the need to install the .NET 9.0 runtime.
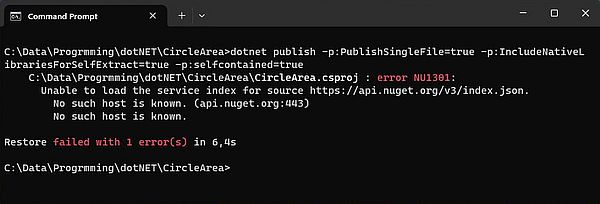
Note: When running the dotnet publish command above, I got an error NU1301. As you can see on the screenshot below, this is related to the fact that nuget.org cannot be reached. Retrying the command when connected to the Internet was successful. Thus, it seems that to create a selfcontained .NET application an active Internet connection is required.
|
What's next?
If you are serious about .NET development, you should visit the Microsoft website. There is lots of documentation concerning .NET, C#, Visual Basic, and F# available, and you can download all manuals and tutorials as PDF documents. You can also find tutorials and project examples on other websites. Several books are available as PDF.
On my site, you can have a look at Developing .NET desktop applications (in Visual Studio), an article that may be seen as a continuation of this tutorial, and that describes the creation of Windows desktop applications (WinForms and WPF projects), mostly using the Visual Studio IDE (examples in C# and VB.NET).
If you find this text helpful, please, support me and this website by signing my guestbook.