The following guidelines are no guarantee that you don't get problems with your computer, but they give you a certain safety by
avoiding problems, that may be easily avoided, if you are just a little bit attentive and follow some common-sense rules. This text
is primarily intended for beginners and "home-office" computer users, even though more experienced people, who think to know all that,
should perhaps have a quick look at it, too. Note, that all what follows applies to Microsoft Windows; some of
it may be specific for Windows 10.
| 1. |
Shutting down your computer. |
| |
When you stop working on your computer, this does not mean that your computer stops working, too: There are still programs
running and data is read from and written to your harddrive or other media. If the electrical current is brutely cut off, these
programs are interrupted, not saved data is lost and files, that have only partially been written to the disk, contain errors.
Corrupted files are no longer usable and if these files are vital system files, you really get a
problem! Perhaps, you already had the situation, where Windows, before showing the log-in screen, told you that one of your drives
has to be checked. Just let it do so; mostly there is no major issue and even if there are file errors, the chkdsk program can fix
them. Sometimes there is a more serious problem, Windows notices that there are corrupted system files and boots into "Windows
Startup Repair". If you are lucky, "Windows Automatic Repair" can fix the problem, if it doesn't ... beside trying to repair the
system manually, you have the possibility to return to an earlier situation (see below); in the worst case, you'll have to
reinstall Windows! There are many reasons for system corruption, but one of them is really easy to avoid:
Never cut off the current to switch off a computer! (by unplgging the power cord or pushing the power-off
button). Note however, that there are situations, where this may be the only possibility to reuse a system that "hangs". To
be really save, do the following:
- Save all documents that you were working on and close all applications.
- In the "Start" menu, click the "Power" button and choose "Shutdown", resp. "Sleep" if you intend to restart working in a
while (on laptops, closing the lid is generally equivalent to putting the computer to sleep).
|
|
| 2. |
Disconnecting removable devices. |
| |
As for your harddisk, there may be data transfer between your computer's memory and removable devices (USB disks, flash drives,
SD cards) even if you don't notice it. And as for your harddisk, interrupting this transfer may result in corrupted files. Removable
devices are used for user or work data, thus you can't "kill" your Windows operating system or programs running on it. But, incorrectly
removing a storage device may result in data loss! If you are really unlucky you may even loose the entire content
stored on the media. Simple rule: Do not disconnect removable devices until they are ready to! Being ready
simply meaning that nor Windows, nor any application accesses the files on that drive. To be safe:
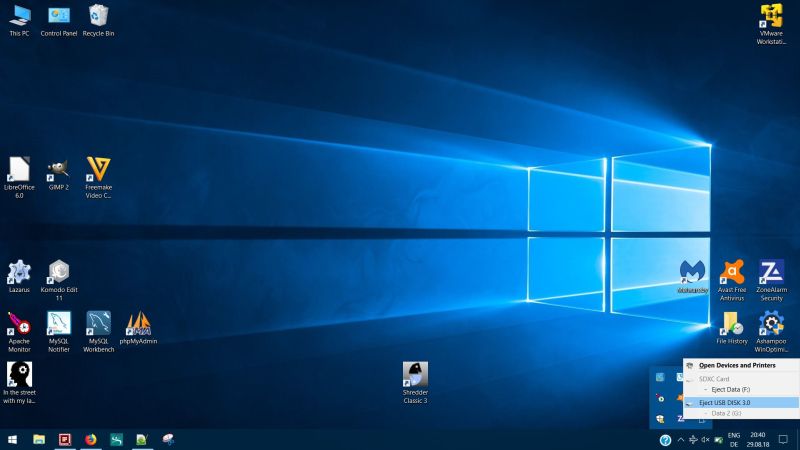
- In the system tray (bottom-right corner of the desktop, where you find the time and language information), click the little arrow
to show the icons normally hidden. Find "Safely remove harware and eject media" (disk icon). Right-click it and in the device list
displayed, click the one, that you want to disconnect
- Wait until Windows displays a notification like "The USB mass storage device may now be safely removed..." and then remove it from
the computer.
Note that you don't need to disconnect removable media before shutting down the computer. If there is still data transfer to the drive,
Windows will wait until it's done...
|
|
|
|
Sometimes, there is actually data transfer to the removable media, when you try to disconnect it, as described above. In this case Windows
pops up the warning message "Device currently in use", telling you that it's not possible to disconnect the media right away. In such a case,
just wait some time and try again.
|
|
| 3. |
Protecting access to your computer. |
| |
|
There is no reason that your teammates or your boss are able to look at your data files and it's really a bad idea to give your
kids the possibility to use your computer as they want. Thus, protecting access to your PC is mandatory! Anyway, when you install
Windows, when creating a user, you are invited to enter a password for her and I think that most people do so, even though the
password, they choose, is often not really lots more than no password (a minimum of 6 to 8 characters, mixing uppercase, lowercase
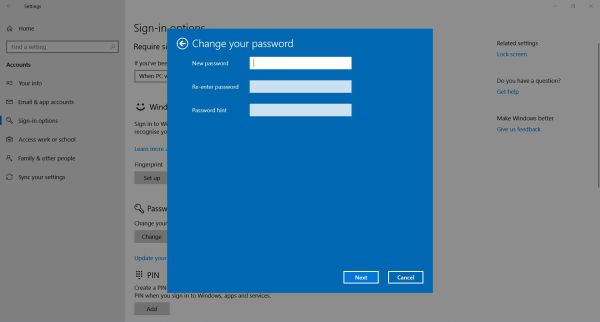
and numbers and including at least one special character is best practice to create a secure password). You may change your Windows password (or set it, if you didn't) at any moment. With earlier Windows versions, this is done under "Users"
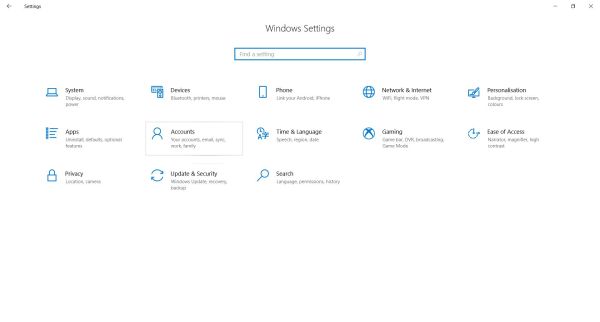
in "Control Panel"; here how to do on Windows 10: Open the Start menu and click the "Settings" icon; in "Settings", choose "Accounts", in the
left pane of "Accounts", choose "Sign in options", and finally in this tab, click the "Change" button beneath "Password".
|
|
|
|
However, setting a Windows password isn't enough to protect access to your computer! Golden rule: Always protect your computer
with a Windows and a BIOS password! It's not in the scope of this text to explain what are BIOS and EFI and what exactly happens when you
turn on your computer. Remember just the following, simplified view: At power-up, Computers boot into (start with) BIOS, a system program, without
which, nor you, nor the operating system installed (such as MS Windows) could do anything with your machine. BIOS has to do with your computer,
but nothing directly with Windows, it is loaded "long" before Windows starts, is loaded even if there is no operating system installed and actually
it is BIOS that starts the operating system (the operating system, installed on your harddrive, or any operating system or utility, located on
USB-disk, CD, DVD or flash-drive). I suppose, that you can imagine, what may happen to your password-protected Windows and your Windows data if
someone boots your computer from a flash-drive (e.g. with an Ubuntu Linux Live distribution): this operating system may access your harddrive
and any data on it without needing any password! Except the case where your data is encrypted (on modern Windows systems, this may be done using
tools like the pre-installed "BitLocker Drive Encryption", turned off by default and I never used it so far), it's possible to view, copy, modify
or delete all your files! What helps here, is setting a BIOS Boot password: This password has to be entered each time your
computer starts (or restarts), so it's not possible to do anything with your machine (in particular running any operating system from any media) without
knowing and entering the correct BIOS password. Beside the BIOS Boot (or User) password, that allows to start the computer (run your Windows
operating system), it's a good practice to also set a BIOS Supervisor password. This is the password you have to enter
to access "BIOS Setup", a utility that allows you to configure your hardware (which devices Windows may use, if special features as Hyperthreading
or Intel Vt/x are enabled, if it is possible to access the boot menu, what is the first device where BIOS should look for an operating system and
also to set, reset and change the BIOS passwords). The BIOS Setup utility is accessed by holding down a predefined keyboard
key during computer startup (the time after you pressed the power-on button and the display of your machine's logo; a message like "Entering BIOS
Setup" will normally be displayed at the bottom of the screen). This key differs from one BIOS manufacturer to another, mostly it's F2, on my HP
Probook it's F10, if neither of them work for you, have a look at the manual that you got with your PC. With a modern BIOS, using BIOS Setup is
similar to using Windows or a Windows appliaction: just use your mouse to select the tab, that contains the items, you want to modify, to open
submenus, or to check the properties you want. On older machines, BIOS Setup is a pure text-based application; you'll have to use the function,
arrow and other keys to open menus and select the options you want. Big warning: Never change BIOS settings, without being 100%
sure what you do! Otherwise you risk that your machine will no more work at all!
|
|
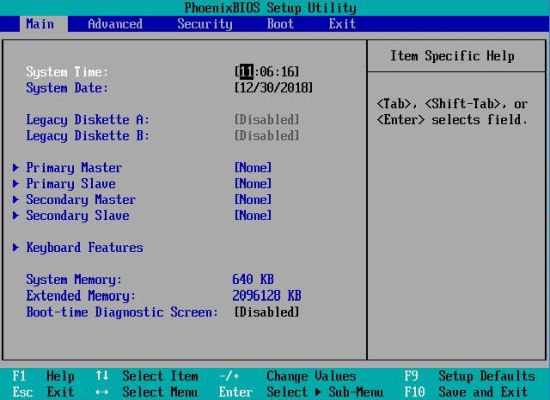
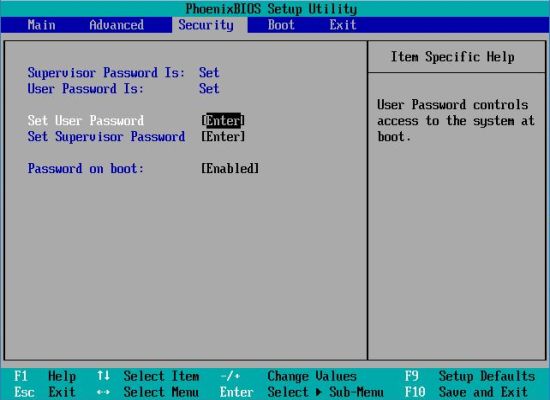
The following screenshots show the text-based BIOS Setup Utility on a VMware virtual machine with PhoenixBIOS. Setting passwords on other systems
may be look quite different, but the main principle is always the same. The first screenshot shows the first page of the Setup Utility (invoked by
pressing F2 during the computer's startup). Use the right arrow key until the "Security" menu opens. You can now use the up and down arrows to navigate
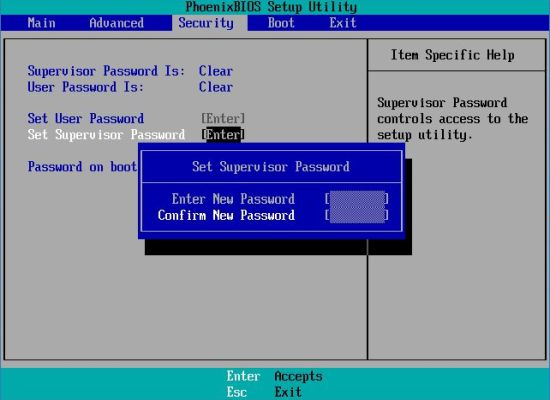
between the different items in this tab. Go to "Set Supervisor Password" and press ENTER, enter your password, press ENTER again and confirm the
password by re-entering it (second screenshot). Important: Be sure not to forget your BIOS supervisor password!. There
are several ways to access a Windows installation even when you don't remember the password, the BIOS user password may be reset when entering BIOS
with the supervisor password, but forgetting the BIOS supervisor password will make your computer inaccessible. I guess that on newer machines, the
only way to proceed in such a case is to contact your computer manufacturer and ask for support! The main purpose of the supervisor password is to
protect your computer against modifications in the BIOS itself; to protect the machine from unautherized booting, you should set a user password,
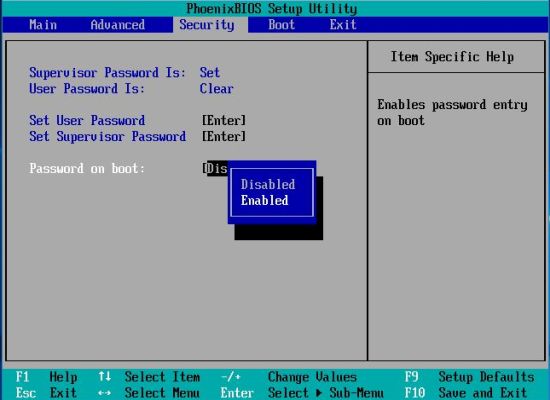
different from the supervisor password. To do this, first enable the "Password on boot" option (third screenshot), then set a user password, proceeding
in the same way, you did for the supervisor password. The fourth screenshot shows the "Security" tab, when all is done: supervisor and user password are now
both marked "set"; "Password on boot" now shows "enabled".
|
|
|
|
|
|
Even though not really necessary, it's a good practice to change the boot order of your machine and to set your primary harddisk
at the first place. This setting determines the order of drives and other places, where the BIOS looks at to find an operating system and then booting the
first one found. If boot order is for example set as "1. removable media, 2. harddisk, 3. network", then the BIOS looks if there are any removable media
attached and if one of them contains an operating system, it boots it. If it does not find any, it proceeds with the harddisk and if there it still doesn't
find any, tries to start the computer over the network. Setting the harddisk as first boot device ensures that your computer always boots with your Windows
installation, regardless what media are attached (except you explicitely choose to boot from another media or, of course, if your Windows is corrupt and
can't boot anymore). With text-based BIOS Setup programs, changing the boot order may be somewhat tricky, as you have to use the '+' and '-' keys to move
a device up or down in the list. And as the old setup programs always presuming a US keyboard, you'll have to push the key, which corresponds to '+' resp.
'-' on a US keyboard (e.g. on a German QWERTZ, you must push the '?' as '-' to move a device towards the end of the list).
|
|
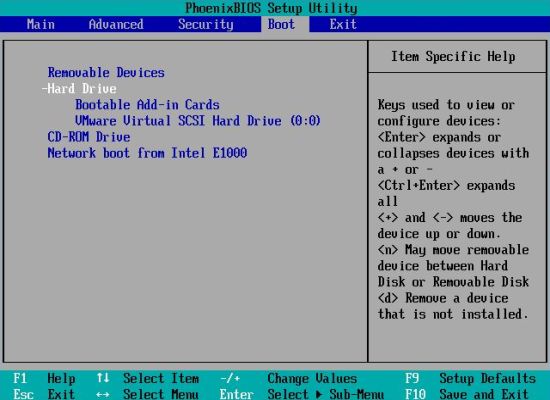
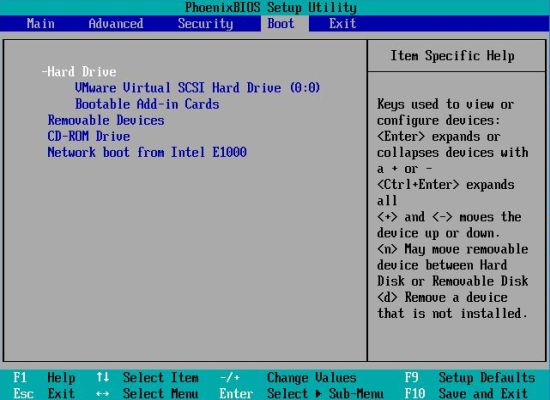
The screenshots below show the boot order configuration on my VMware virtual machine. Use the right and left arrow keys to navigate to the "Boot" menu.
In this tab, use the up and down arrows to navigate in the list. Some devices are shown as groups (marked with a '+' sign): with a group selected, hit
ENTER to show its individual devices. Select the device you want to change the boot order of and use the '+' key to move it up (higher order) or the
'-' key to move it down (lower order). The first screenshot shows the initial boot configuration, the second one, the "good practice" setting, after
in the group "Hard Drive", I moved the SCSI disk (primary harddisk) in front of the Add-in card and then the "Hard Drive" group at the top of the list.
|
|
|
|
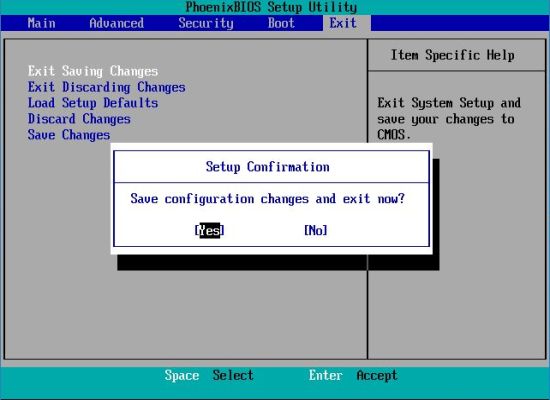
The last 2 screenshots of this little BIOS tutorial show how to save the changements I made to my PhoenixBIOS resp. the computer start-up after these
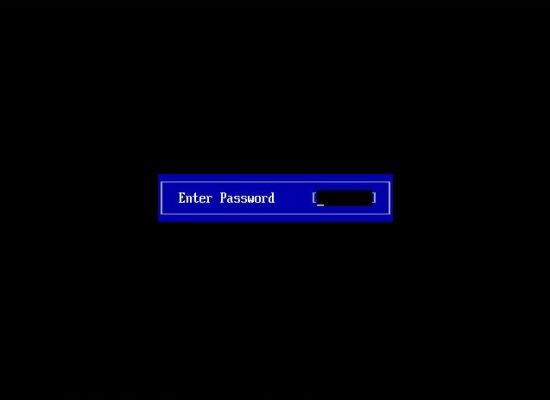
changements have been done: Some seconds after power-on, a screen aking for the boot password appears and without it, it will no more be possible to
start your machine. Three things to remember: 1. To enter the BIOS Setup Utility, press F2 (or corresponding key on your system) and enter the supervisor
password. 2. Be sure not to forget your supervisor password. 3. And most important: Do only change BIOS settings if you know what you do!
|
|
|
|
Supposed that you chose passwords with a reasoable strength and you didn't write them down on a sheet of paper placed near your PC, access to your computer
is now protected. But what's about the data on your disk? Are they really secure? The answer is NO! There is even a very simple way to steel you any files,
you have on your disk: simply removing the harddrive from your machine and installing it into another one ... no password needed (except the boot password
of the thief) to access your disk and everything it contains. Thus, if you work with really confidential data, protecting access to your
PC is not enough! You have to protect the data itself! This may be done for the whole drive, using software as BitLocker, or for individual files and
folders by saving them into a vault using encryption programs as "Sophos Free Encryption" or simply archieving them as password protected .zip files with 7-zip
(note, that with these two applications, you have to remove the files from the vault every time you want to work on them). Another, simple and very efficient
way is to set a Harddrive password, possibility offered with modern BIOS Setup programs. Attention however: If your harddisk is protected
with a harddrive password and you forget it, your whole disk's content will be lost; even your computer manufacturer will not have a possibility to help you
accessing your disk in this case!
|
|
| 4. |
Network and anti-malware protection. |
| |
|
Please note, that this part of the document includes technical stuff, that might not be understood by everyone. Don't bother, the only thing that's
really important is to never use your computer without following the rules stated here. Absolutely mandatory!
|
|
If your computer is connected to a network, such as the Internet, it is in communication with other computers, what means
that other people have the possibility to access it, steal your data, destroy it and even making your entire system unusable. To manage incoming and
outgoing traffic, to shield you from hackers and online threats, always remember this rule: Never connect to any network wihout
being protected by a firewall!.
|
|
In the old days with dial-up connections or ISDN and the old Windows systems, there was no network protection at all and the installation of a third
party firewall was mandatory. Things have changed meanwhile: If you use your computer at home or at the office, you connect to the Internet through
a router, that blocks the ports that others might use to access your machine. Furthermore, modern Windows systems include
Windows Firewall, a so called local firewall, that allows you to easily configure what external access you want to allow,
what programs may access the Internet and so on. Considering the security articles published in the most popular computer magazines, on a platform
like Windows 10, the combination of a (corrctly configured) router and the OS included Windows Defender Firewall are sufficient to protect your ccomputer
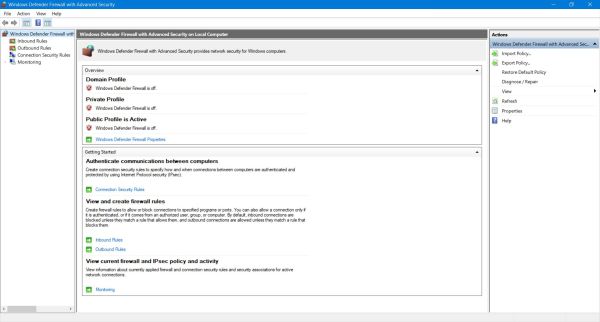
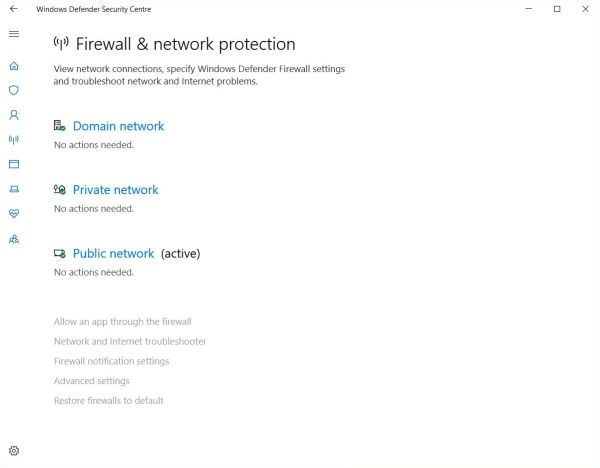
against attacks from the outside. The following screenshot shows the main page of the Windows Defender Firewall on my computer (actually turned off, as
I use a third party personal firewall).
|
|
|
The default settings of personal firewalls provide a reasonable protection allowing all common applications that need Internet access to run smoothly.
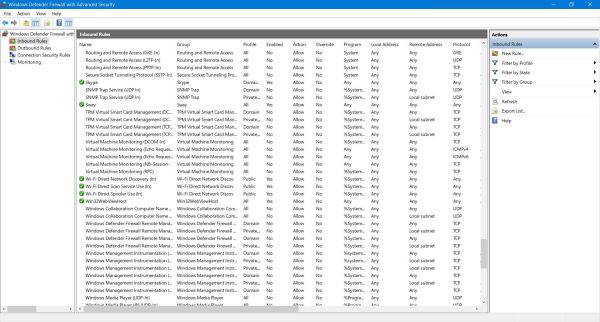
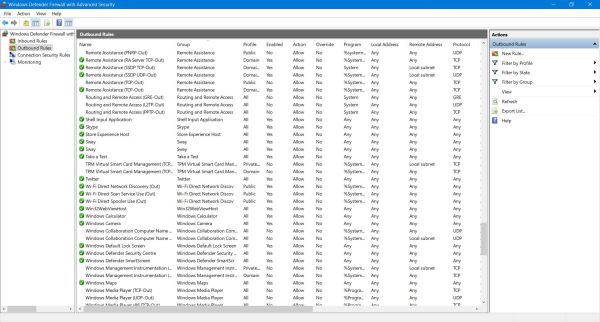
If you want to enforce security or on the other hand allow supplementary in- or outgoing traffic, you have to modify the corresponding firewall rules, inbound rules concerning traffic from the local network or Internet to your computer, outbound rules managing how
your local applications may access the local network or the Internet (screenshots below). Here two examples, where you have to modify the firewall
inbound rules:
-
If your computer is part of a local network, you may want other computers on this network to able to ping your machine. Allowed by default on
Linux systems, Windows Firewall is preconfigured to block all ICMP traffic.
-
If you install an application as µTorrent, the setup program asks you if you wish to modify Windows firewall rules. If you don't do so torrent
download might not work correctly. On the other side, always be aware that the more ports are open, the more vulnerable you
are!
|
|
|
You may wonder why I turned my Windows Defender Firewall off and why I use a third party personal firewall. First thing to say: You can't use two active
firewalls at the same time without messing up your system (the installation programs of third party firewalls automatically turn off Windows Firewall).
Then, my reasons:
-
I think you can call me a very oldfashioned man, having no ideas concerning all these modern apps installed on my Windows 10, having no Facebook,
preferring developing my desktop applications using Free Pascal rather than considering to use modern programming languages such as Java, C# or
being convinced that the simplest way to create appliactions on Windows is using Visual Studio. There are (freeware) programs, that exist and that
I use since there are personal computers. I made the best experiences with them, on all versions of Windows I ran and one of those actually is
ZoneAlarm Free Firewall.
-
No idea, if using ZoneAlarm does resolve this, but Windows Firewall is always mentioned in conjunction with a router. Being homeless and accessing
the Internet through public networks, I haven't the protection of a router firewall.
-
Year after year, ZoneAlarm Free Firewall is stated by all major computer magazines as one of the best personal firewalls of the world. This is at
least a reason to ask myself "why shouln't I continue to use it?"
-
Perhaps I'm wrong, but my trust in Microsoft and its products has serious limits and it's no secret that several applications, preinstalled on
Windows, send lots of information to Bill Gates' society. ZoneAlarm is independent software and I think (or at least hope) that the firewall sets
the outbound rules for Microsoft programs exactly the same way as for any other programs.
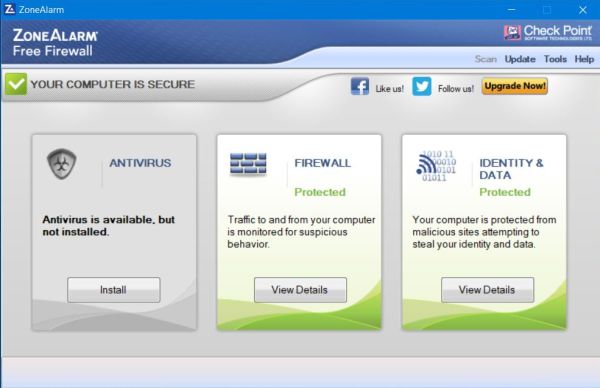
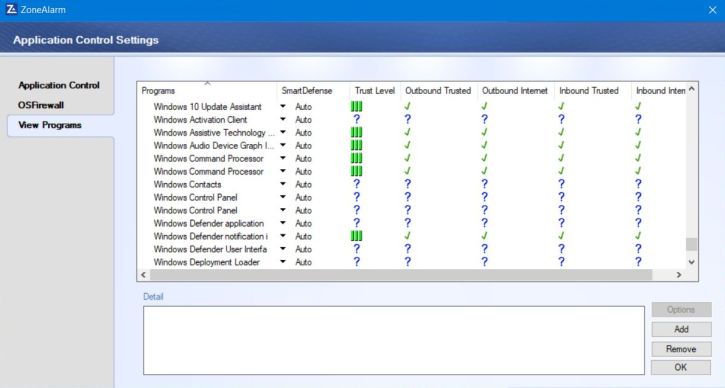
The screenshots below show the ZoneAlarm Free Firewall main page (ZoneAlarm Free Firewall also includes Identity Protection and, optionaly, an antivirus
program) and the "Application Control" settings on my actual Windows 10.
|
|
|
|
Another potential risk for your computer and the data stored on it is malware. Malware is a global term used to designate computer
programs, that have been developed with the aim to execute an unwanted, generally harmful function. This includes stealing your data, destroying it or blocking
access to it, making your operating system unusable or giving remote control of it to someone else. No concessions here: Never use a
computer without an antivirus program installed and be sure the virus definitions are up to date!
|
|
There are several ways, how malware can be installed on your computer. One of the most commons is by e-mails. Lots of problems could be avoided if you just
remember: Only open e-mails if you are sure who is the sender! Another possibility is that websites exploit some weakness in your
operating system or other programs. Always installing the most recent updates (see below) is mandatory, but be aware that software
venders need a certain time to react after hackers have developed a new virus. In such a case, all you may hope, is that your antivirus program detects and
eliminates the malware before it can harm your computer. Installing appliactions is a third way how malware may infect your system. So called trojans, being part of an application setup program, are installed at the same time as the application itself and if the antivirus doesn't
remove them, they may do the "job" they were created for. Easy to say and not realistic for everyone: Only install programs when you may trust those who
developed them!
|
If on a modern Windows system you don't have to bother about a firewall, concerning antivirus software, this is not true. Internet sites dealing with computer
security describe the actual situation as follows: Question: "Is Windows Defender good enough to protect my PC?" Answer: "No, but it might be someday." So:
Always install a third party antivirus program! Must this be commercial software or are free antivirus programs secure enough?
Everytime I bought a new laptop, the shopmen tried to convince me to also buy their favorite antivirus; I never did! Would I do if I wasn't a homeless guy but
had plenty of money because still working as programmer for the government? Probably not! Freeware, such as Avast Free Antivirus have very good scores in all major computer magazines. And with the experiences, I made, give you all the protection you
need. But two important things to remember (and this is also true for commercial products):
-
An antivirus program can only protect you, if its virus definitions are up to date (note that some free antiviruses do not updating automatically).
-
Be sure the software, you use, includes a real time scanner, i.e. a program that runs all the time and scans files as they are used or downloaded!
-
A given situation may change from one day to another: The antivirus, called "the very best one" today may become second choice tomorrow,
or even fall in the category of those that experts qualify to dissuade from!
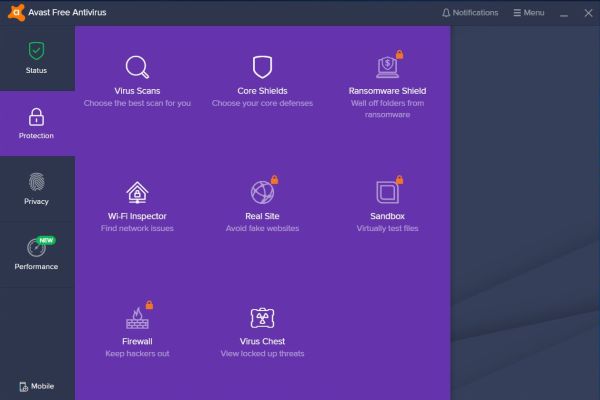
Avast Free Antivirus offers lots more features than just a virus scanner; several of them being not free...
|
|
|
|
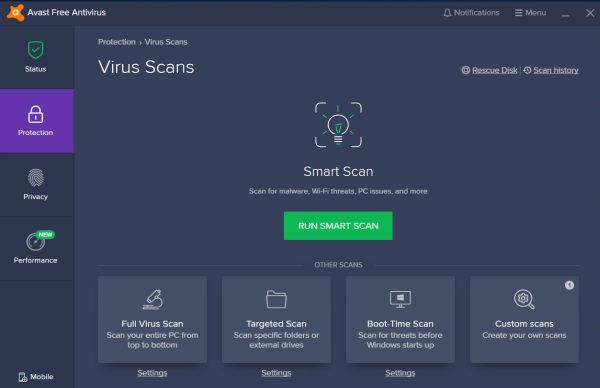
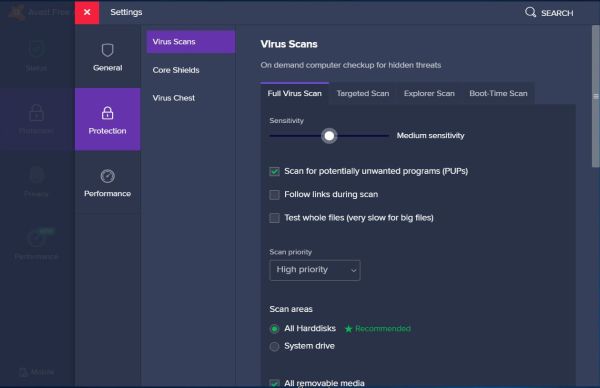
The following 2 screenshots show the Avast Free Antivirus "Protection" (virus scan) and "Virus scans settings" pages. Note that settings done in the "Virus scan"
tab apply to on-demand scans (scheduled scans are not possible with the freeware version, I think), whereas the "Core Shields" settings apply to the real-time
scans.
|
|
|
|
On some relevant sites, Avast Free Antivirus is not considered as first choice concerning antivirus software, giving better scores to programs such
Bitdefender Antivirus Free Edition and Kaspersky Free Antivirus. But I don't see a reason not to continue using it: It includes all I
need - search for spyware, potentially unwanted programs (PUP) and rootkits, e-mail scan and scan at boot-time, also offering the extra feature to create a rescue disk (see below) - and for all the time, I rely on it, has kept me safe from any infection.
|
"No software is perfect; that's why we have patches and updates. Antivirus software is no exception. Sometimes a brand-new attack gets past your antivirus;
the worst of these can disable or damage your security software. And if malware has already set up shop in your unprotected PC, it may prevent installation
of a traditional antivirus. That's where Malwarebytes Free comes in. Its speedy scan seeks out attackers that got past your main
defenses."
[text taken from article "Malwarebytes Free Review and Rating" on the PC Magazine
website]
|
|
Malwarebytes Free does not include a real-time scanner; thus, using Malwarebytes Free, still makes necessary to install a traditional
antivirus program! Note that the premium (non-free) version of the software includes a real-time scanner, however programs like Avast Free Antivirus
have better scores on computer security related websites. On the other side, Malwarebytes not working the way, antivirus programs normally do, it is possible
to install it aside with other antivirus software, increasing your real-time protection and offering you the benefit of the special Malwarebytes on-demand
scanner, in the case your computer is infected with some malware. Personnaly I would say Do not rely on your traditional antivirus software
alone; install Malwarebytes Free aside with it and regularly run on-demand scans of your entire system with both programs. Please, note that the
free edition of Malwarebytes does not automatically update virus definitions, thus be sure not to forget to do this manually as often as possible!
|
|
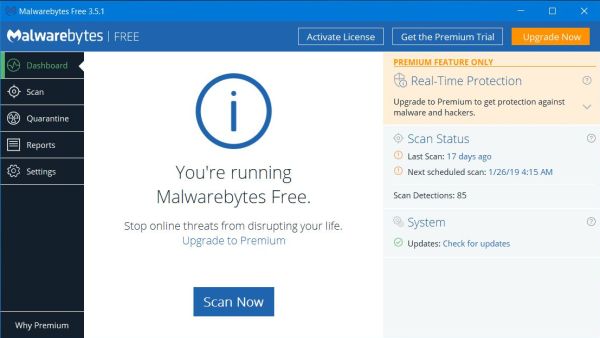
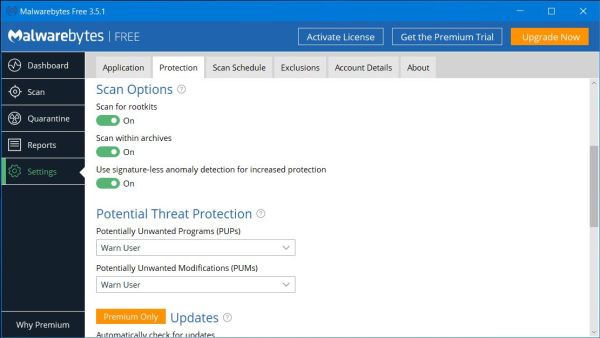
The 2 screenshots show the Malwarebytes Free main page and the "Protection settings" (scan configuration). Scan for PUPs and PUMs as well as for rootkits is
included. Scans may be scheduled even with the free version of the program. The free as the commercial version may be downloaded from the Malwarebytes website. Note, that the freeware version includes a 1 month free trial of
the premium functions (that you may or may not activate during install).
|
|
|
|
As you can see on the screenshots above, there is an antivirus program distributed by ZoneAlarm, as there is a firewall solution proposed by Avast; both have
only medium scores. There exist however so-called security suites that aim to provide an all-around protection by including firewall and
antivirus software and generally several other utilities as for example, backup, tune-up, encryption, or data shredder. Installing 1 single application and having
all you need to be protected (as I said above, don't rely to much on any security software and installing Malwarebytes Free costs only a moment and may save you
if your traditional protection fails for one reason or another). In PC magazine, the best scored security suites for 2019 include products from Bitdefender, from Kaspersky and
Symantec Norton Security Premium, that can protect up to 10 Windows, macOS, Android,
or iOS devices. A freeware suite, not listed in the PC magazine article, is Comodo Internet Security including antivirus and an award winning (according to the vender's description) firewall. Could I increase my
security by installing several security packages on the same machine? Don't do it! Trying to use several antivirus programs (or several
firewalls) at the same time, may seriously mess up your system!
|
|
Windows Defender Security Center.
|
|
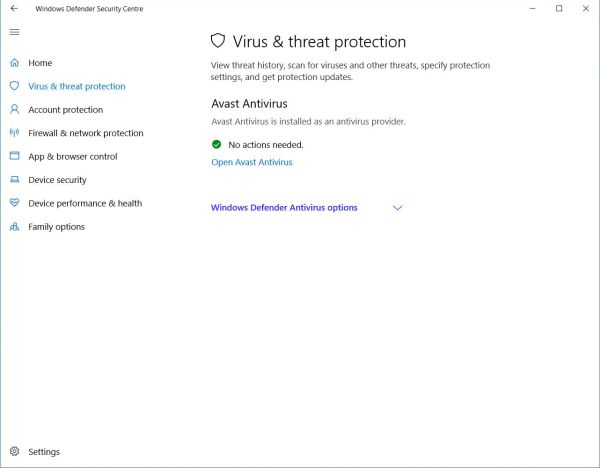
This feature included with Windows 10 (and called Security Center with Windows 8, maybe even Windows 7) monitors your computer and
sends notifications with critical information about the health and security of your machine. On Windows 10, you may access it by choosing "Windows security"
on the "Updates and security" page, that you may open using "Windows Settings" (the "wheel" icon in Start menu). The security center recognizes programs such
Avast Free Antivirus and ZoneAlarm Free Firewall and displays warning notifications if they are turned off or if your virus definitions are out of date.
|
|
|
|
Saving an infected system using a rescue disk.
|
The best protection of all best protections may fail, your computer may be infected and in the worst case, it could happen that you're no longer able to
boot your Windows. As I described when writing about the BIOS, a computer may not only booted into the Windows installed on your hard drive, but also into
some (generally Linux) operating system, started from CD, DVD or flash-drive and then running in memory. Such a system has nothing at all to do with your
infected Windows, it's 100% clean and you could use it to save your Windows data files to some USB device. But there is a lots better possibility: there are
special mostly Linux based systems, often called rescue disk, that have specially been developed for such a case, in fact not lots
more than a rudimentary operating system, antivirus software and some general purpose tools, that may be useful to make the cleanup after you got infected
by some malware. This not only allows you to remove the malware, but also to make your (now clean) Windows usable again! A remark by the way:
The only way to detect malware that is able to "hide" from your Windows, is to run a scan from an OS started from an external media.
I will try to write one day a tutorial concerning rescue disks. Mentioning here just 2 points:
-
You must not confound the antivirus rescue disks with those you may
create using Windows included features or software provided by your computer vender (and installed when you install Windows); these also called rescue disks
aim to give you the possibility to boot your computer if booting Windows does not work and include tools to restore corrupted system files or reinstall
Windows, but do not include a complete antivirus appliaction to clean up an infected machine.
-
Among the freeware rescue disk solutions, note the following:
- Avast Antivirus Free includes a feature to create a rescue disk (CD or USB). As there is no image download link provided,
you must install the Avast antivirus software on your computer to be able to create the disk. Rudimentary, in fact nothing else than a program that
boots your computer and asks you what drives to scan.
- AVG Rescue CD may be created as bootable CD or bootable from
flash-drive. It is a text-based, menu-driven program, that after booting your computer gives you the options to scan for viruses, to copy and edit
files, test your drives or edit the Windows registry.
- Kaspersky Rescue Disk may be created as bootable CD/DVD or bootable from
flash-drive. It presents a graphical user interface with the possibility to set up an Internet connection to download the latest virus definitions,
and configuring the scan settings. Please, note that the link above is for the 2018 version (that is still actual in 2022, I think). If you are
interrested in details, you may want to have a look at my Performing an external virus check using
a Live-CD tutorial.
|
|
| 5. |
Protecting your privacy. |
| |
|
| 6. |
Updating system and applications. |
| |
|
| 7. |
Backing up your personal files. |
| |
|
Please note, that this paragraph deals with your personal files. Concerning the backup of your operating system and applications, have a look at
"Restore points and system images" below.
|
|
Computers may be used to store all kind of data: Personal photos and videos, music albums and films, books in PDF format, text based documents,
that you are working at for school or for your job, contact information of friends and co-workers, e-mails and faxes, the accounting data of your
business... All this data is stored in so called files, that are organized in folders
(on platforms other than MS Windows, more commonly called directories). Directories are organized hierarchically (a common
term in this context is "folder structure"); a directory may contain files as well as other directories, then called subdirectories. When you create
(or download) a file, it is saved in the directory, that you specify (or in a default directory, for that type of file or specific for the application,
you are working with) on your harddisk, more exactly, into a given partition of your harddisk (disk partitioning is an advanced topic, that we may
simply ignore here). All your data grouped together on your harddisk is a fine thing, but if, for any reason, your harddisk becomes
unaccessible, all your personal files are lost!. (You may also loose your data due to virus infections or if they become inaccessible because having
been blocked by a malicious Internet site). Loss of all your personal files - unless you have a copy of them at a safe place, what in this case means some
external media (USB disk, flash drive, SD card...). Thus, golden rule: Always make regular backups of your personal files!
|
|
User folders backup with File History.
|
File History is a feature, that is part of all newer versions of MS Windows. It makes backup of your files easy. Some evident plus points:
- File History runs automatically on a time-scheduled basis (and may of course be run manually at any moment). With default settings, it backs up the
user's desktop settings, contacts, all libraries (Documents, Pictures, Music and Videos) and other user specific data (such as
the content of the Downloads folder), in fact all subdirectories of C:\Users\"user_name"
- File History is easy configurable: choice of the drive for the backup, the schedule, when to run it, the exclusion of a given library (or, indirectly)
a part of it.
- As the name lets guess, File History not just saves its files by replacing the older ones with the new ones, but creates a history of all files, that it
is asked to back up. This means, that your backup drive will contain copies of the files, made at different dates/times (each one
of them containing the new modifications, that you made to the file). Especially for programmers and web designers, this may save dozens of hours of work by
being able to go back to a previous version of the source code.
|
| Disadvantage of File History: File History only considers the libraries, so you cannot (directly) back
up files located in other folders (cf. below for work-around). |
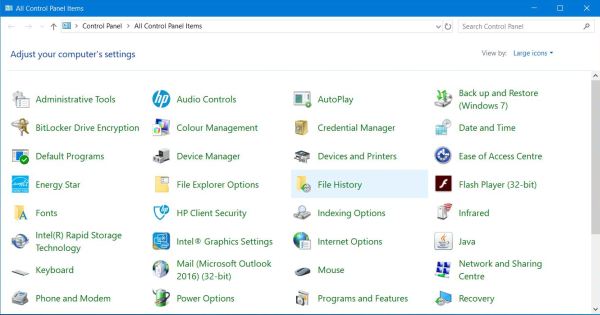
| One possibility to access File History is to use Control Panel (the alternative being to use Settings > Updates and Security
> Backup). To open Control Panel, browse your applications in Start menu; under W, open "Windows System" and choose "Control Panel" and in its "All Control
Panel items" window, click "File History". |
|
|
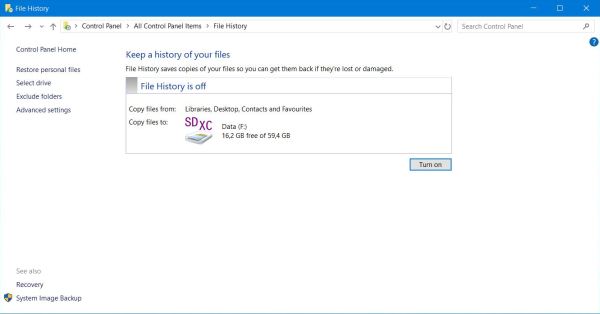
| In the main File History window, you can turn the feature on and off (scheduled automatic run), run it manually at the moment,
that you like (see below), choosing configuration options ("Select drive", "Exclude folders", "Advanced options"), as well as restoring your files to a previous
version ("Restore personal files"). On the screenshot below (on my actual Windows 10 system), there is already a backup location selected (a SDXC card) and File
History is shown "turned off"; this is because I don't run it automatically, but manually as needed, depending primarily on the prograssion of my programming
activity. Do this only, if you are sure not to forget to run it each time, you made important modifications to your data files! |
|
|
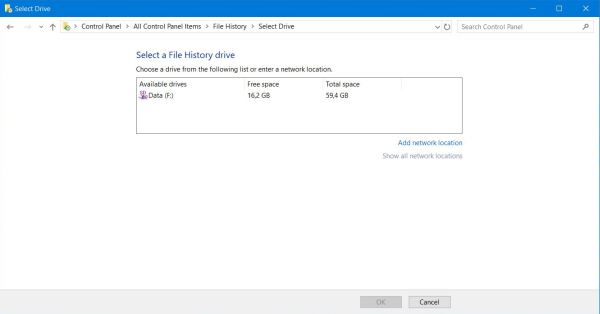
| After installation of MS Windows, File History is not turned on. This is obvious: You have first
to choose a File History drive (this done, you can run it without any further configuration, unless you want to change settings). File History searches the
computer for drives and shows those, that are available. They do not include the local harddisk (even if there are several partitions), thus it is made sure
that the backup is at a safe place. For advanced users, note that File History also allows to save data to a network drive.
|
|
|
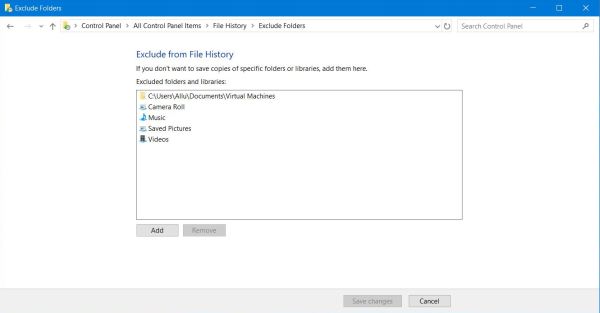
| As I said above, File History backs up by default the 4 Windows libraries Documents, Pictures, Music and Videos. In "Exclude folders",
you have the possibility to exclude a whole library or a part (some subfolders) from being backed up. I do this for the Music and Videos libraries, as I (manually)
copy my multimedia files to a big USB disk. I also exclude a part of the Pictures library; I store my "reviewed" pictures in a Pictures subfolder (that I call Photos)
and this folder, as not stated here, is automatically included with File History. Exclusion of the VMware virtual machines (in the Documents library) is an obvious
choice.
|
|
|
| Advanced options (no screenshot) allows to choose the schedule for automatic run (from 10 mins to 1 day) and the time, how long to
keep the backup files ("Until space is needed" should be fine). It also contains a link to clean up old versions.
|
| When File History is turned on, it immediately starts; no details or duration indication are displayed. When it has done, it
displays the backup date and time. It then also shows a "Run now" link, to manually run the backup (note that once it's started,
it automatically runs at the moment scheduled).
|
|
|
|
Restoring File History files.
|
|
Restore of the File History backup files may be done using "Restore personal files" on the File History main page. Sorry, but I can't
tell anything about it: I never used this feature...
|
If you want to restore only one or a few files (for example to set back the program, you're working on, to a previous version), the simplest way is to
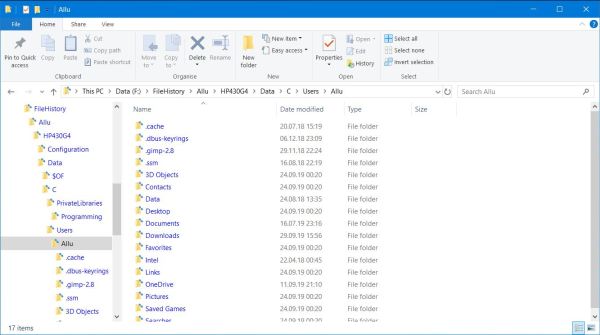
access the File History folders and copy/paste the files that you want. Data for a given user may be found in
"File History drive":\FileHistory\"user_name"\"computer_name"\Data\"system_drive"\Users\"user_name"
On the screenshot on the left, you may in particular recognize the folders with the user's desktop settings, contacts and downloads, as well as the Documents
and Pictures libraries. All these files are originally located at "system_drive"\Users\"user_name".
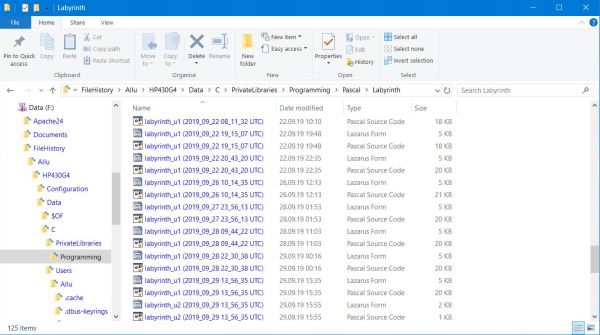
If folders outside this directory have been included in the backup, they appear at ...\"computer_name"\Data\"original path", as is the case of
C:\PrivateLibraries\Programming, the location of all my development files (see below for details).
On the screenshot on the right, you can see the different versions of some of my Free Pascal files, as backed up by File History. All file names contain a suffix indicating the date and time, when the backup has been done. You may copy these files to their original location and reuse them as
before. But, two things to do: 1. renaming the file by removing the suffix, 2. removing the read-only flag, set by File History (for
newbies: this is done in the properties of the file, accessible via the "Properties" icon in the menu bar of File Explorer or via the context menu, that opens
if you right-click on a file).
|
|
|
|
Other ways to backup your data files.
|
|
The important thing is that you do backup your personal files, how you do it, is just your choice. File History is simple to use, once set up, it runs
automatically, old versions are kept. Depending on the content of your files, you may not need all these features or even don't want them. Files that are
not changed, or, if changed have to replace the old version, that is no longer accurate, (as for example my music and video files) are more simply backed up by
simple copy/paste operations in File Explorer. This is also the simplest way to proceed if the files to be backed up are not located
in the Windows libraries.
|
|
The copy/paste task (especially if you often copy files with the same location source and destination) may be automatically done by
third party backup software. I've not actually running such software, but I know, that there are lots of backup programs available on
the Internet, simple or more sophisticated, freeware or commercial. And very probably, you'll find one day a backup program, written by myself, on the Free Pascal
download page of this site...
|
|
Using File History with "non-user" folders.
|
|
File History is a nice tool to back up all your user folders, i.e. all data stored in C:\Users\"user_name". This includes in particular the Windows libraries
(Pictures, where normally all images are stored; Music, where normally all your music files are stored; Videos, where normally all your videos are stored;
Documents, where normally all other files, that you create with various applications, are stored), as well as your Contacts and the Downloads folder (where
normally all files, that you download from the Internet, are stored). Thus, home and office computer users will normally not have to bother with files, stored
at locations outside those mentioned above (as they not directly belong to a given user, I called such folders "non-user" folders in the heading of this paragraph).
And if there are such files, to include "non-user" folders into a File History backup, simply copy them to your Documents directory.
|
|
Please, note, that on a multi-user computer, you will have to run File History for each user to back up her personal files. As the backup file structure is based on
user names (cf. screenshot above), the files for the different users will be properly grouped by the different user names.
|
|
There is a work-around for (nearly) everything, so it's also possible to include "non-user" folders (in fact, any folders, that you like) in a File History backup.
And it's more than easy to do: Just define the "non-user" folder, that you want to back up, as a library - and that's it! As File History
automatically includes all libraries, the folder will be backed up each time File History runs. Thus, on my actual Windows 10 system, I created the folder structure
C:\PrivateLibraries\Programming (destinated to contain all my programming and web site development related files), defined the Programming subfolder as a library
and every time, I make important changes to the source code, as well as every evening, when I stop working, I run File History; all my sources, with individual
files for all major modifications, are hereby backed up to my SD card and regardless if my Windows or my harddrive crash, I have nothing lost of my work! (To
note that as simpler alternative, I could have stored my development files in a Programming folder in the Documents library).
|
|
As "common" computer users do normally not have to bother with "non-user" files and as there is always the possibility to copy any files to include with File
History to the Documents library, I will not explain Windows libraries (that anyway are a more advanced topic) here; perhaps a specific tutorial later... Just
mentioning, that if the libraries are not displayed in the left pane of File Explorer, click "View" in the menu bar to display the "View" icons menu bar, then
click the "Navigation pane" icon and check "Show libraries".
|
|
| 8. |
Restore points and system images. |
| |
|
| 9. |
Safe Internet surfing. |
| |
|
| 10. |
System maintenance and optimization. |
| |
|
![Running File History [1] Running File History [1]](../screenshots/guidelines7e.jpg)
![Running File History [2] Running File History [2]](../screenshots/guidelines7f.jpg)
