| 1.7.1. |
SQLite embedded databases. |
| 1.7.1.0. |
The SQLite distribution. |
| |
SQLite is an in-process library that implements a self-contained, serverless, zero-configuration, transactional
SQL database engine. The code for SQLite is in the public domain and is thus free for use for any purpose, commercial or private. SQLite is the most
widely deployed database in the world.
SQLite is an embedded SQL database engine. Unlike most other SQL databases, SQLite does not have a separate server process. SQLite
reads and writes directly to ordinary disk files. A complete SQL database with multiple tables, indices, triggers, and views, is contained in a
single disk file. The database file format is cross-platform – you can freely copy a database between 32-bit and 64-bit systems or
between big-endian and little-endian architectures.
We the developers hope that you find SQLite useful and we entreat you to use it well: to make good and beautiful products that are fast, reliable, and simple
to use. Seek forgiveness for yourself as you forgive others. And just as you have received SQLite for free, so also freely give, paying the debt forward.
|
|
The paragraph above is taken from the SQLite user manual. The important here, apart the fact that the database engine is 100% free and open source, as well as
totally shareable between any platforms, is that SQLite is just a DLL to be included into the application programs (instead of a
separate running server application in the case of most other databases). For the rest, all works in a similar way than, for example MySQL: To connect from a
given programming language application, you need some SQLite-specific diver, or you can implement a generic
ODBC connection. The communication with the engine is more or less standard SQL (SQLite doesn't support all SQL features and the full
syntax, has some own extensions, and some features work differently as you know from other relational database systems).
|
|
| 1.7.1.1. |
Setting-up SQLite. |
| |
|
You can download SQLite from the SQLite Download Page. There you find the source code, as
well as precompiled binaries for all major platforms (a zipped DLL in the case of Windows). The DLL, used in this tutorial (all samples have been build and
tested on Windows 10) is the 64-bit DLL for SQLite v3.44.2 (file: sqlite-dll-win-x64-3440200.zip). You should also download the version
corresponding SQLite tools (file: sqlite-tools-win-x64-3440200.zip); the documentation is available as a bundle of static HTML files
(file: sqlite-doc-3440200.zip).
|
|
Setting up SQLite is done in just a minute. Unzip the archive containing the database engine and copy its content (the files sqlite3.dll
and sqlite3.def) to your system directory; in the case of a 64-bit Windows, this is C:\Windows\SysWOW64. Unzip the tools archive, and
copy its content to "some" directory (I used C:\Programs\SQLite). If you intend to create your databases in another directory, you may want to add the directory
with the SQLite tools to your PATH environment variable. Concerning the documentation, unzip the archive and double-click the file index.html to open the main
page in your web browser.
|
The tools archive contains 3 command line programs:
- sqlite3.exe: A SQLite client that can be used for SQLite database administration, as well as to
enter SQL queries and commands. I will describe its usage in the next section.
- sqldiff.exe: A command-line utility program that displays content differences between SQLite databases.
For details, have a look at the sqldiff.exe: Database Difference Utility page at the SQLite
website.
- sqlite3_analyzer.exe: A command-line utility program that measures and displays how much and how efficiently space is used by
individual tables and indexes with an SQLite database file. For details, have a look at the The sqlite3_analyzer.exe Utility Program page at the SQLite website.
|
|
| 1.7.1.2. |
The sqlite3 command line client. |
| |
|
Whereas connecting to a database like MySQL consists in connecting as an authenticated user to a database specified as the name of a database that you have
created on the database server before, connecting to a SQLite database consists in accessing a file created by sqlite on the file
system (the path to this file having to be specified as database). SQLite does not include user authentication and if you may or may not access the file
depends on where it is located: If you created it in a subdirectory of your User directory, only you can access it, if you created it in some Windows system
directory you probably need administrator privileges to modify it, otherwise any user of the computer has full access to it.
|
|
Note: SQLite does support user authentication, but to use it, you'll have to rebuild the database engine with special build
options. Click the following link for details concerning SQLite user
authentication.
|
Two important facts concerning the connection to SQLite:
- If the filename, that you specify as database, doesn't actually exists, by default, a new database
(with this filename) will automatically be created.
- If you connect without specifying a database name, an transient in memory database will automatically be created.
|
|
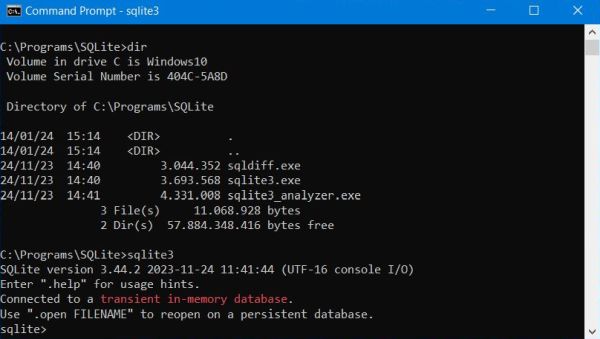
The screenshot below shows my folder with the 3 SQLite executables and the execution of sqlite3.exe without parameter, thus the connection to a transient
in memory database.
|
|
|
The client program sqlite3.exe accepts three kinds of input:
- Commands: They start with a dot (.) and must not be terminated with
a semicolon. Examples: Use .help to display the sqlite3 help documentation; use .quit to terminate
the program.
- SQL statements: Regular SQL statements, that may span over several lines. Hitting ENTER continues
the statement in the next line. SQL statements must be terminated with a semicolon (;). If the last character in the actual line is a semicolon and you
hit ENTER, the statement is executed.
- Pragmas: Like SQL statements, they must be terminated with a semicolon. Example: pragma foreign_keys
= 1;
|
|
Here is a list with some sqlite3 commands that you should know (for a more detailed overview, have a look at the SQLite tutorial at the
SQLite commands article at the tutorialspoint
website:
|
| Command | Description |
|---|
| .databases | List database names and files |
| .tables | List names of tables |
| .indices | List names of indices |
| .mode MODE | Set display mode, where MODE is one of: csv, column, html, insert, line, list, tabs, tcl |
| .header(s) ON|OFF | Turn display of table headers on resp. off |
| .output FILENAME | Send output to a file |
| .read FILENAME | Execute SQL statements in a file |
|
|
| 1.7.1.3. |
Creating the "world" database. |
| |
|
The program samples in this tutorial use the MySQL "world" database. If you have MySQL installed with this database, you can get the SQL by doing
an export of the 3 tables. Otherwise, you can download the SQL of the "world" database
from the MySQL website. You can use copy/paste to create the files for SQLite from those for MySQL. I myself created the following files: create_country.sql,
create_countrylanguage.sql, and create_city.sql (containing the CREATE TABLE statements), fill_country.sql, fill_countrylanguage.sql, and fill_city.sql
(containing the INSERT statements), and create_indices.sql (containing the statements to create the primary keys and other indices for all 3 tables).
However, when trying to execute the table creation statements (using the .read command), I got lots of
errors due to SQLite-MySQL SQL compatibility issues. In particular, you'll have to remove the
CHARACTER SET and COLLATE attributes, as well as the
ENGINE=InnoDB DEFAULT CHARSET=utf8 at the end of the statement. For the "country" table, you'll also have to
replace the ENUM('Asia', 'Europe', 'North America', 'Africa', 'Oceania', 'Antarctica', 'South America')
by some data type that is supported by SQLite, for example CHAR(13).
|
|
Another important difference between SQLite and MySQL is that SQLite does not support the addition of a foreign key constraint to an existing
table (ALTER TABLE ... ADD CONSTRAINT ... FOREIGN KEY ... is not supported). This means, that if you want to use foreign keys,
it's mandatory to define them during table creation (also note that you must not specify a name for SQLite foreign keys)!
|
|
Concerning the AUTO_INCREMENT attribute of the "ID" field in the "city" table, I did not succeed to implement it. The SQLite
documentation says that an integer field, that actually is a primary key, is automatically considered as being an auto-increment (the attribute
AUTO_INCREMENT is not supported). But, defining ID as NOT NULL will make
it impossible to insert records into the table without specifying an ID. And allowing it to be null (what is possible in SQLite), sets the value to NULL, and not
to the next increment value, if you insert a record without an ID specified.
|
|
You'll also have to edit fill_city.sql. SQLite does not support the escape of a single quote by \' as it is used in
two city names.
|
|
Finally, you have to create the primary keys using CREATE UNIQUE INDEX ... ON ..., and the other indices using
CREATE INDEX ... ON ..., instead of using ALTER TABLE ... ADD PRIMARY KEY ... and
ALTER TABLE ... ADD KEY ... as it's done with MySQL.
|
|
As this file editing is annoying and just costs time, I have placed a copy of my "world" SQL statements
on this site, where you can download an archive with the 7 files mentioned above, and ready to be used with the .read command of
sqlite3.exe.
|
|
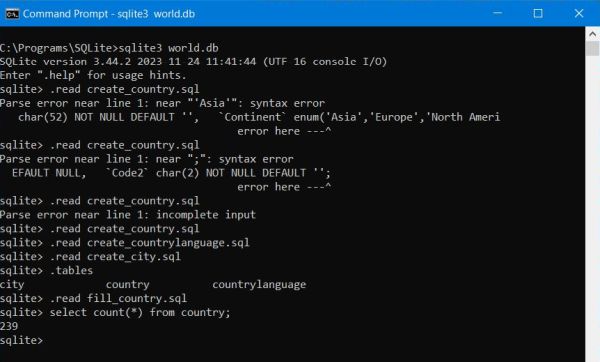
The screenshot below shows the creation of the 3 tables from the corresponding files (with the ENUM problem, and then a syntax error
with the "country" table, the display of the 3 tables, the insertion of the "country" records, and finally the display of the number of records in the "country"
table.
|
|
|
|
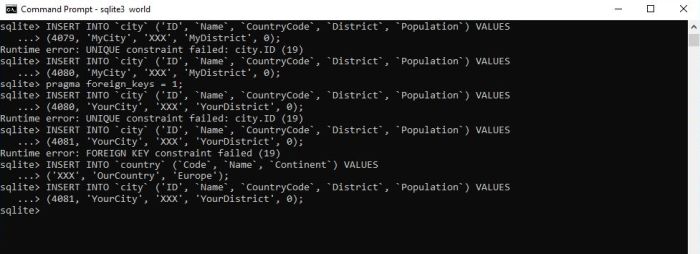
And the following screenshot (taken on my other Windows 10) shows the insertion of some records into the "city" table. The first insertion fails, as the primary
key ID is already used. The second insertion succeeds. This might surprise you, as it's an insertion with a country code that doesn't actually exist in the
"country" table, what means that the foreign key constraint has not been checked. The reason for this is that in SQLite foreign keys checking
is disabled by default, and in order to use this feature, we have to set PRAGMA FOREIGN_KEYS = 1. With this done, the insertion
will fail, as it will succeed after we'll have created the referenced record in the "country" table.
|
|
|
|
| 1.7.1.4. |
SQLite GUI tools. |
| |
|
I suppose that the "standard" GUI tool to manage SQLite databases is DB Browser for SQLite, that you can download free of charge
from sqlitebrowser.org. It is available as 64bit and 32bit installer, as well as as portable
application. I actually installed version 3.12.2, 64bit.
|
|
The application is simple to use, has all you need to work with your SQLite databases, and offers a very wide range of configuration options. If you aren't
normally connected to the Internet and want to avoid the "Host not found" warning at startup, just disable auto-update. A more important setting is to
select the foreign keys enabled checkbox on the Database tab of the Preferences
window, if you actually use foreign keys with your databases.
|
|
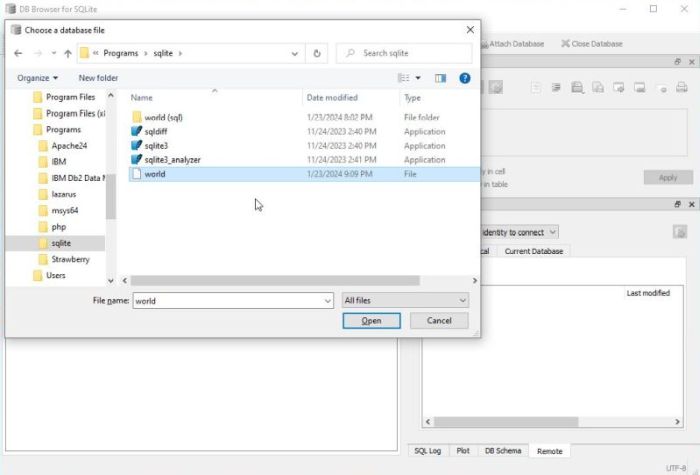
Connection to the database is just opening the corresponding file. From the menu, choose File > Open Database... and browse to your
SQLite database file. The file extension expected by DB Browser for SQLite is either .db, or .sql. Using .sql as extension for
your SQLite database files is not recommendable, as this extension is usually used for SQL source files. If the extension of your database file is none of
those expected by the application (on my Windows 10 VM I forgot to add an extension when I created the "world" database), select All
files in the Choose a database file dialog box in order to get your file displayed for selection.
|
|
|
|
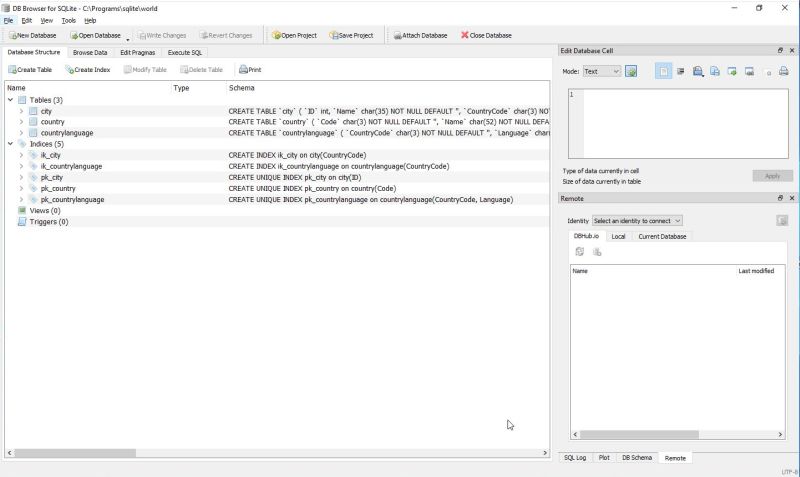
The tab layout of the GUI window is very clear. Below the menu bar, you find two icon bars. The first one allows to create, open, attach, or close a database
(you can also create projects). The second one allows to edit the database structure (create a new table, or index), to edit a table's data (with a large edit
field for this at the right side of the window), to edit the pragmas, and to execute SQL statements. The screenshot shows the structure of the "world"
database. Note the column schema, that contains the SQL statement used to create a table or index. These statements are actually
stored in the table sqlite_master that you can view using a SELECT statement. There is a
pragma writable_schema = 1, however it seems that the table is read-only and that there is no way to update it, thus no possibility
to add a foreign key to an existing table this way, as is suggested in some forums.
|
|
|
|
If you have MariaDB installed on your computer, you probably use HeidiSQL. This application also
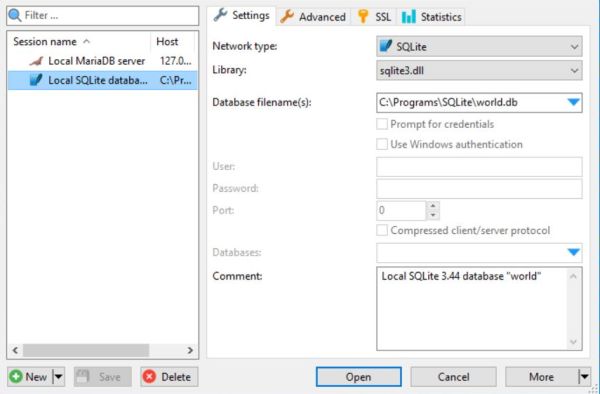
works well with SQLite. When HeidiSQL starts up, click the New button to create a new session. Select
network type = SQLite, select Library = sqlite3.dll and browse to your database file to fill in the
corresponding edit field. Do not forget to save the newly added session.
|
|
|
|
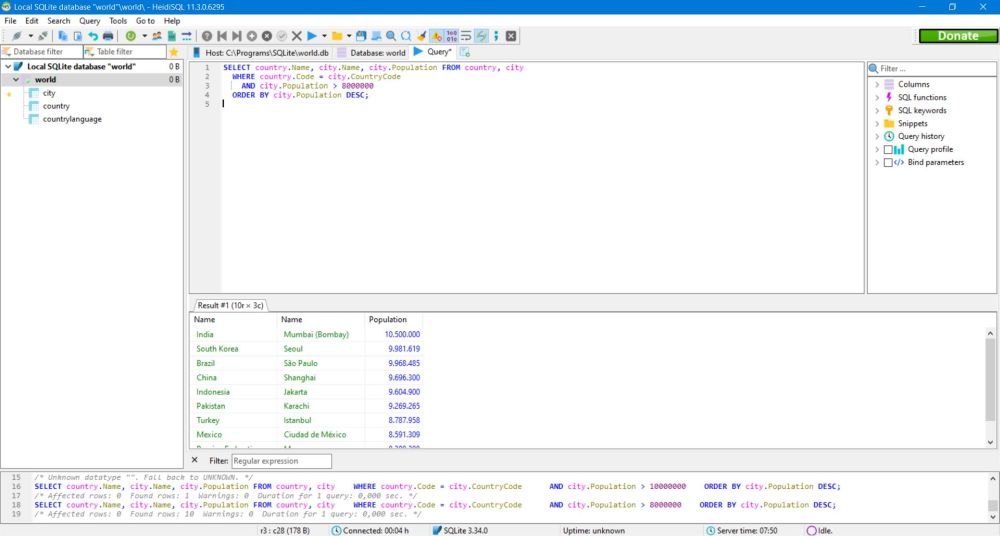
The screenshot shows the execution of a SELECT statement in a HeidiSQL query tab.
|
|
|
|
| 1.7.1.5. |
Accessing SQLite with PHP: FAILURE. |
| |
|
Using PHP 8.0.0, I did not succeed to access the SQLite database "world". Using the extension sqlite3, I got the error message
Class SQLit3 not found, with the extension pdo_sqlite, the message was
could not find driver. Same issue when trying to use ODBC. Maybe that there is a path to be set (for
other databases this is not the case), maybe that the installed drivers do not work with my version of SQLite. As I very rarely use PHP, I made no further
investigation to find out.
|
|
| 1.7.1.6. |
Accessing SQLite with Perl. |
| |
|
Access to a database engine with Perl is normally done using DBI (access using ODBC is also possible, of course). DBI is a generic
interface that acts with a given database distribution via a specific driver. In the case of SQLite, this driver is dbi:SQLite,
that is included by default with the Strawberry Perl installation files. Thus, nothing to install, nothing to configure (to access the database from web
applications, CGI must be configured, of course). Here is the code of a simple console application, that displays the number of cities in the "world"
database.
|
use strict; use warnings;
use DBI;
my $database = 'C:\Programs\SQLite\world.db';
my $dsn = "dbi:SQLite:dbname=$database";
my $username = ''; my $password = '';
my $dbh = DBI->connect($dsn, $username, $password, {RaiseError => 1},)
or die $DBI::errstr;
my $sql = "SELECT COUNT(*) FROM city";
my $sth = $dbh->prepare($sql);
$sth->execute();
my ($count) = $sth->fetchrow();
print "\nNumber of cities in the world.city table = $count\n\n";
$sth->finish();
$dbh->disconnect();
|
To run the script (I called it sqlite.pl) in Command Prompt, type:
perl sqlite.pl
|
|
| 1.7.1.7. |
Accessing SQLite with Python. |
| |
|
Access to SQLite with Python is simple and without having to install special components. In fact, the driver needed (sqlite3)
is included by default with the Python 3 installation files. Here is the code of a simple CGI application, that displays the number of cities in the "world"
database.
|
import sqlite3
print("Content-type: text/html")
print()
print("<html>")
print("<head><title>Python SQLite test</title></head>")
print("<body>")
try:
sqliteConnection = sqlite3.connect('C:\Programs\SQLite\world.db')
cursor = sqliteConnection.cursor()
query = "select count(*) from city;"
cursor.execute(query)
count = cursor.fetchone()[0]
print("<p>Number of cities in database 'world' = ", count, "</p>")
except sqlite3.Error as error:
print("Error while accessing SQLite database", error)
finally:
if sqliteConnection:
cursor.close()
sqliteConnection.close()
print("</body>")
print("</html>")
|
Place the script (I called it sqlite.py) in the cgi-bin directory of your webserver, and type the follwing in the address field of your web browser:
localhost/cgi-bin/sqlite.py
|
|
| 1.7.1.8. |
Accessing SQLite with Lazarus/Free Pascal. |
| |
|
There are two ways to connect from a Lazarus/Free Pascal application to a SQLite database: first, using a TSQLite3Connection,
object and second, using a TODBCConnection object. Both ways are described in my tutorial
Using SQLite databases with Lazarus/Free Pascal.
|
|
| 1.7.1.9. |
Accessing SQLite with Java. |
| |
|
To connect from Java to a database engine, you need the JDBC driver, specific for this database distribution. You can download
the SQLite JDBC Driver from Sourceforge. The download is a ZIP
archive containing the driver code as JAR file. Move the JAR to "some directory", for example together with your SQLite files (C:\Programs\sqlite, in my
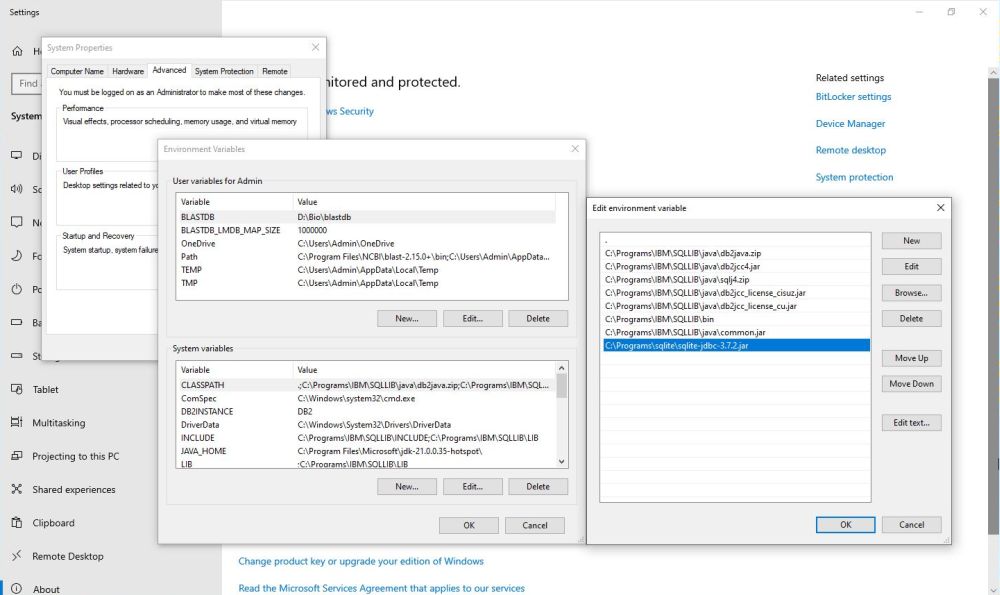
case). The important thing is that you'll have to add the driver to the Java class path. In Windows 10, this is done by adding
the full filename (path + name + extension) to the environment variable CLASSPATH: In File Explorer,
right-click This PC and from the context menu choose Properties (this actually opens the
Settings > System > About page). On the right side of this page, click
the Advanced system settings link. In the window that pops up, push the Environment variables button.
If there is a variable called CLASSPATH, push the Edit... button to modify it, otherwise push New...
to create it. In the Edit environment variable window, push the Add button and enter the full path
name of your JAR file, in my case C:\Programs\sqlite\sqlite-jdbc-3.7.2.jar.
|
|
|
|
Here is the code of a simple Java console program, that displays the number of cities in the "world" database.
|
import java.sql.DriverManager;
import java.sql.Connection;
import java.sql.ResultSet;
import java.sql.SQLException;
import java.sql.Statement;
public class testsqlite {
private Connection connect() {
String url = "jdbc:sqlite:C:\\Programs\\sqlite\\world.db";
Connection conn = null;
try {
DriverManager.registerDriver(new org.sqlite.JDBC());
conn = DriverManager.getConnection(url);
} catch (SQLException e) {
System.out.println(e.getMessage());
}
return conn;
}
public void selectCount() {
String sql = "SELECT COUNT(*) FROM city";
try {
Connection conn = this.connect();
Statement stmt = conn.createStatement();
ResultSet rs = stmt.executeQuery(sql);
if (rs.next()) {
int reccount = rs.getInt(1);
System.out.println ("Number of records in table 'city' = " + reccount);
}
} catch (SQLException e) {
System.out.println(e.getMessage());
}
}
public static void main(String[] args) {
testsqlite app = new testsqlite();
app.selectCount();
}
}
|
To compile, and then run the program (I called it testsqlite.java) in Command Prompt, type:
javac testsqlite.java
java testsqlite
|
|
|
|
If you get the error message No suitable driver found, then it's probably because you forgot to register the
driver, what in the program above, is done with the statement DriverManager.registerDriver(new org.sqlite.JDBC()).
|
|
