Installing FileZilla FTP Server on Windows 11.
FileZilla Server is a free file transfer server that supports FTP and FTP over TLS which provides secure encrypted connections to the server. Support for SFTP (SSH File Transfer Protocol) is available only in FileZilla Pro Enterprise Server.
This tutorial is about the installation and configuration of a local FileZilla FTP server (version 1.8.1, 64-bit) on Windows 11. It should also apply to Windows 10 and Windows 8.1. The download is a Windows-typical installation program, some important settings having to be configured during setup.
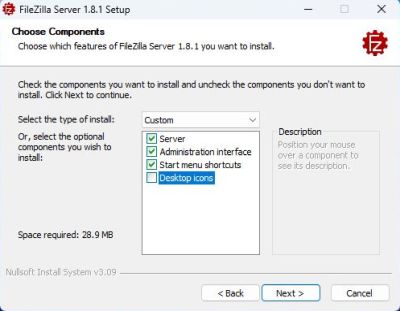
After the acceptance of the license, you have to choose the components to be installed. Beside the server itself, you'll have to install the Administration interface, that will allow you to configure the server.
 |
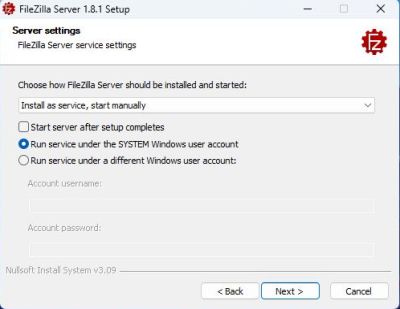
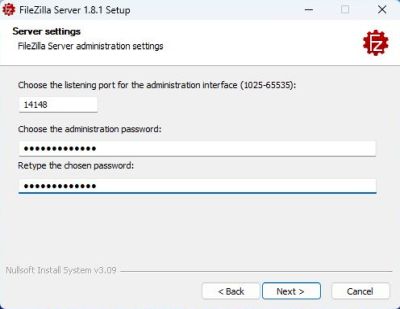
After having chosen the installation directory, the basic server configuration has to be done. First, you have to to decide if you want to install FileZilla as a service that starts automatically with Windows, or if you want to start it manually; I chose this latter option (screenshot on the left). You have also to decide if you want to run FileZilla under the Windows SYSTEM account, or under some other Windows user account. I let the default setting. In the following window, you have to choose a port (I let the default port 14148), and a password for the Administration interface (screenshot on the right). Finally, you have to decide, how to start the administration interface (no screenshot); the most obvious choice is to start it manually.
|
|
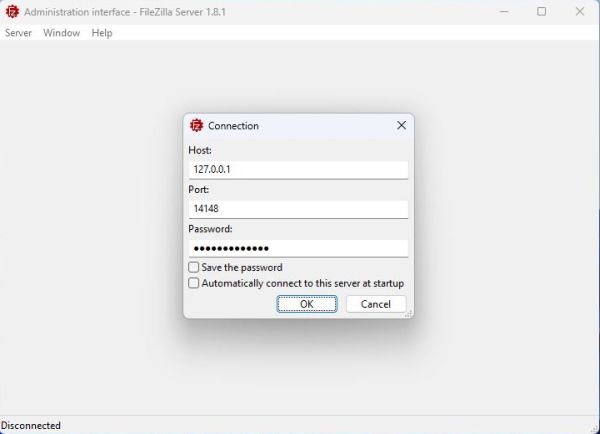
The server may be started and stopped from the corresponding items created in the Windows Start menu. It's also from here, that you can launch the Administration interface. At start up, this one shows an empty window with a Connect button. Pushing it will open the connection window, where you have to enter the host (normally 127.0.0.1 = localhost), the port (the one, you choose during installation) and the administration password (chosen during installation).
 |
The first time that the interface starts up, you'll have to confirm that you trust this server. The unknown fingerprint provided by the server should be the same as the one displayed at the end of the installation process.
The interface main page displays the real-time log as you configure the server. The 3 warning messages are nothing else but some hints of what must be done to successfully connecting to the server; these messages will always (even after the server is fully configured) be displayed. To configure the FileZilla server, choose Server > Configure... from the menu bar.
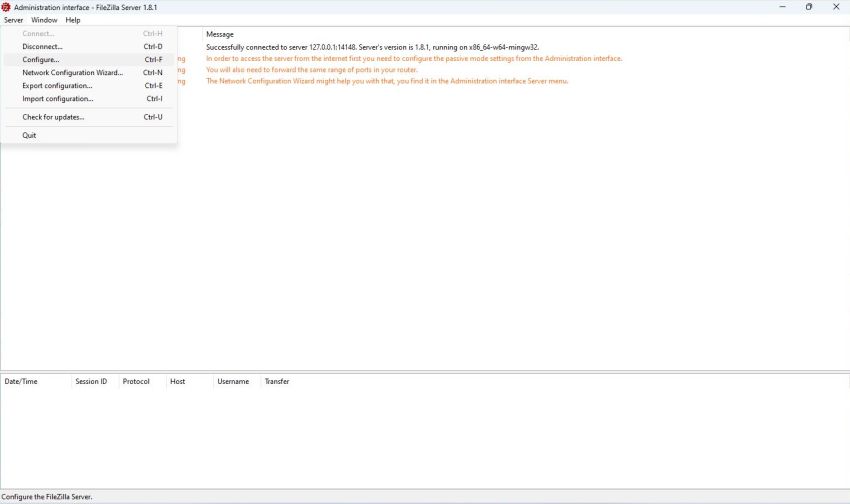 |
Configuring the server.
The minimum configuration of the FileZilla server includes the following tasks:
- Setting the IP address that the server listens to.
- Setting the port that the server listens on.
- Setting the protocol with which the server and the client communicate with each other.
- Setting the port range for passive FTP.
- Generate a new self-signed certificate to be used for the secure (encrypted) connection.
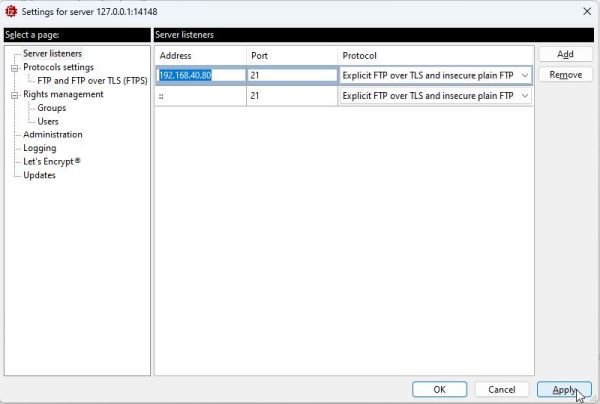
The first three of these settings are available on the Server listeners page of the configuration window. Replace 0.0.0.0 by the local IP address of your computer. As a FTP server only makes sense within a network, this IP has either been set manually in network configuration, or (more probably) the Windows 11 machine gets it via DHCP from a router (in my case from my IPFire firewall-router machine). You can look it up by entering ipconfig in Command Prompt. Use the value listed as IPv4 address; in my case 192.168.40.80. You should choose Require explicit FTP over TLS as protocol (I let Explicit FTP over TLS and insecure plain FTP checked, because my VMware virtual network includes old operating systems, that probably would have problems with TLS). The standard FTP port is port 21. You'll need these settings values when configuring the connection on the client.
 |
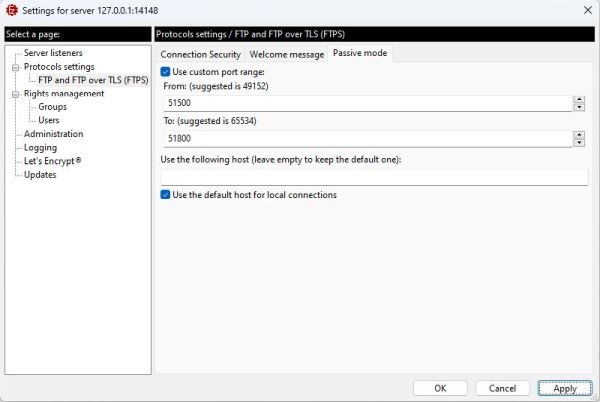
If you do not want to allow incoming connections on all ports, or if you have a NAT router, you need to tell FileZilla Server to use a specific range of ports for passive mode connections. With a NAT router, you'll need to forward these ports to the local machine, where FileZilla Server is installed on. You should use ports above 50000; a range of 50 – 100 ports should be sufficient in most cases. The passive mode port range is set on the Passive mode tab of the Protocol settings page. I chose to use ports 51500 to 51800.
 |
The generation of a new certificate is optional, at least if you use the FileZilla client. At the first startup, FileZilla will display the certificate data together with the error message that the host name does not match the certificate, but it allows you to ignore this by checking the "Always trust this certificate in future sessions". A new certificate can be generated on the Connection security tab of the Protocol settings page.
![FileZilla Server on Windows 11: Configuration - Generation of a new certicicate [1] FileZilla Server on Windows 11: Configuration - Generation of a new certicicate [1]](../screenshots/win11_fz7.jpg) |
After you have pushed the Generate certificate button, the certificate data window pops up. You'll have to enter two values: 1. The distinguished name of the server. This is a string value that has to start with "CN="; as name you may choose whatever you like. 2. The hostname of the server; that is the full qualified network name of your computer. This is the computer name (in my case "wk-win11") plus the local domain name of the network that your computer belongs to; you can look it up using ipconfig (in my case the domain name is "intranet.home").
![FileZilla Server on Windows 11: Configuration - Generation of a new certicicate [2] FileZilla Server on Windows 11: Configuration - Generation of a new certicicate [2]](../screenshots/win11_fz8.jpg) |
Note: It's obvious that if you intend to run FileZilla Server on the Internet, a higher level of security is required. A more detailed configuration of the server should be done. Also, you should have a look at Securing your Windows Service installation at the FileZilla website.
Creating groups and users.
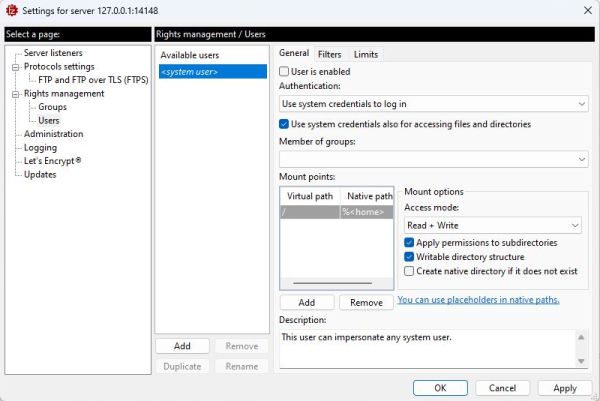
I don't know if you must create user groups, or if you may just create individual users, being part of no group at all (?). Anyway, I decided to create 2 groups, each one with 1 user: The group "RW Users" (with user "Allu"), who should have read-write access to a "file-sharing" directory, that will have to be created for this purpose, and read-only access to the (existing) directories, where are stored my programming related files. And the group "RO Users" (with user "Nemo"), who should only have read-only access to the "file-sharing" directory. The configuration of groups and users is done on the Right management > Groups resp. the Right management > Users page of the configuration window. To create a new group/user, push the Add button.
 |
Setting up the FTP directories.
This is obviously the most complicated part for network newbies. It requires the understanding of the virtual directories concept. On the computer, where your FTP server is running on, you have a file structure with one or several drives, each of these drives containing directories and subdirectories. The native path to these directories is their "file structure address", as you enter it in Command Prompt, and as it appears in the address bar of File explorer. The path of those directories, that we want the FTP users have access to, have to be defined for each group or user, with the group/user rights (read-only, or read-write) on these directories (and making them correspond to a virtual path in the FTP client). On my system, the following native paths are concerned:
| C:\FTP | the "main FTP directory" | |
| C:\FTP\Share | the FTP "file-sharing" directory | |
| C:\Data\Programming | my main programming directory with the subdirectories: dBase, Executables, Lazarus, and SASM | |
| C:\Users\Allu\source\repos | the default directory used by Visual Studio to store this user's projects |
The FTP client will only see (and have access to) those directories that we decide it to be able to see. It will also see them the way that we decide that it's able to see them. What the client will see is in fact a user-dependent virtual directory structure, starting at the server root (/) and the accessible directories mounted beneath the root. The FTP root is similar to the root directory on Apache webserver, or the root of a Linux file system. It's the directory that is at the top of the file system and that includes all other directories. On Apache, the root directory by default is the htdocs folder in the Apache installation directory, on a FTP server, it's ourselves who decide what folder on our computer will be the root directory for a given FTP user.
I suppose that you guessed that I made correspond the root directory for the "RW Users" group to the C:\FTP directory. This is the first virtual path/native path pair that we have to fill in as mount points for this group. I gave the group read-only access to this directory, without selecting the "Apply permissions to subdirectories" checkbox (thus having to set permissions for these when adding them to the virtual file structure).
![FileZilla Server on Windows 11: Configuration - Setting up the mount points [1] FileZilla Server on Windows 11: Configuration - Setting up the mount points [1]](../screenshots/win11_fz10.jpg) |
This means, that if user "Allu" connects to my FileZilla server, he will see the content of C:\FTP (that actually is the folder "Share").
Here is the virtual file structure, that I want "Allu" to see as remote directory structure in his FTP client:
\ --|-- Share
|-- Programming --|-- dBase
|-- Executables
|-- Lazarus
|-- SASM
|-- VisualStudio
As "Share" is a subdirectory of C:\FTP (corresponding to the FTP root directory), "Allu" already sees this directory. However, as we want "Allu" to have write access to it, we'll have to add it to the "RW Users" mount points. As we want "Allu" to see it as a directory in the server root, the virtual path has to be /Share. We'll apply these permissions to the folder's subdirectories, what gives "Allu" read-write access to all files and folders in C:\FTP\Share. "Programming" is another directory that "Allu" should see as a directory in the server root. The third virtual path thus is /Programming, and the corresponding native path is my programming directory C:\Data\Programming. Defining this mount point (with read-only access) and applying these permissions to the folder's subdirectories, will allow "Allu" to read the content of the folders "dBase", "Executables", "Lazarus", and "SASM" (that are subdirectories of C:\Data\Programming on the native file system).
Remains the directory with my Visual Studio files. The native path is C:\Users\Allu\source\repos and we want "Allu" to see it as "VisualStudio", a subdirectory of "Programming". Thus, our last virtual path is /Programming/VisualStudio.
The screenshots show the setup of the /Share mount point (on the left) and the setup of the /Programming/VisualStudio mount point (on the right).
![FileZilla Server on Windows 11: Configuration - Setting up the mount points [2] FileZilla Server on Windows 11: Configuration - Setting up the mount points [2]](../screenshots/win11_fz12a.jpg)
|
![FileZilla Server on Windows 11: Configuration - Setting up the mount points [3] FileZilla Server on Windows 11: Configuration - Setting up the mount points [3]](../screenshots/win11_fz12b.jpg)
|
Now lets see for the "RO Users" group. The only folder on the Windows 11 machine that we want them to have access to is C:\FTP\Share. So, what mount points would you suggest? Not previewing to ever give the "RO Users" group access to any other folders, I chose to mount C:\FTP\Share as root directory. Permissions being set to read-only, and applying these permissions to the folder's subdirectories, will let "Nemo" only see (and read the content of) C:\FTP\Share and its subdirectories.
![FileZilla Server on Windows 11: Configuration - Setting up the mount points [4] FileZilla Server on Windows 11: Configuration - Setting up the mount points [4]](../screenshots/win11_fz13.jpg) |
Concerning the users, we will configure them to have to use a password when connecting to the server (at creation time, you'll have to enter this password), make "Allu" a member of the group "RW Users" and "Nemo" a member of the group "RO Users". I think that the root mount point has to be redefined here, without being sure (?). Anyway, not a big deal to do it; just make sure to use the same settings than those that you'd used for the root mount point for the group, the user belongs to. The screenshot shows the settings for our two users: the read-write user "Allu" on the left, the read-only user "Nemo" on the right. The mount points and permissions to /Share and /Programming for "Allu" will be inherited from the "RW Users" settings.
![FileZilla Server on Windows 11: Configuration - Setting up the mount points [5] FileZilla Server on Windows 11: Configuration - Setting up the mount points [5]](../screenshots/win11_fz14a.jpg)
|
![FileZilla Server on Windows 11: Configuration - Setting up the mount points [6] FileZilla Server on Windows 11: Configuration - Setting up the mount points [6]](../screenshots/win11_fz14b.jpg)
|
Accessing the FTP server with FileZilla.
FileZilla is a free multi-platform FTP client; you can download it from the FileZilla Client website. For details concerning the installation and usage, you might want to have a look at the article FileZilla: the definitive guide at the SupportHost website.
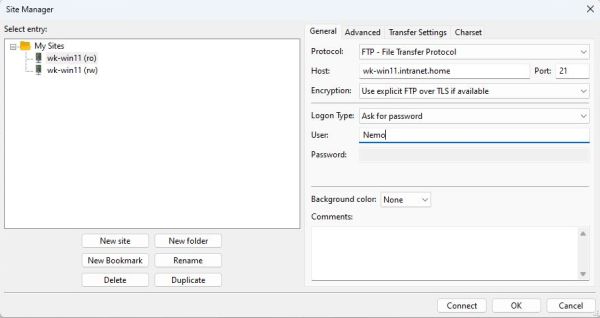
I installed FileZilla on my Windows 11 and created two new connections (using the New site button), one for accessing my FileZilla Server with "Allu", the other to access it with "Nemo". Configuration settings have to be the following:
| Protocol | FTP - File Transfer Protocol | |
| Host | wk-win11.intranet.home | |
| Port | 21 | |
| Encryption | Use explicit FTP over TLS if available |
You can save user name and password with the connection, or configure the client to ask for the password when you connect (as I did; cf. screenshot). To add the connection permanently to the FileZilla site manager, push the Ok button.
 |
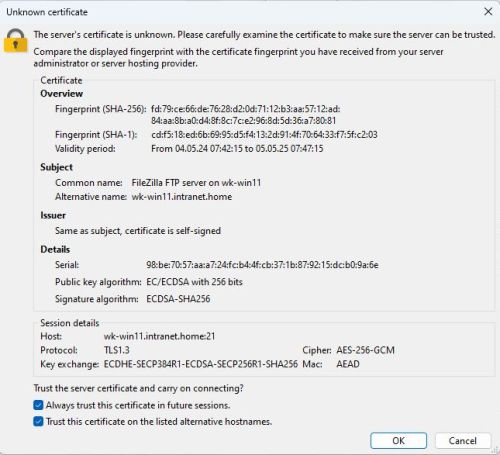
When connecting for the first time, FileZilla will display an unknown certificate window (this error occurs because the certificate is self-signed). It includes the certificate data (in particular the distinguished name and host name that we defined when regenerating the certificate) and two checkboxes, that allow you to confirm that you always trust this certificate. The connection will then be automatically opened in future sessions. Note, that the display of the certificate indicates that the communication with the server will be encrypted using TLS (TLS 1.3 in this case).
 |
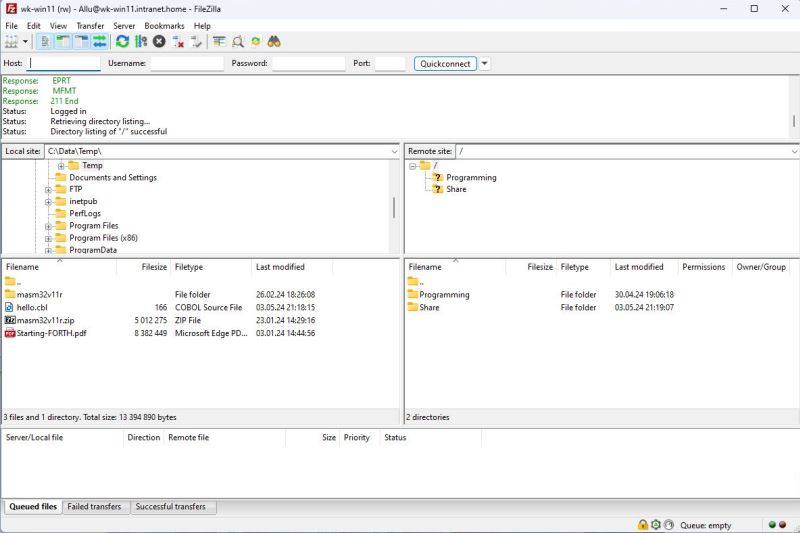
When not otherwise specified FTP clients connect to the root directory (/) on the server. The screenshot shows this root directory when I connected using the "wk-win11 (rw)" connection (user "Allu"). As expected, this directory shows two subdirectories: "Share" and "Programming". The reason that they are marked with a question mark is because FileZilla did not yet access them, and so has no idea what their content is.
 |
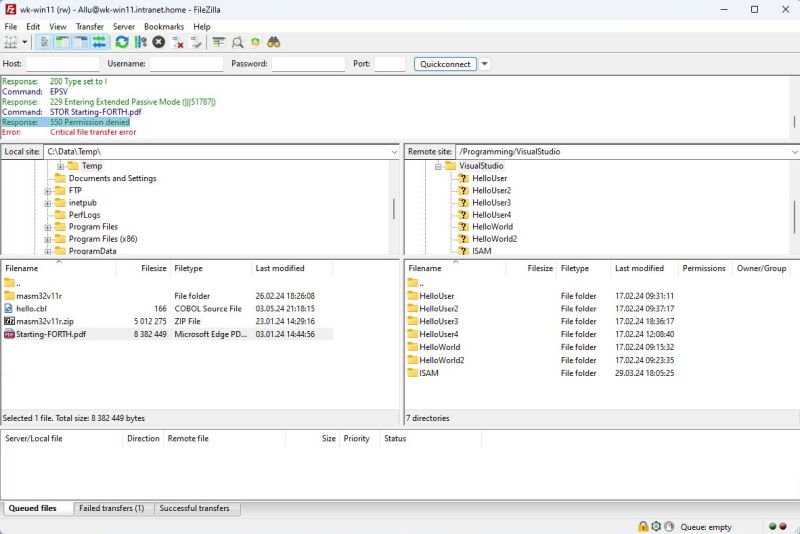
At this point, you should test the server installation. Checking if /Share is writable, checking if the subdirectories of /Programming are readable, but not writable. The screenshot below shows how trying to upload a file to the /Programming/VisualStudio directory results in a Permission denied error message (and, as we wanted, the file transfer is not done).
 |
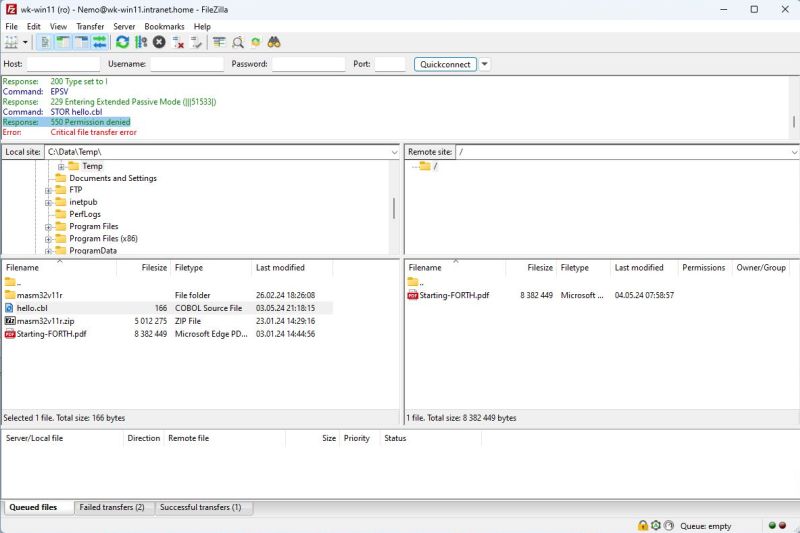
I then successfully tested download form the /Programming subdirectories, as well as upload of the PDF file "Starting-FORTH.pdf" to /Share. Deconnecting "Allu" and connecting using the "wk-win11 (ro)" connection (user "Nemo"), the remote site has a completely different look: Nothing than the root directory, containing the file "Starting-FORTH.pdf"! Is this magic? Not at all; just remember what we said above: the directory structure seen by a given user depends on how we define the virtual directory structure for that user. For "Nemo", we set the root directory to /Share (and didn't allow him access to any other directory), thus what we actually see on the screenshot is the content of C:\FTP\Share. And this directory contains the PDF file, that user "Allu" uploaded before. You can also see on the screenshot that trying to upload a file to the "file sharing" directory is denied for "Nemo". Trying to download the PDF document, on the other hand, will succeed (a window will pop up asking you if you want or not overwrite the file already existing in the current local folder).
 |
Accessing the FTP server from a remote host.
Doing FTP on the local machine hasn't a big sense. What we did above was nothing else than to access the folder C:\FTP\Share as /Share by FTP instead of simply accessing it by its native path in File Explorer. Now, what must we do in order to access the FileZilla Server from another computer? Globally speaking, there are 3 possibilities:
- The client runs on a machine behind a router: In this case, we have to configure the router to open port 21 for the server machine, as well as configure passive FTP.
- The client runs on the local network and the server machine runs a firewall that blocks port 21: In this case, we have to configure the firewall to allow incoming connections on port 21 (for computers on the local network).
- The client runs on the local network and the server machine runs a firewall that allows traffic on port 21 by default (if it originates from the local network; all firewalls block all ports for connections from the extranet): In this case, we can connect the same way as we did from the local machine.
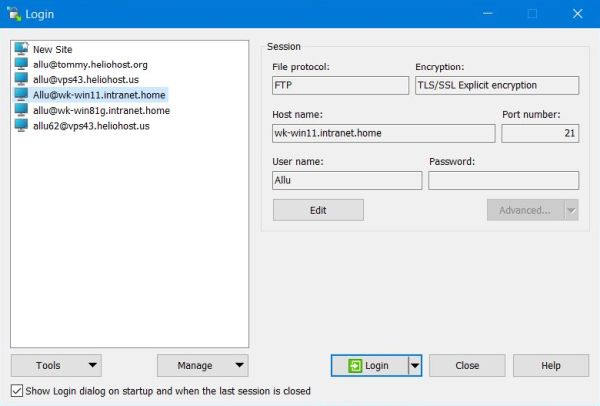
This tutorial only considers case (3): Connection from my Windows 10, that actually runs ZoneAlarm Free Firewall, that allows access on all ports for connections originating from the local network (considered by default as a private network). The client used in this case is WinSCP; to connect using FileZilla is similar.
The screenshot below shows the connection settings for user "Allu" in WinSCP on my Windows 10.
 |
As before with FileZilla, you'll get a certificate error window, because the certificate is self-signed. Answer Yes to the question if you want to continue connecting and store the certificate (i.e. trust this certificate for future sessions).
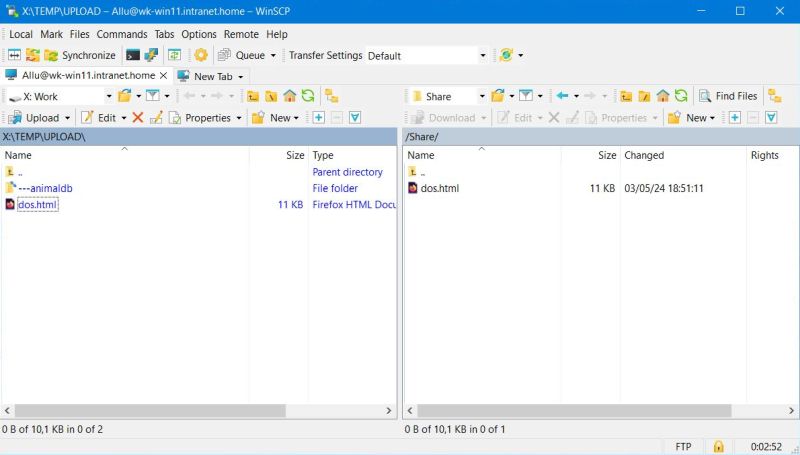
The screenshot shows the connection as "Allu" with the successful upload of the file "dos.html" to the /Share folder on the FileZilla server (the folder C:\FTP\Share on Windows 11).
 |
Note: I will some day write a tutorial concerning the configuration of a router for FTP. Concerning firewalls, that block the ports even for computers on the local network, please search the Internet for help. As the way to proceed is similar for FTP as it is for HTTP, my tutorial Windows Firewall: Allowing intranet computers to access local webserver might also be helpful.
If you find this text helpful, please, support me and this website by signing my guestbook.