Changing the IP address on NetBSD.
In this tutorial, I'll show how to change the IP address (i.e. setting a new manual IP) on a NetBSD server. The server, that I actually use, is NetBSD 9.2. Not really sure, how far the tutorial applies to other NetBSD releases.
The first step to make is to determine the name of the network adapter. To do this (it is supposed that you are logged in as root), run the
command:
ifconfig
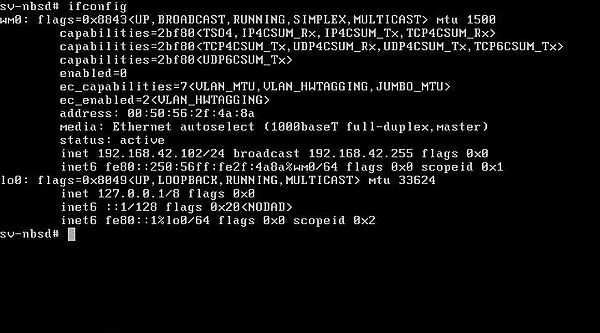 |
As you can see on the screenshot, on my NetBSD, the network adapter is called wm0 (this may be different on your system!). The actual IP is 192.168.42.102, and I want to change it to 192.168.42.131.
You can temporarily change the IP using the ifconfig command (in this case it will be reset to the old value when rebooting). But, what we want to do here is to permanently change the IP.
In order to make the IP address change, let's first check the content of the file /etc/rc.conf, that contains the actual network settings,
overwriting the default settings in /etc/defaults/rc.conf. We can edit this file using the vi editor:
vi /etc/rc.conf
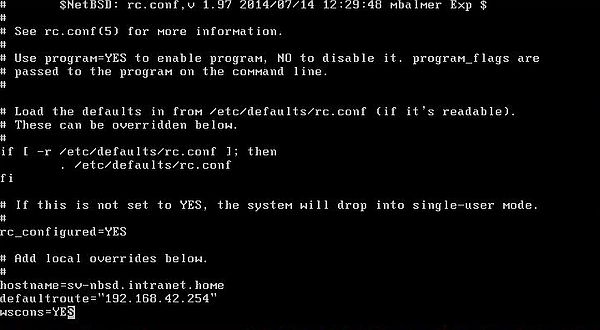 |
As you can see, the file contains settings concerning the hostname ("sv-nbsd"), but neither the option to use DHCP (that actually isn't the case on my system), nor manual IP settings are configured here. If this should be the case on your system (?), you'll have to replace the stated IP address (192.168.42.102) by the new one (192.168.42.131).
Whereas on OpenBSD, the IP address associated with a given network adapter is stored in the file /etc/hostname.<adapter-name>, on NetBSD,
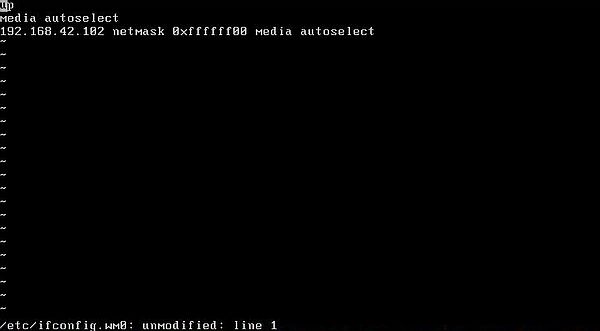
the file /etc/ifconfig.<adapter-name> is used. We can edit the file using vi. In our case:
vi /etc/ifconfig.wm0
The screenshot shows this file opened in vi. As told by ifconfig, the actually used IP is 192.168.42.102.
 |
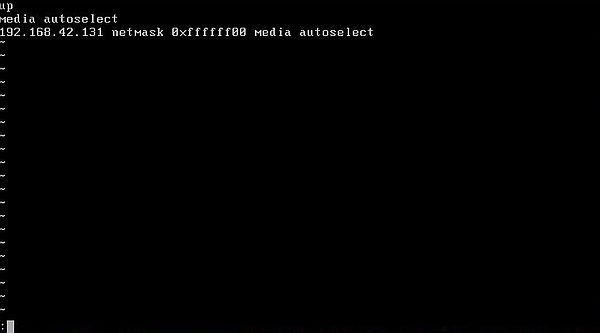
All that we have to do is to replace "192.168.42.102" by "192.168.42.131" (change the "02" at the end of the IP by "31"). Be sure to save the file, before leaving the editor. The screenshot shows the new content of the file /etc/ifconfig.wm0.
 |
Note: If you aren't used to vi, editing a file may be a major issue. You can find some basic usage tips in the section Using vi on NetBSD.
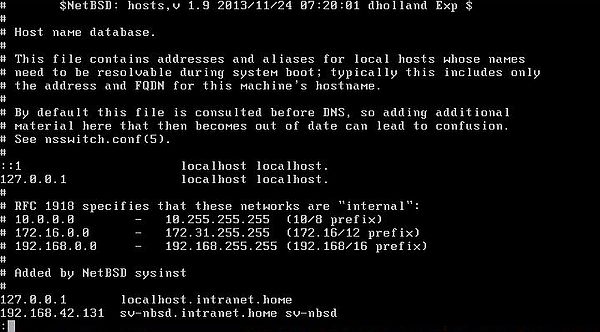
What we have actually changed is the IP address associated with the network interface wm0, but the hostname is still associated with the old IP address. Thus, we also must change the file /etc/hosts (at least, I think so...).
The screenshot shows this file opened in vi, after I have made the changes.
 |
Let's now reboot the computer. This makes the changes active and we can check if the new settings are preserved after performing a reboot.
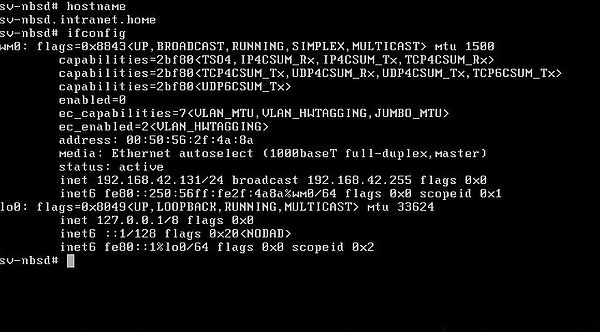
To display the hostname and the actual network configuration, use the commands
hostname
ifconfig
The screenshot shows the output of the two commands. Note, the new IP address 192.168.42.131 for the interface wm0.
 |
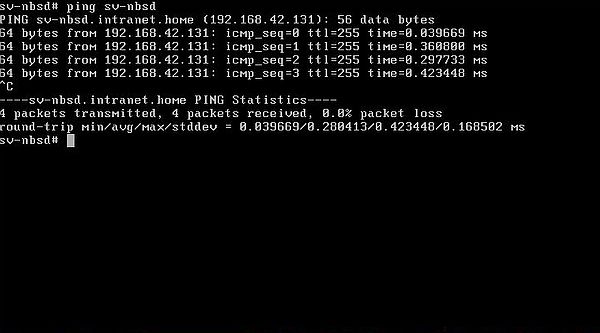
We should also verify that the IP address of the host has been correctly changed. We can do that, using the following command ("sv-nbsd" being the hostname of my NetBSD
machine):
ping sv-nbsd
The screenshot shows the successful ping of IP address 192.168.42.131.
 |
Using vi on NetBSD.
The vi editor is not really so difficult to work with, but it's somewhat special, different from the text editors that we are used to. If, after having opened a text document, you try to enter some text, nothing happens! The only thing that seems to work is navigating around in the document using the cursor-keys ("arrow" keys), even though there might be operating systems where even this does not work.
The important fact to understand is that vi works in one of two modes:
- Command mode: A character entered from the keyboard is considered being a command. If the letter, that you enter, is a valid vi command, the command is executed, otherwise an error message is displayed on the last line of the screen.
- Entry mode: The text, that you enter from the keyboard, is added to the document's content (normally inserted at the current cursor position).
To pass into command mode, press the ESC key. Now the input of vi commands is possible. These 1-letter commands execute immediately when the letter is pressed (no ENTER key used to terminate the command input). Here are some examples:
| Command | Description |
|---|---|
| o | add a new line below the line where the cursor is actually positioned |
| O | add a new line above the line where the cursor is actually positioned |
| x | delete the character where the cursor is actually positioned |
| a | switch to entry mode, allowing to insert text at the right of the character where the cursor is actually positioned |
The implementation of vi is simplified on some operating systems by allowing the usage of some control keys. Thus, on OpenBSD, to delete a character, you can select this character and press the DEL key. And to insert text to the right of the cursor, you can use the INS key. These control keys are not valid vi commands on NetBSD!
Besides the editing commands, vi also includes several file commands. They are entered by pressing ESC, followed by a colon (:). The cursor goes down to the last line on the screen (that isn't part of the document content, but a status and command line) and displays the colon. Now, you can enter a file command. Note, that you have to press the ENTER key after having pressed the command letter(s). Examples:
| Command | Description |
|---|---|
| w | save the file actually opened in the editor |
| q | quit the editor (only valid if the document wasn't changed, or if the changed document was saved) |
| wq | save the file and quit the editor |
| q! | force quitting the editor (even if the file has been changed) |
So, to change the IP address in the two files on the NetBSD machine, you can delete the last two digits of the IP, using the x command. Then, position the cursor at the position of the now last digit of the IP, use the a command to allow insertion of text to the right of the cursor, and enter the 2 digits of the new IP.
If you are interested in details concerning vi, have a look at the article Basic vi Commands in the Solaris documentation.
If you find this text helpful, please, support me and this website by signing my guestbook.